A liquidity sweep is one of the most useful ways to identify a potential reversal.
However, a sweep by itself is not enough.
Price can take a high or low and continue in the same direction.
The real question is:
Did price only take liquidity, or did the sweep actually create a new protected swing and change the direction of delivery?
This is where the Candle 1–2–3 model and lower-timeframe CISD become important.
The higher timeframe shows us the potential swing.
The lower timeframe confirms whether that swing is real.
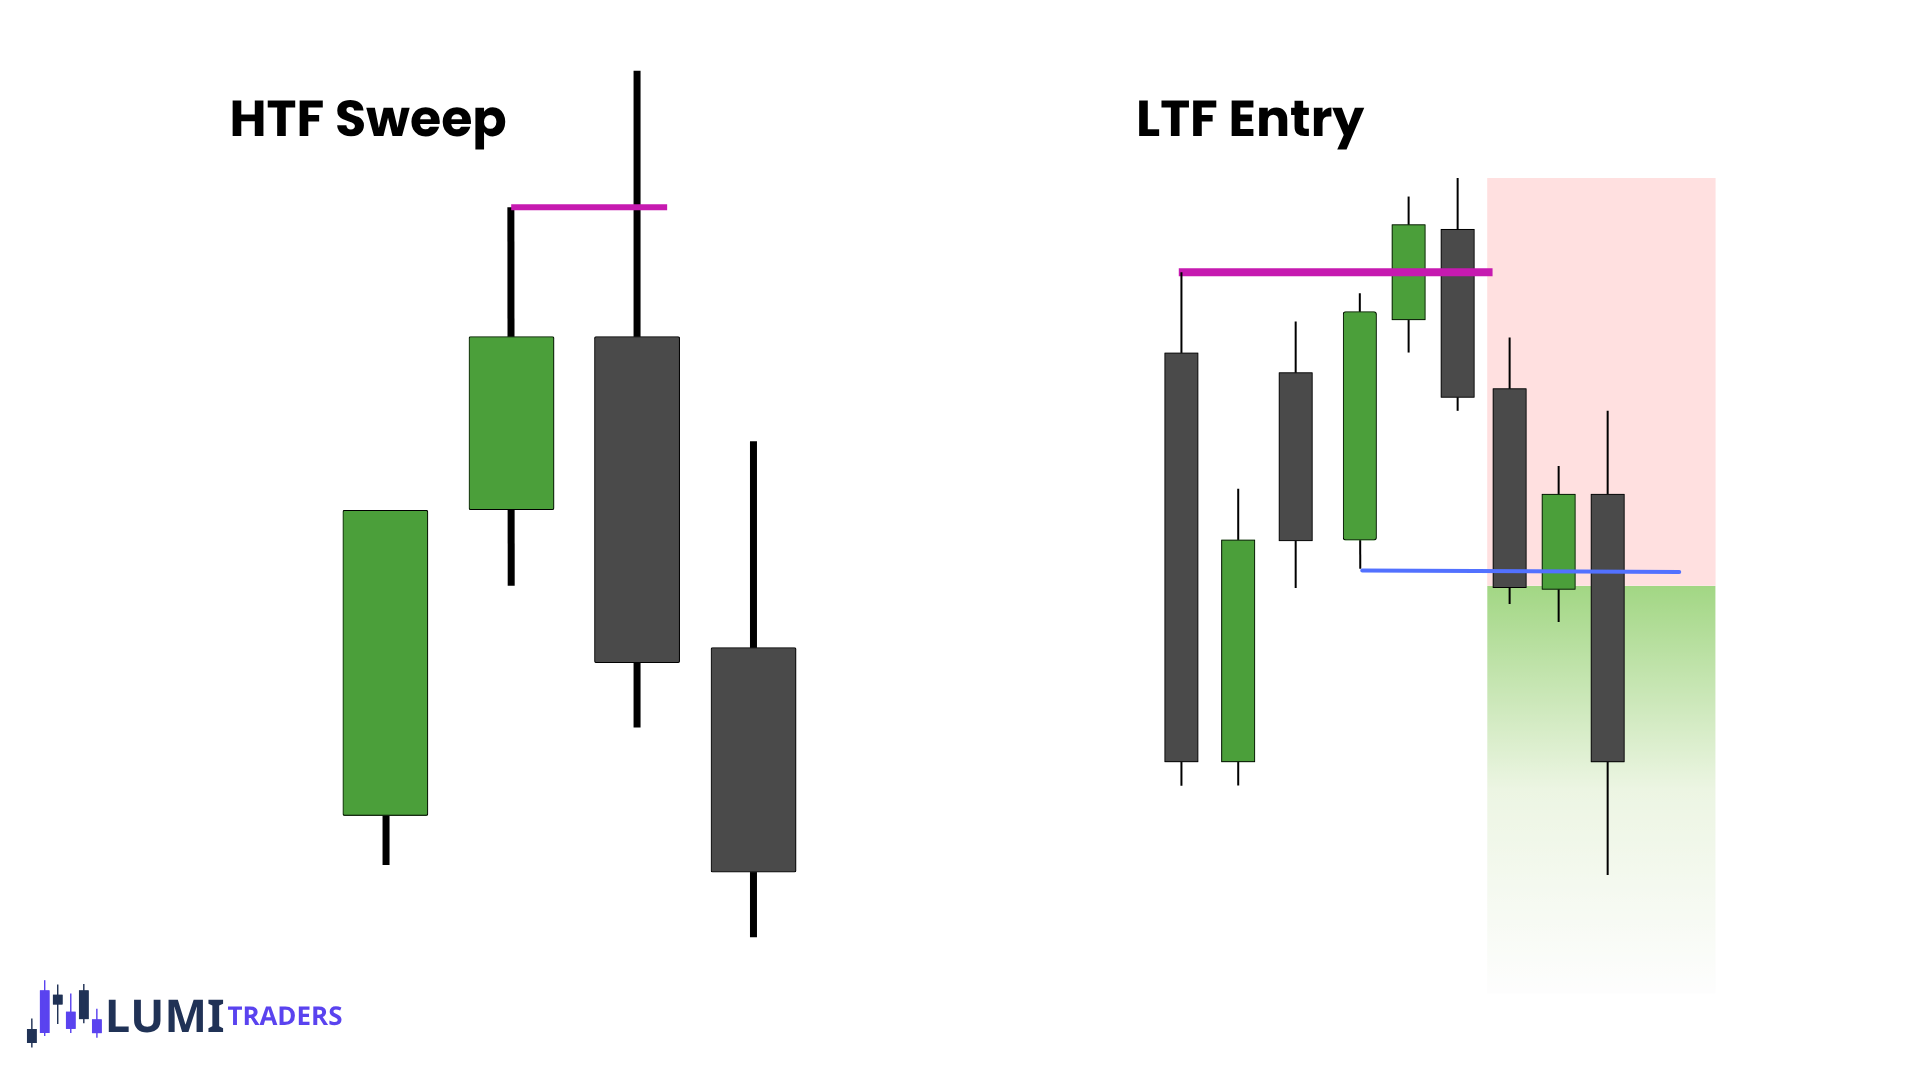
What Is a Liquidity Sweep?
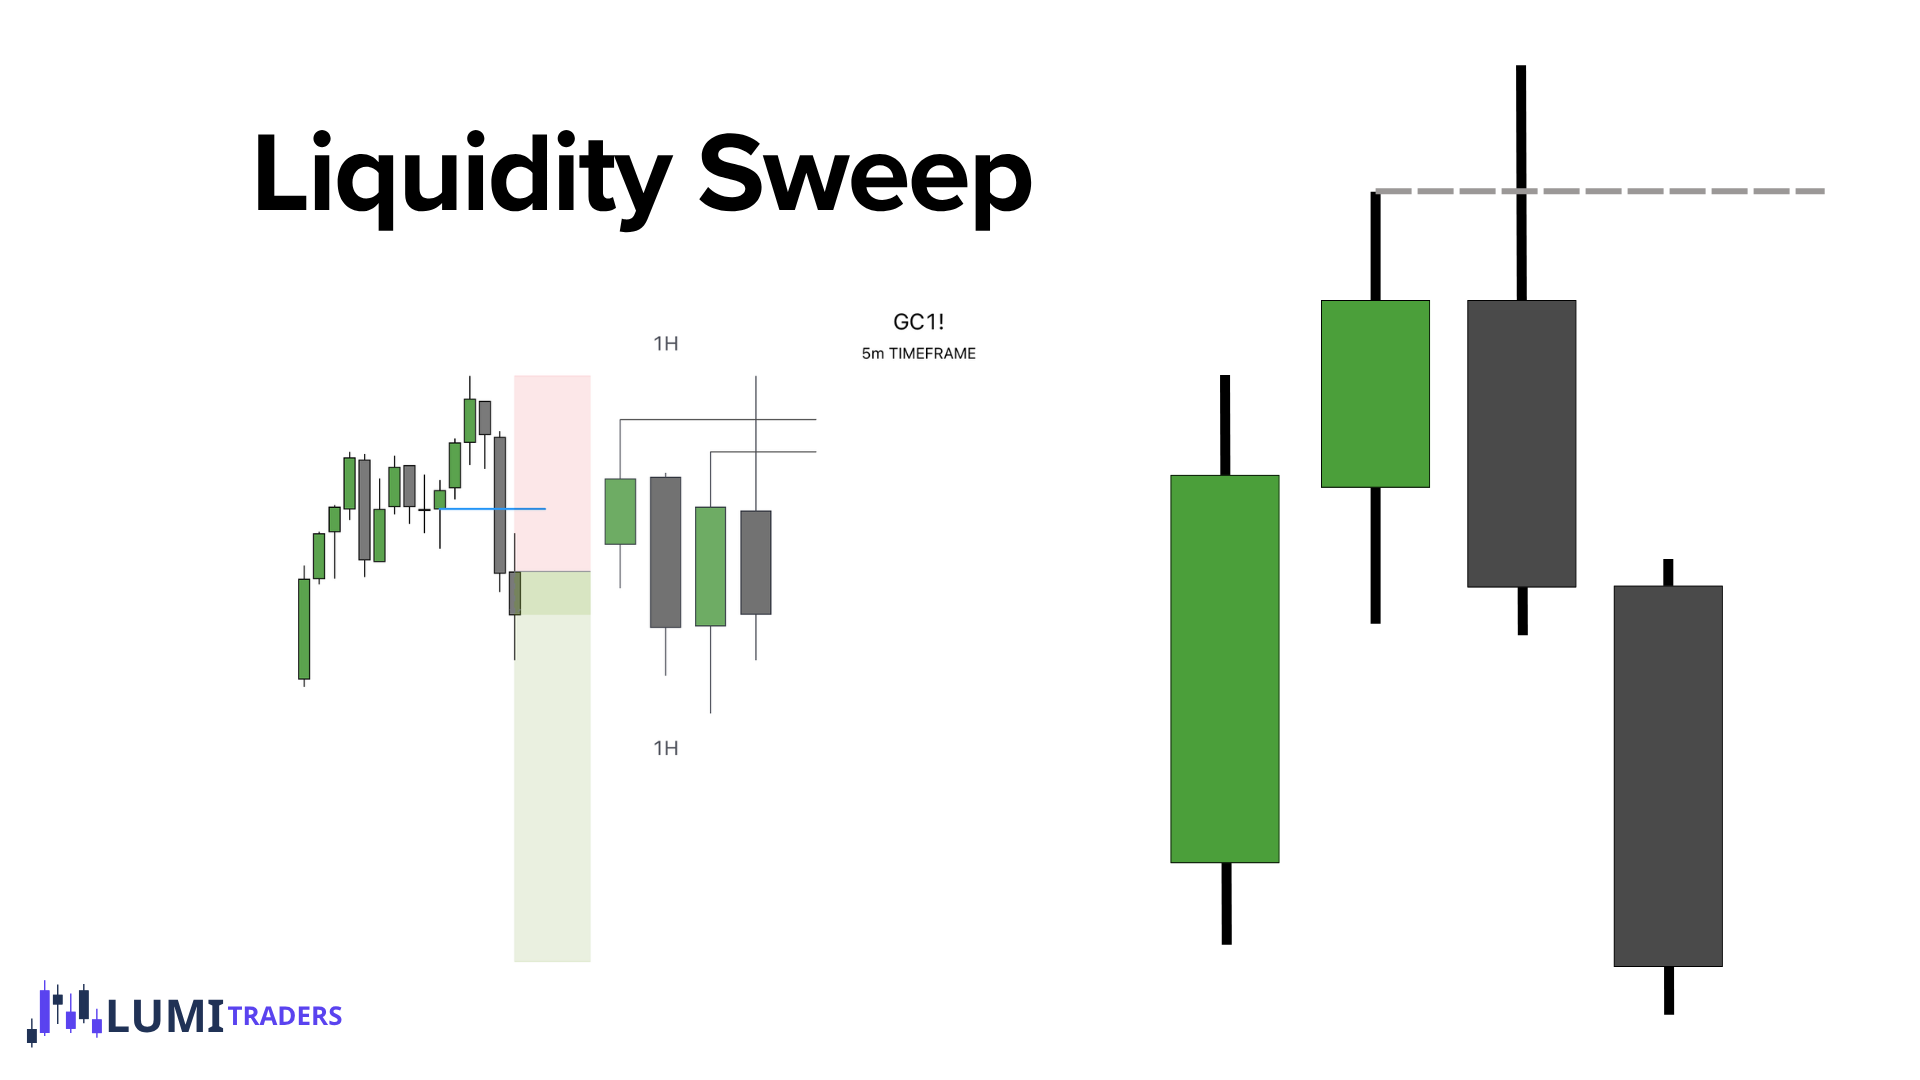
A liquidity sweep occurs when price trades through a previous high or low and then fails to continue in that direction.
A previous high contains buy-side liquidity.
A previous low contains sell-side liquidity.
When price trades through one of these levels, it may trigger:
Stop losses.
Breakout orders.
Resting liquidity.
Traders entering in the direction of the apparent breakout.
But taking liquidity does not automatically mean price will reverse.
We need to see how the candle closes and how the lower timeframe responds afterward.
This creates the Candle 1–2–3 framework.
Candle 1
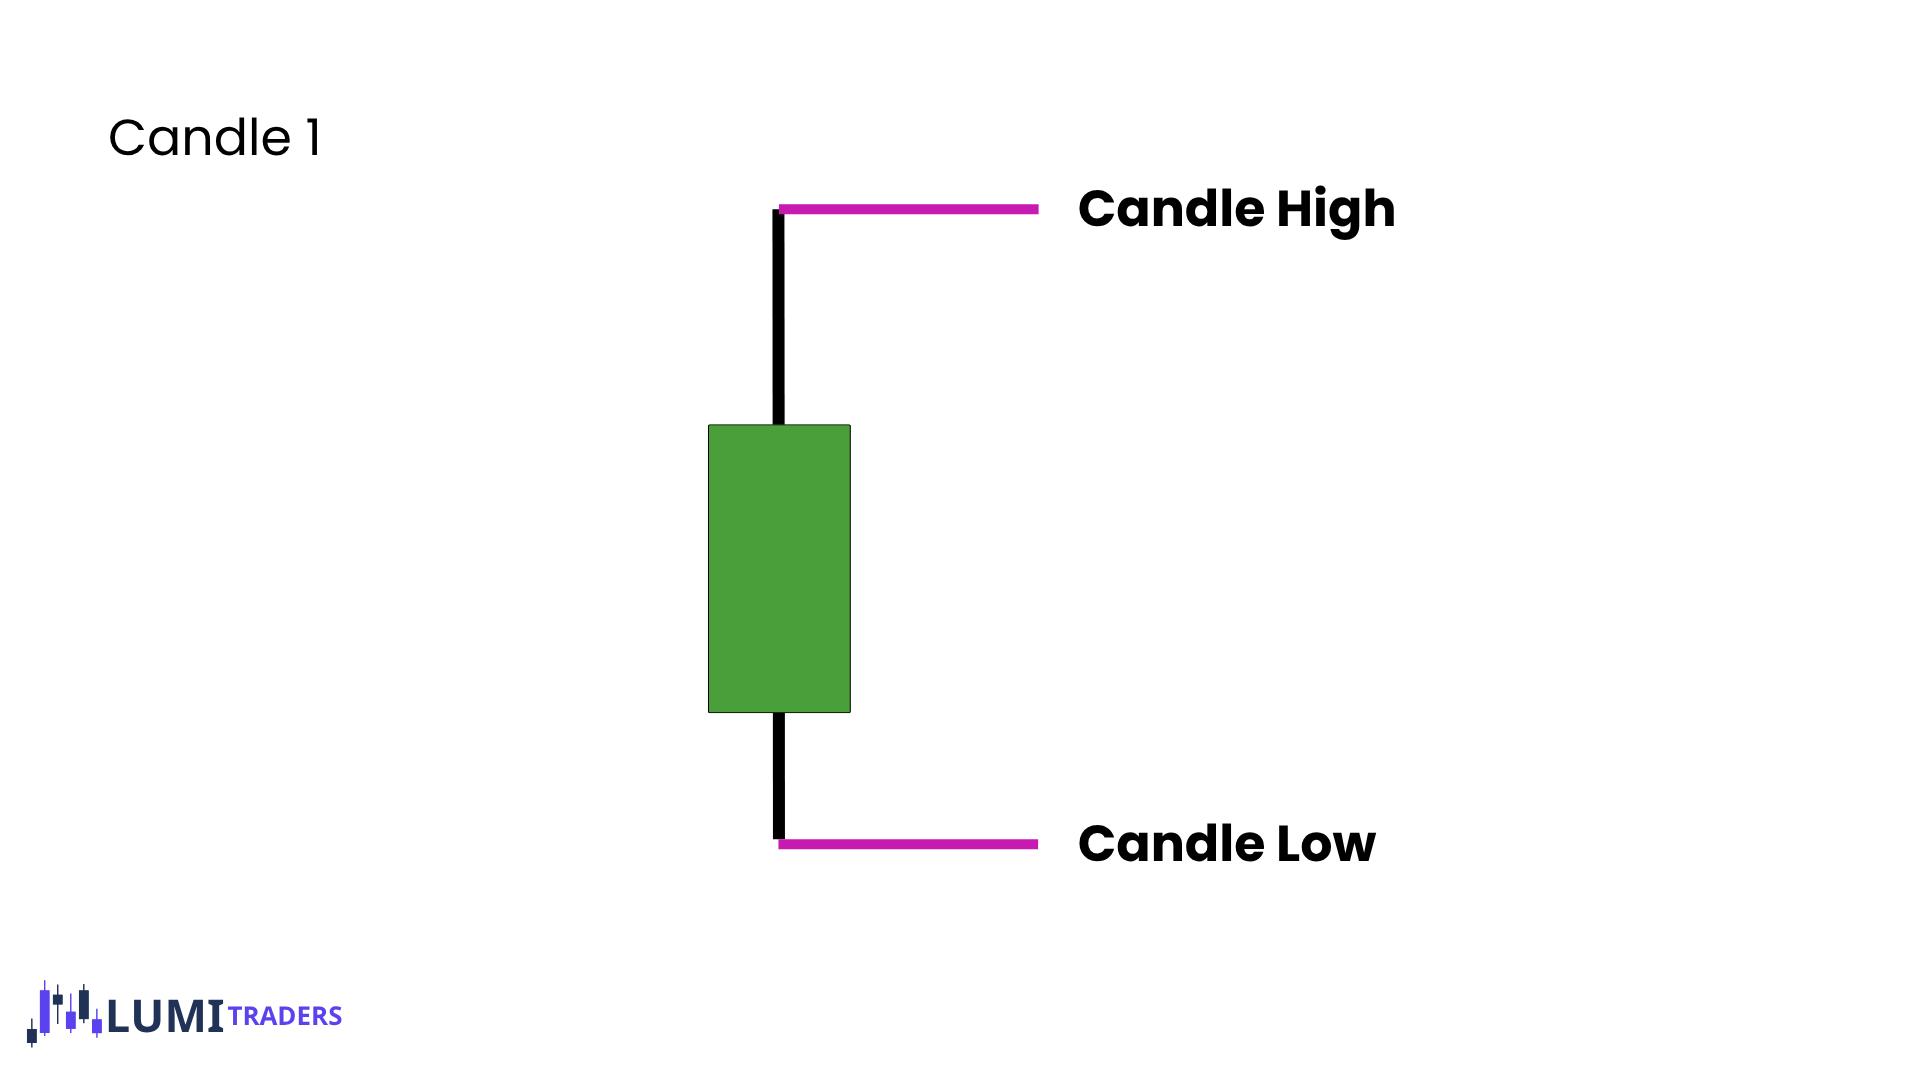
Candle 1 creates the liquidity level.
For a potential bullish reversal, we are interested in:
Candle 1 Low
For a potential bearish reversal, we are interested in:
Candle 1 High
Candle 1 itself is not the setup.
It simply establishes the reference level that the next candle may attack.
Think of Candle 1 as:
The liquidity candle.
Candle 2
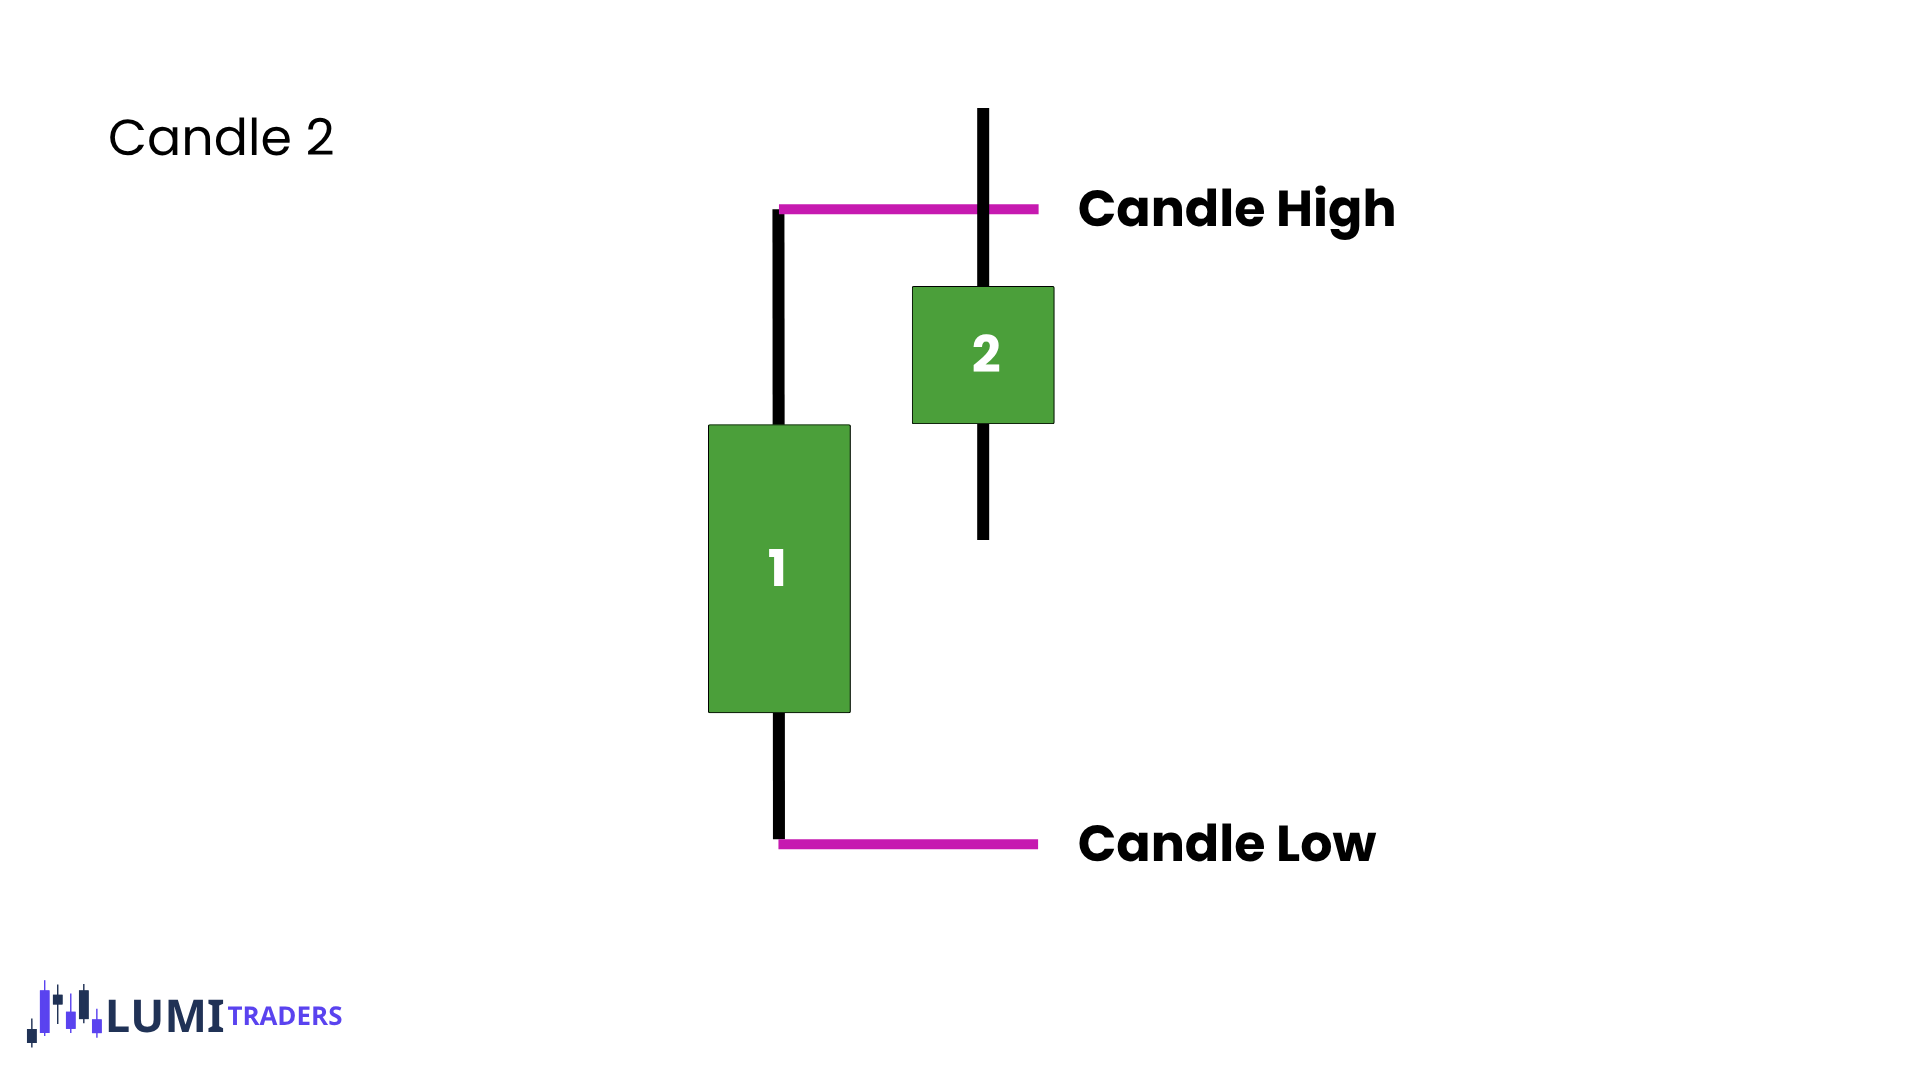
Candle 2 is the manipulation candle.
Its job is to trade through the liquidity created by Candle 1.
For a bullish setup:
Candle 2 takes the low of Candle 1.
For a bearish setup:
Candle 2 takes the high of Candle 1.
But the sweep alone is not enough.
The Candle 2 closure is extremely important.
Bullish Candle 2 Closure
For a valid bullish Candle 2 sweep:
Candle 1 establishes a low.
Candle 2 trades below the Candle 1 low.
Candle 2 takes sell-side liquidity.
Candle 2 closes back above the Candle 1 low.
This tells us that price traded below the previous low but failed to accept below it.
The move below Candle 1 may have been manipulation.
Now we can anticipate that Candle 3 may expand higher.
Bearish Candle 2 Closure
For a valid bearish Candle 2 sweep:
Candle 1 establishes a high.
Candle 2 trades above the Candle 1 high.
Candle 2 takes buy-side liquidity.
Candle 2 closes back below the Candle 1 high.
This tells us that price traded above the previous high but failed to accept there.
The move above Candle 1 may have been manipulation.
Now we can anticipate that Candle 3 may expand lower.
Candle 3
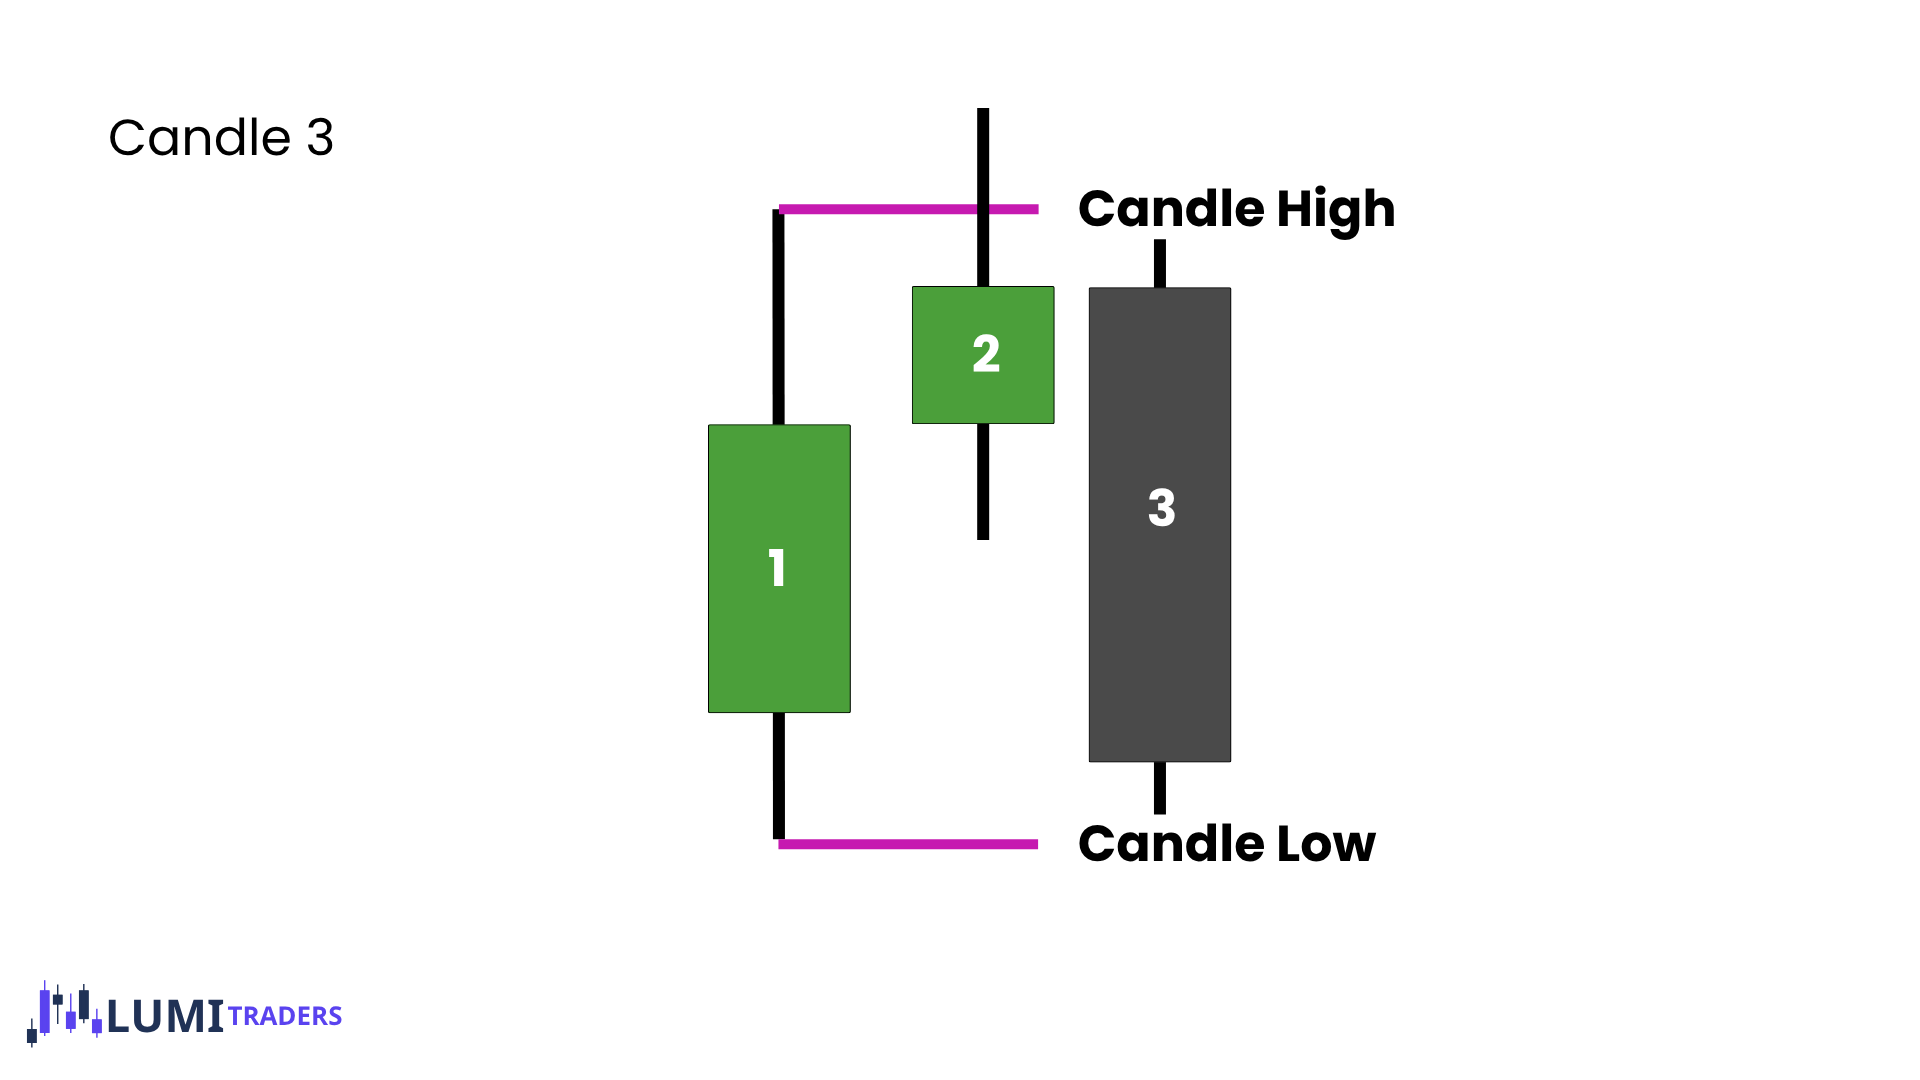
If Candle 2 gives us a valid sweep and closure, Candle 3 becomes the expected expansion candle.
This creates the basic model:
Bullish
Candle 1 liquidity → Candle 2 sweeps low and closes back above → Candle 3 expands higher
Bearish
Candle 1 liquidity → Candle 2 sweeps high and closes back below → Candle 3 expands lower
This is why we do not want to blindly enter during Candle 2.
Candle 2 is creating the potential swing.
Candle 3 is where we expect the market to begin delivering away from that swing.
What If Candle 2 Sweeps but Does Not Close Back Inside?
This is important.
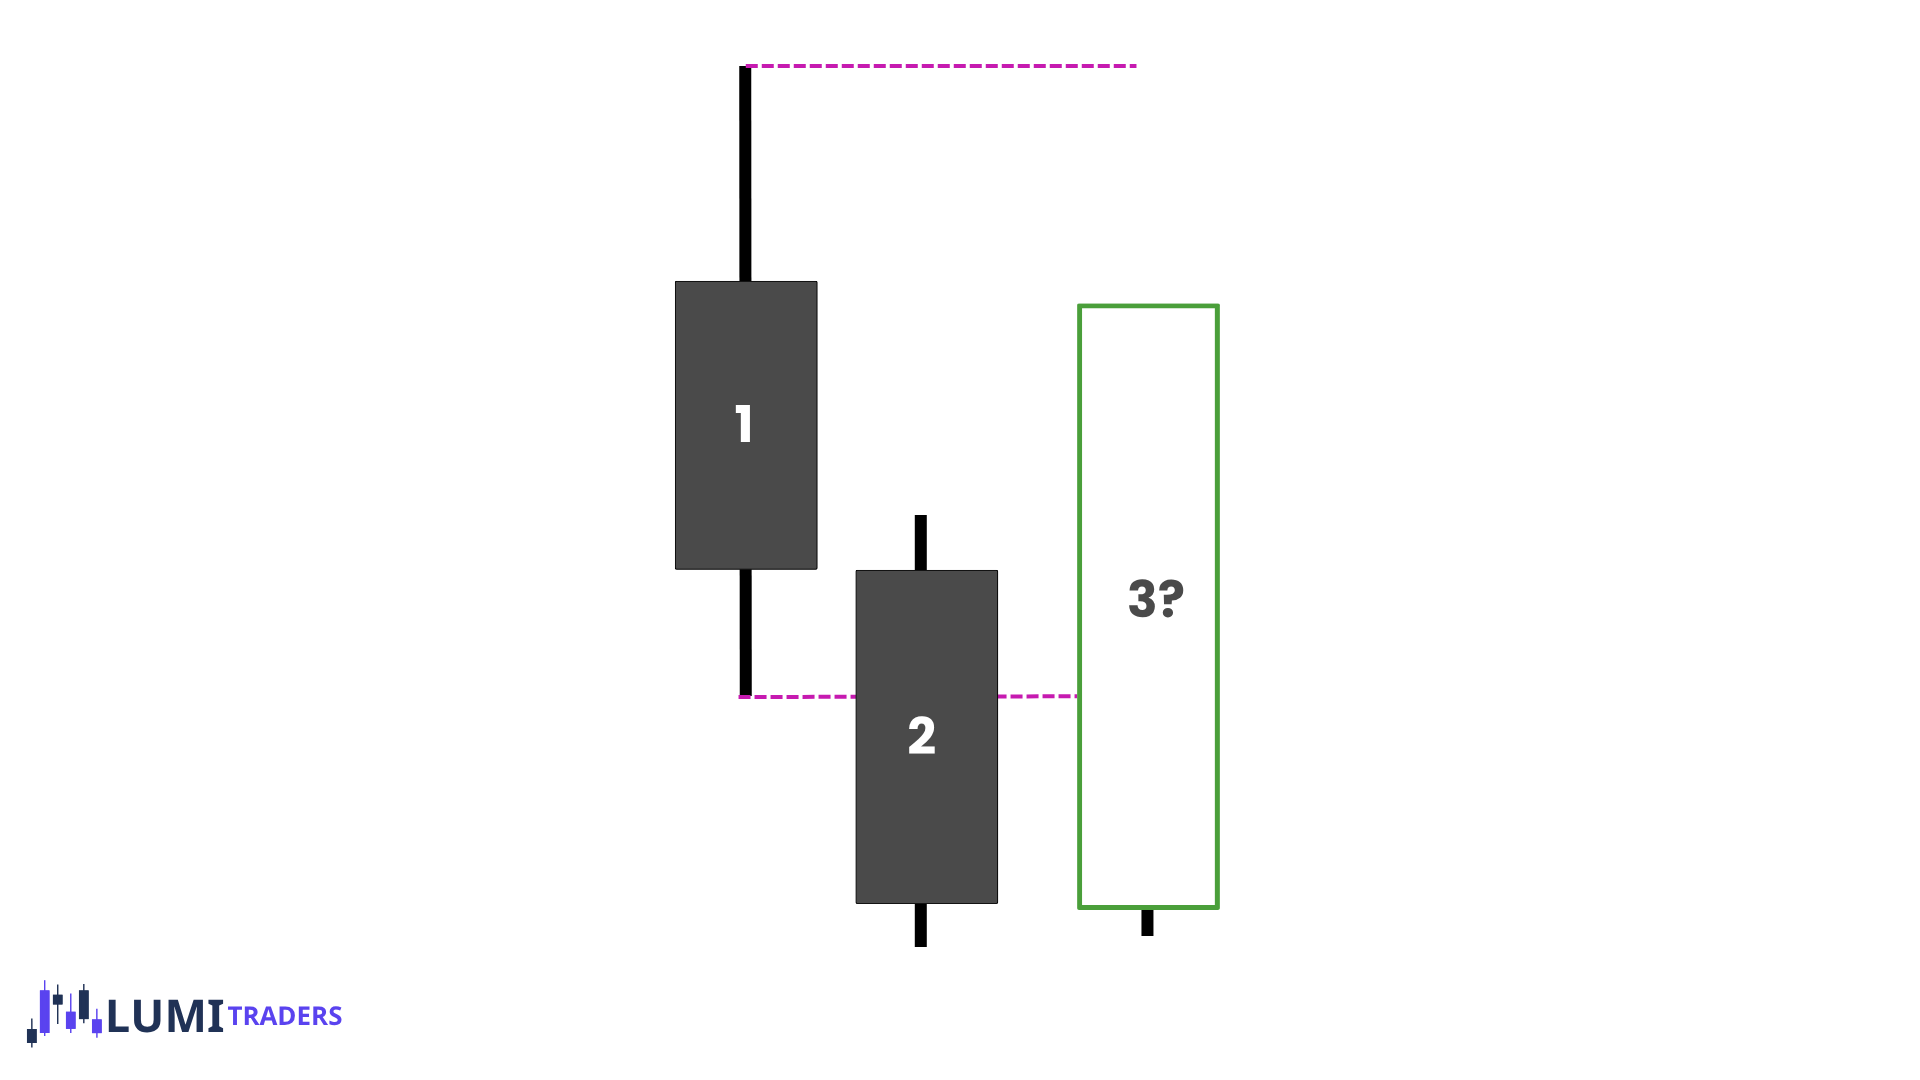
Imagine Candle 2 takes the Candle 1 low, but instead of closing back above that low, Candle 2 closes below it.
We had a sweep, but we did not get the required failure back inside the range.
Do not automatically call this a reversal.
We need more information.
This is where Candle 3 becomes the confirmation candle.
Candle 3 Closure Setup
If Candle 2 fails to give us the proper closure, we allow Candle 3 to form.
We do not need to force a trade.
If Candle 3 produces a strong reversal closure, it can validate the swing that Candle 2 attempted to create.
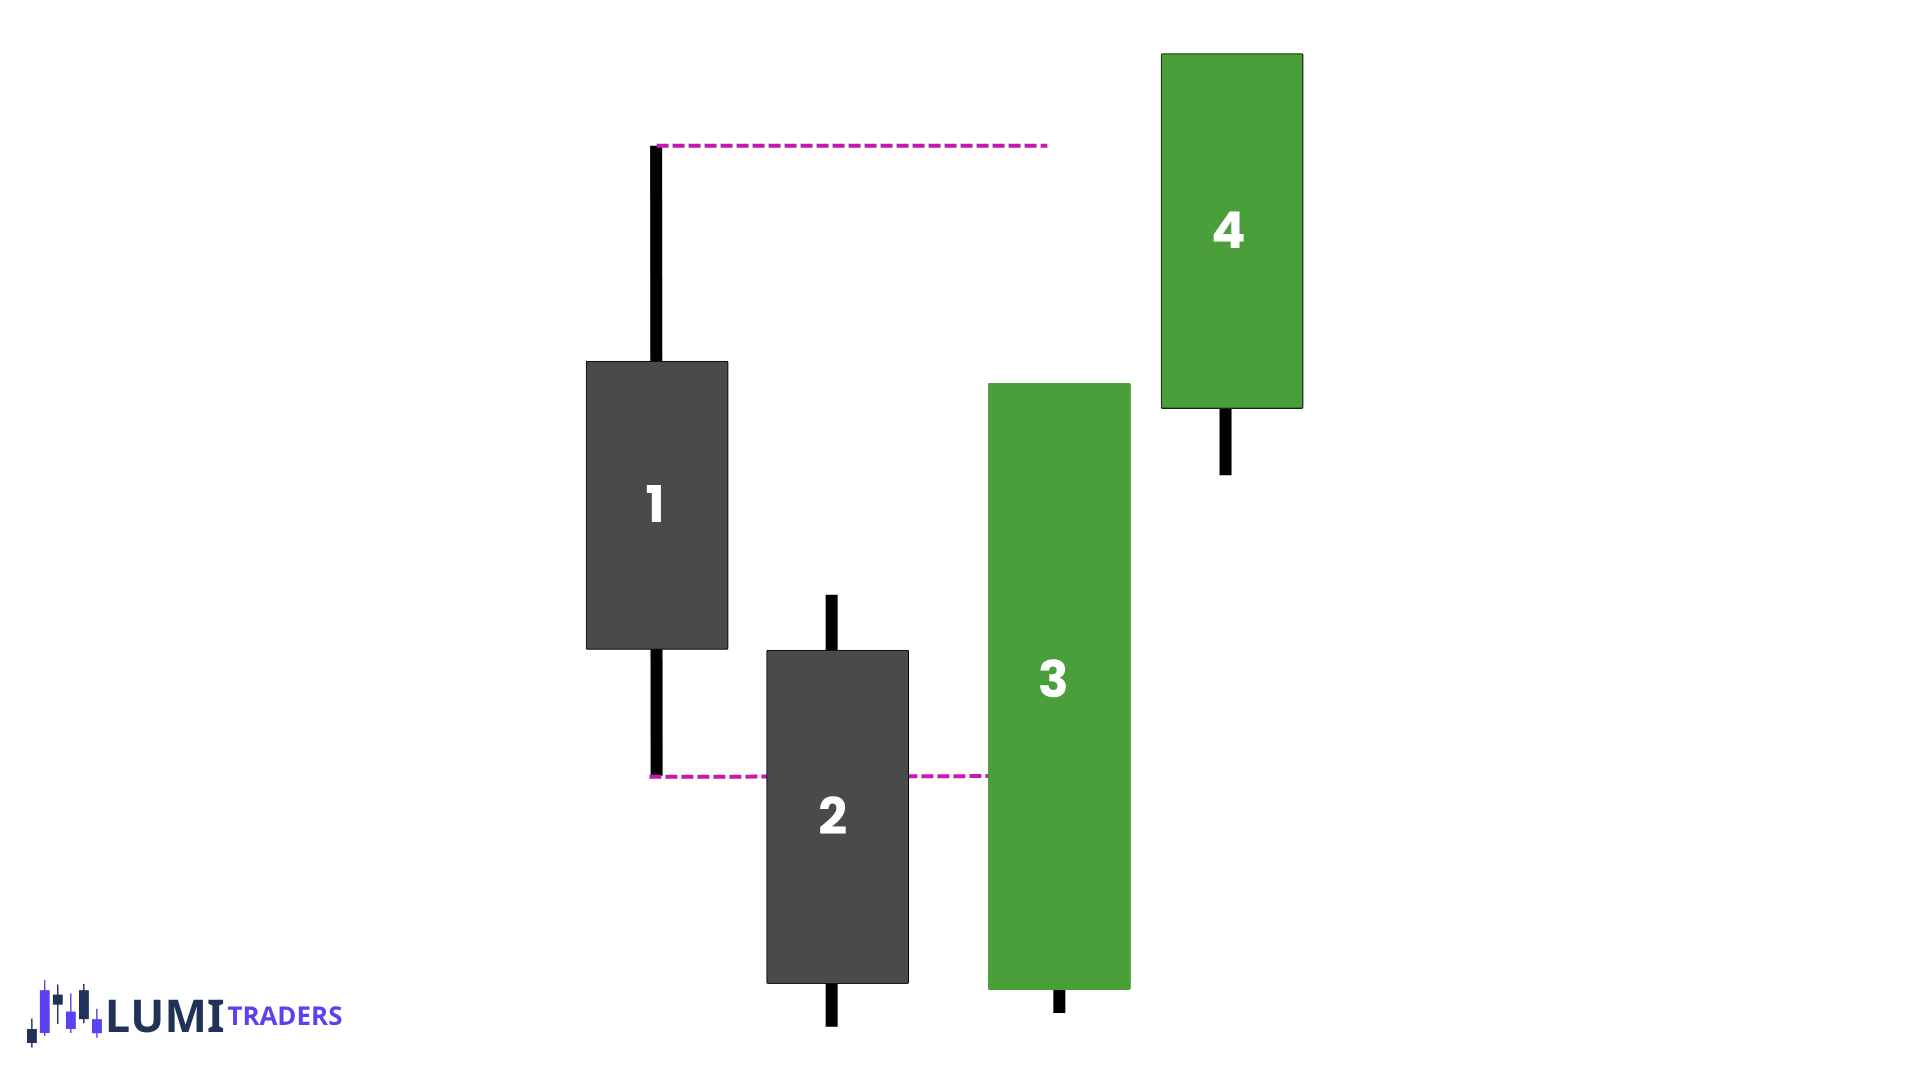
When Candle 2 fails to close correctly, Candle 3 provides additional information; a strong Candle 3 closure can validate the reversal and make Candle 4 the expected expansion/continuation candle.
The sequence becomes:
Candle 1 → Candle 2 sweep without proper closure → Candle 3 confirmation → Candle 4 expansion
This is different from:
Candle 1 → valid Candle 2 closure → Candle 3 expansion
That distinction is extremely important.
The Sweep Is Not the Entry
One of the biggest mistakes traders make is entering immediately when the higher-timeframe liquidity is swept.
For example:
Price takes a 1-hour low.
A trader immediately buys because:
"Liquidity was swept."
But price can continue significantly lower.
The higher-timeframe sweep only tells us:
A potential swing is forming.
We still need confirmation that price delivery has actually changed.
That confirmation comes from the lower timeframe.
This is where we use CISD.
Why CISD Is Important After a Liquidity Sweep
Imagine a 1-hour candle sweeps the previous 1-hour low.
That sweep tells us:
Sell-side liquidity has been taken.
But it does not yet tell us:
The low is protected.
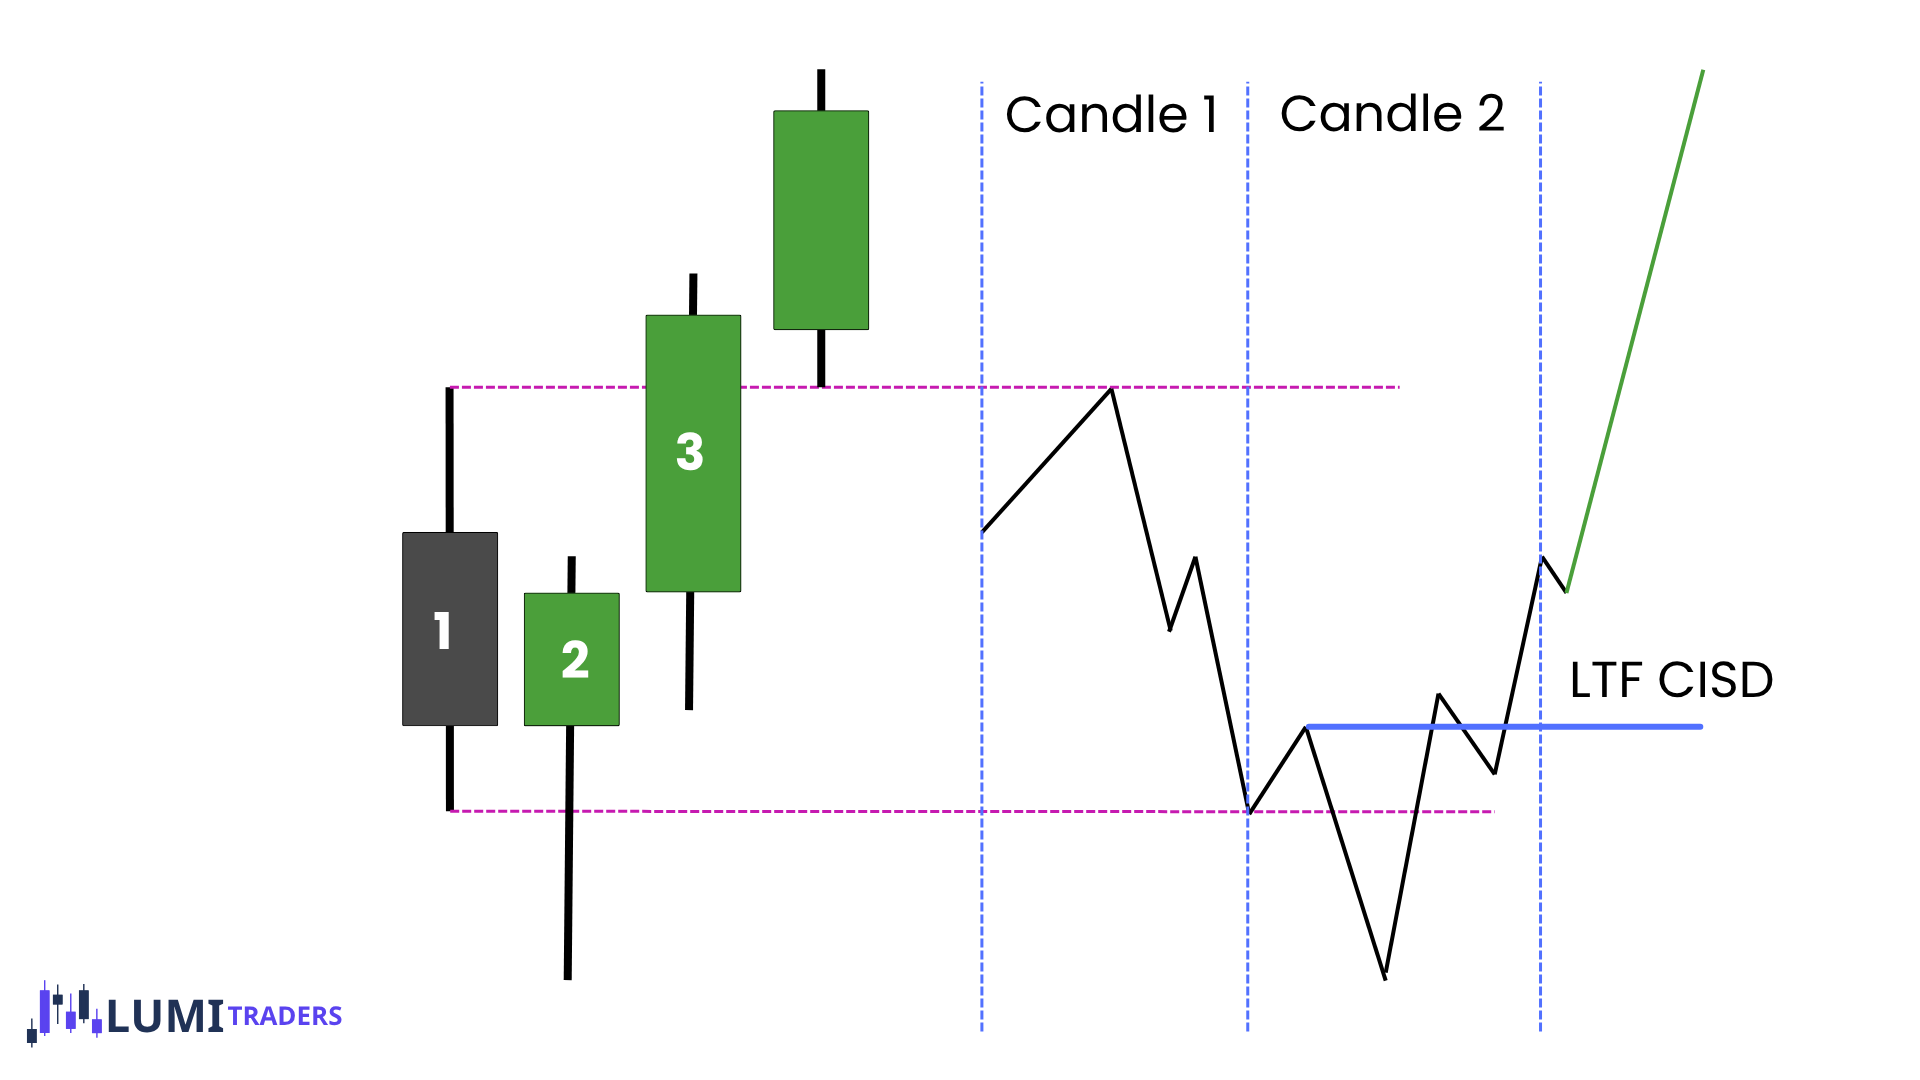
When we drop to the lower timeframe and see bullish CISD, we now have evidence that:
The bearish delivery into the low has failed.
Buyers have taken control of short-term delivery.
The sweep low may now become a protected low.
Candle 3 has a reason to expand higher.
This creates the sequence:
HTF liquidity sweep → HTF closure → LTF CISD → protected swing → expansion
The same applies in reverse for bearish setups.
Higher Timeframe vs. Lower Timeframe Jobs
The higher timeframe and lower timeframe have different jobs.
Higher Timeframe
The HTF tells us:
Where liquidity is.
Which high or low is being swept.
Whether Candle 2 closed correctly.
Whether a swing may be forming.
Where the larger objective is.
Lower Timeframe
The LTF tells us:
Whether delivery has actually changed.
Whether CISD occurred.
Where the protected swing is.
Where our precise entry can form.
Where our stop belongs.
A simple way to remember this:
HTF = Location and setup.
LTF = Confirmation and execution.
Timeframe Alignment Chart
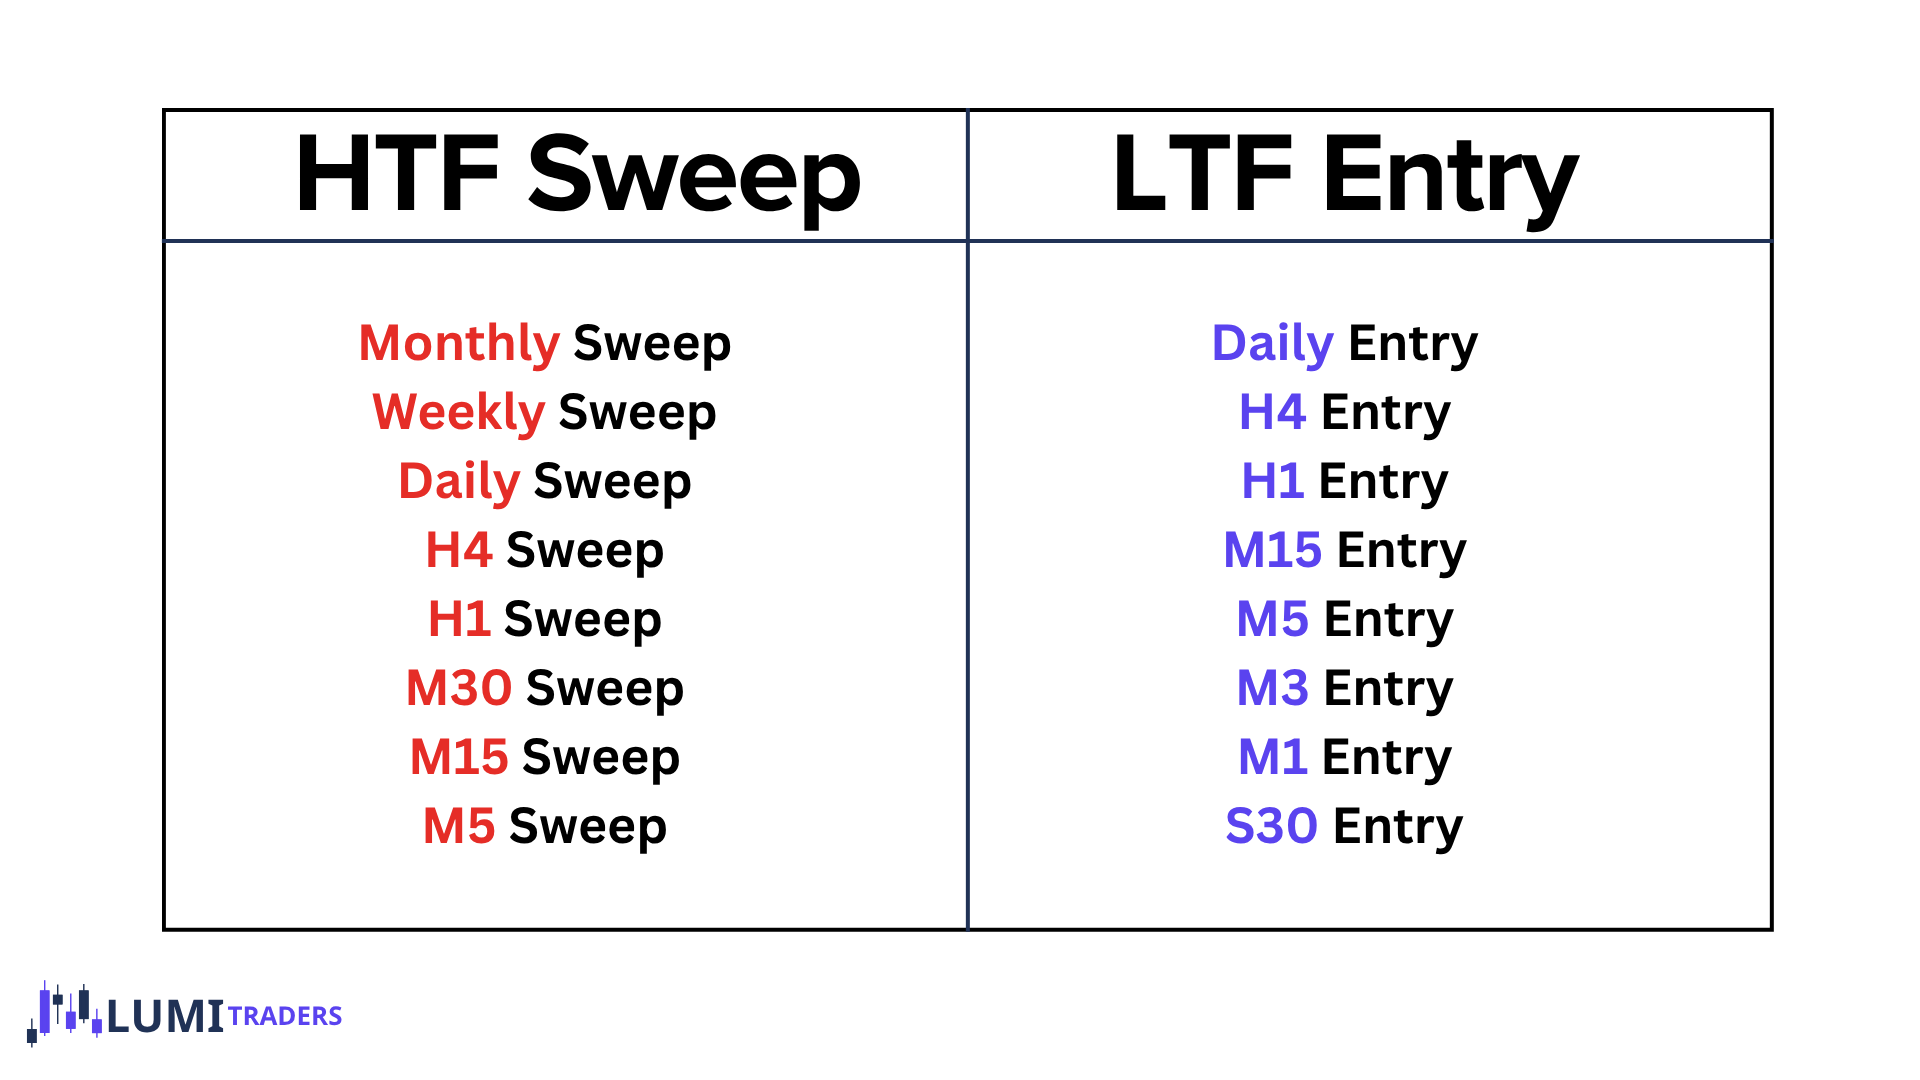
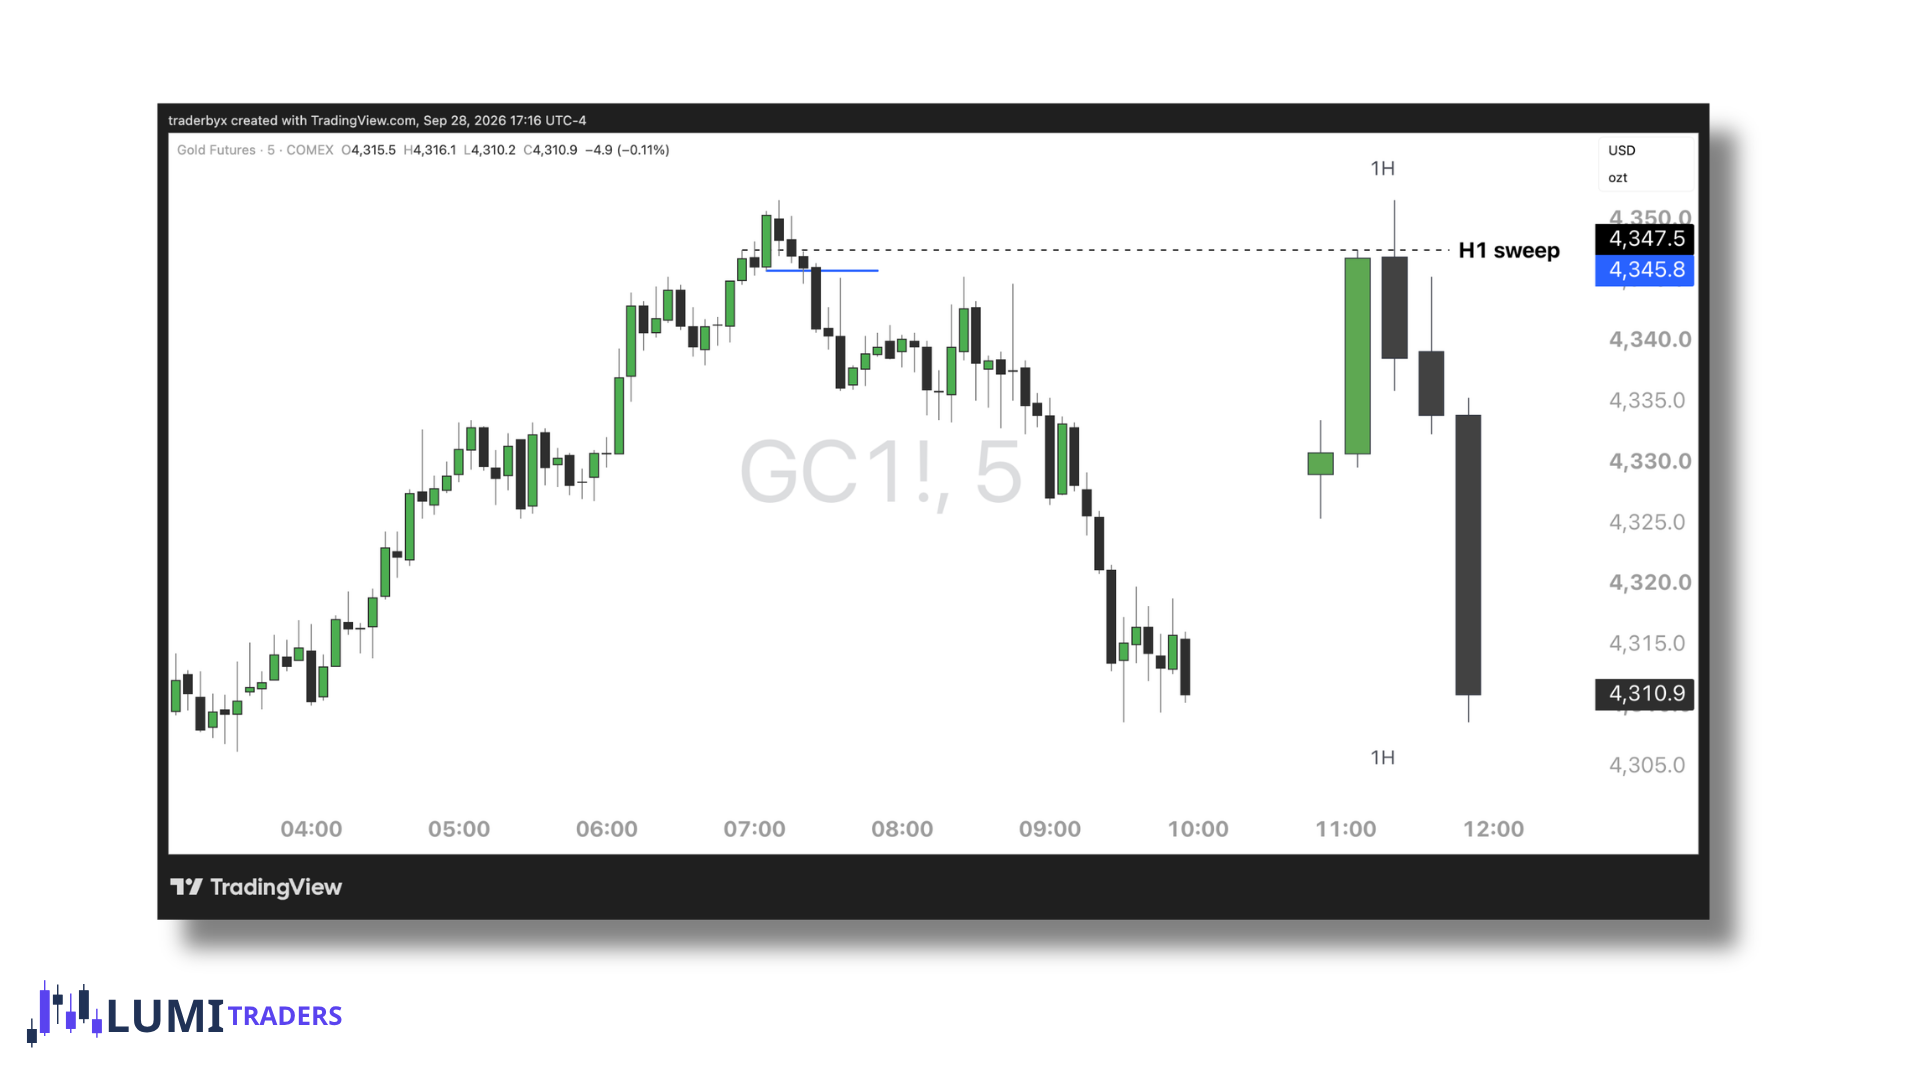
The purpose is not simply to drop to the smallest possible timeframe.
We want a lower timeframe that is structurally related to the higher-timeframe candle.
Why Timeframe Alignment Matters
A lower timeframe will constantly create small CISDs.
If we simply trade every CISD we see, we will be reacting to noise.
The higher-timeframe sweep gives the lower-timeframe CISD meaning.
For example:
A random 3-minute bullish CISD in the middle of a range may mean very little.
But:
30M Candle 2 sweeps Candle 1 low → closes back above → 3M bullish CISD
has a completely different context.
The same applies to a 5-minute CISD.
A random 5-minute shift is not the model.
But:
1H liquidity sweep → valid closure → 5M CISD
creates a structured higher-timeframe-to-lower-timeframe setup.
LumiTraders 30M/H1 Liquidity Sweep Playbook
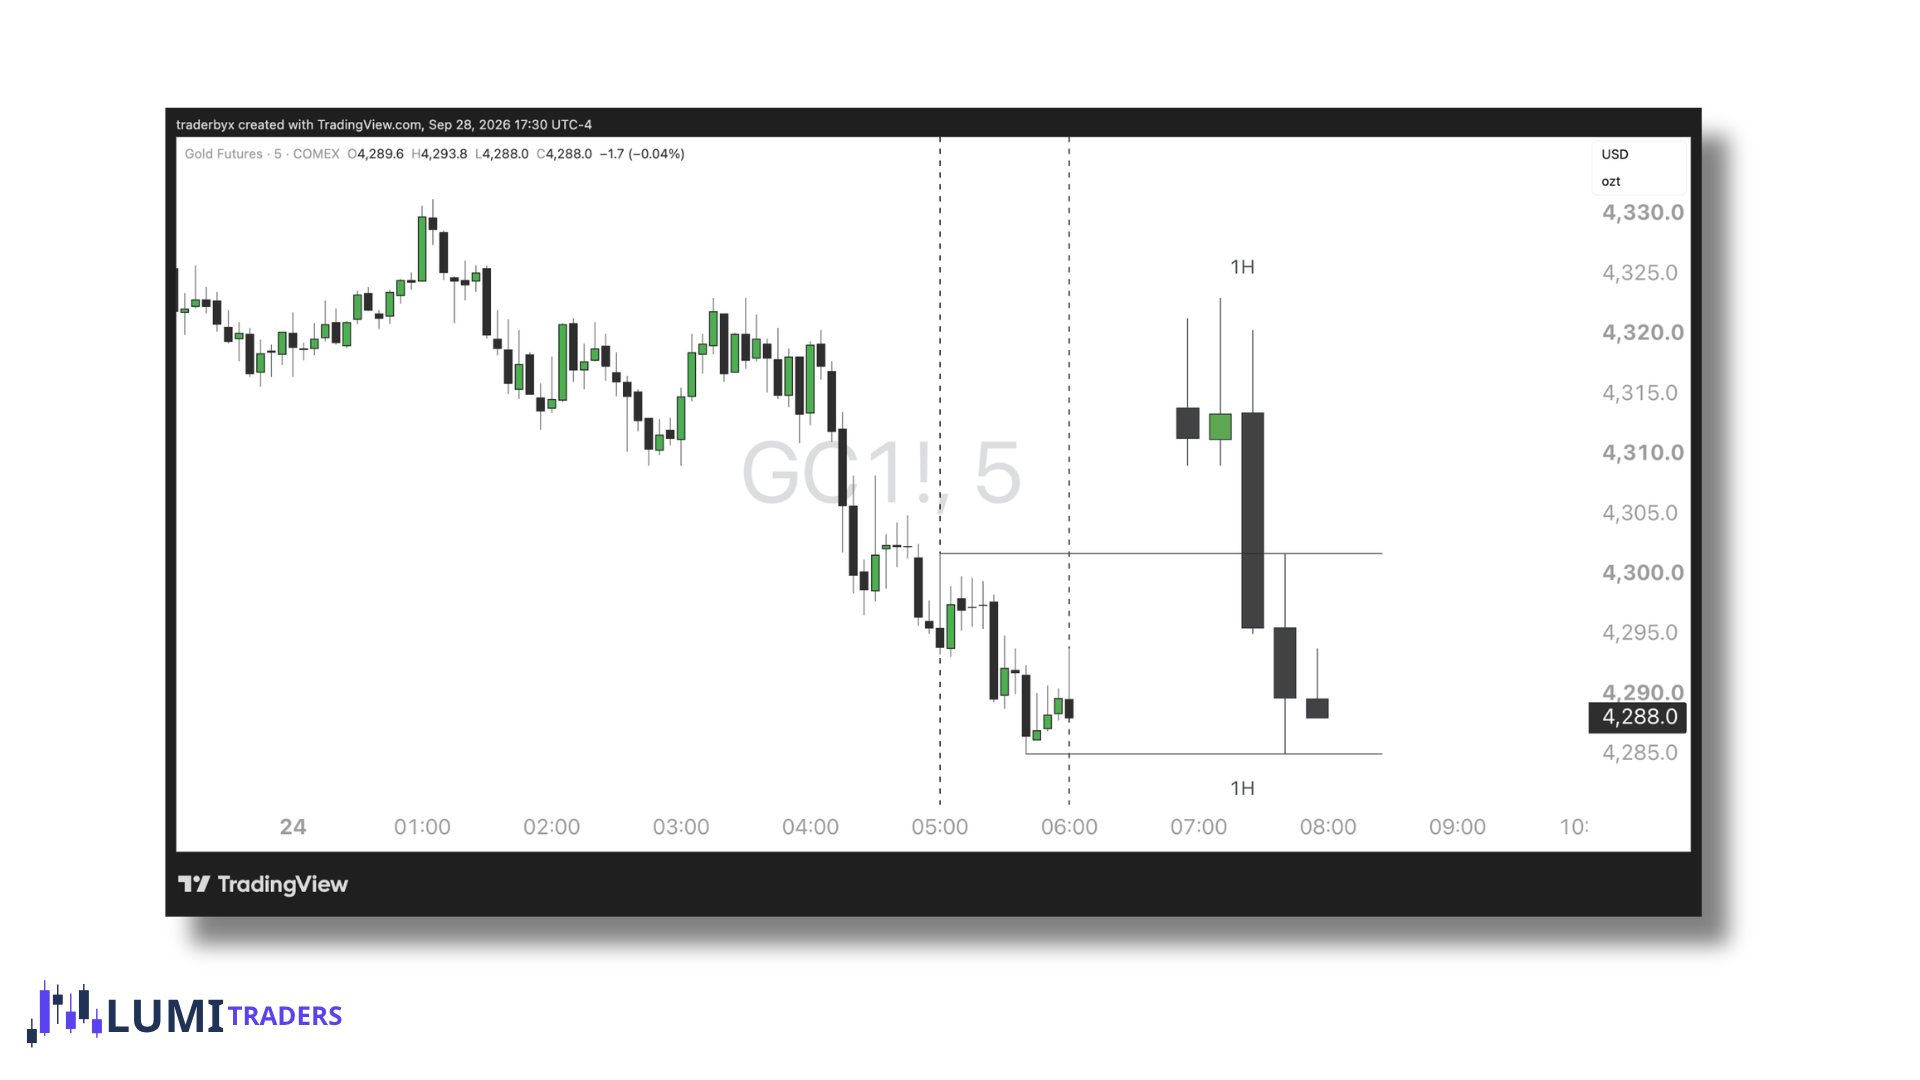
Step 1 — Identify Candle 1
On the 30-minute/1-hour chart, identify Candle 1's low.
This low represents potential sell-side liquidity.
Do not anticipate the sweep.
Let price come to the level.
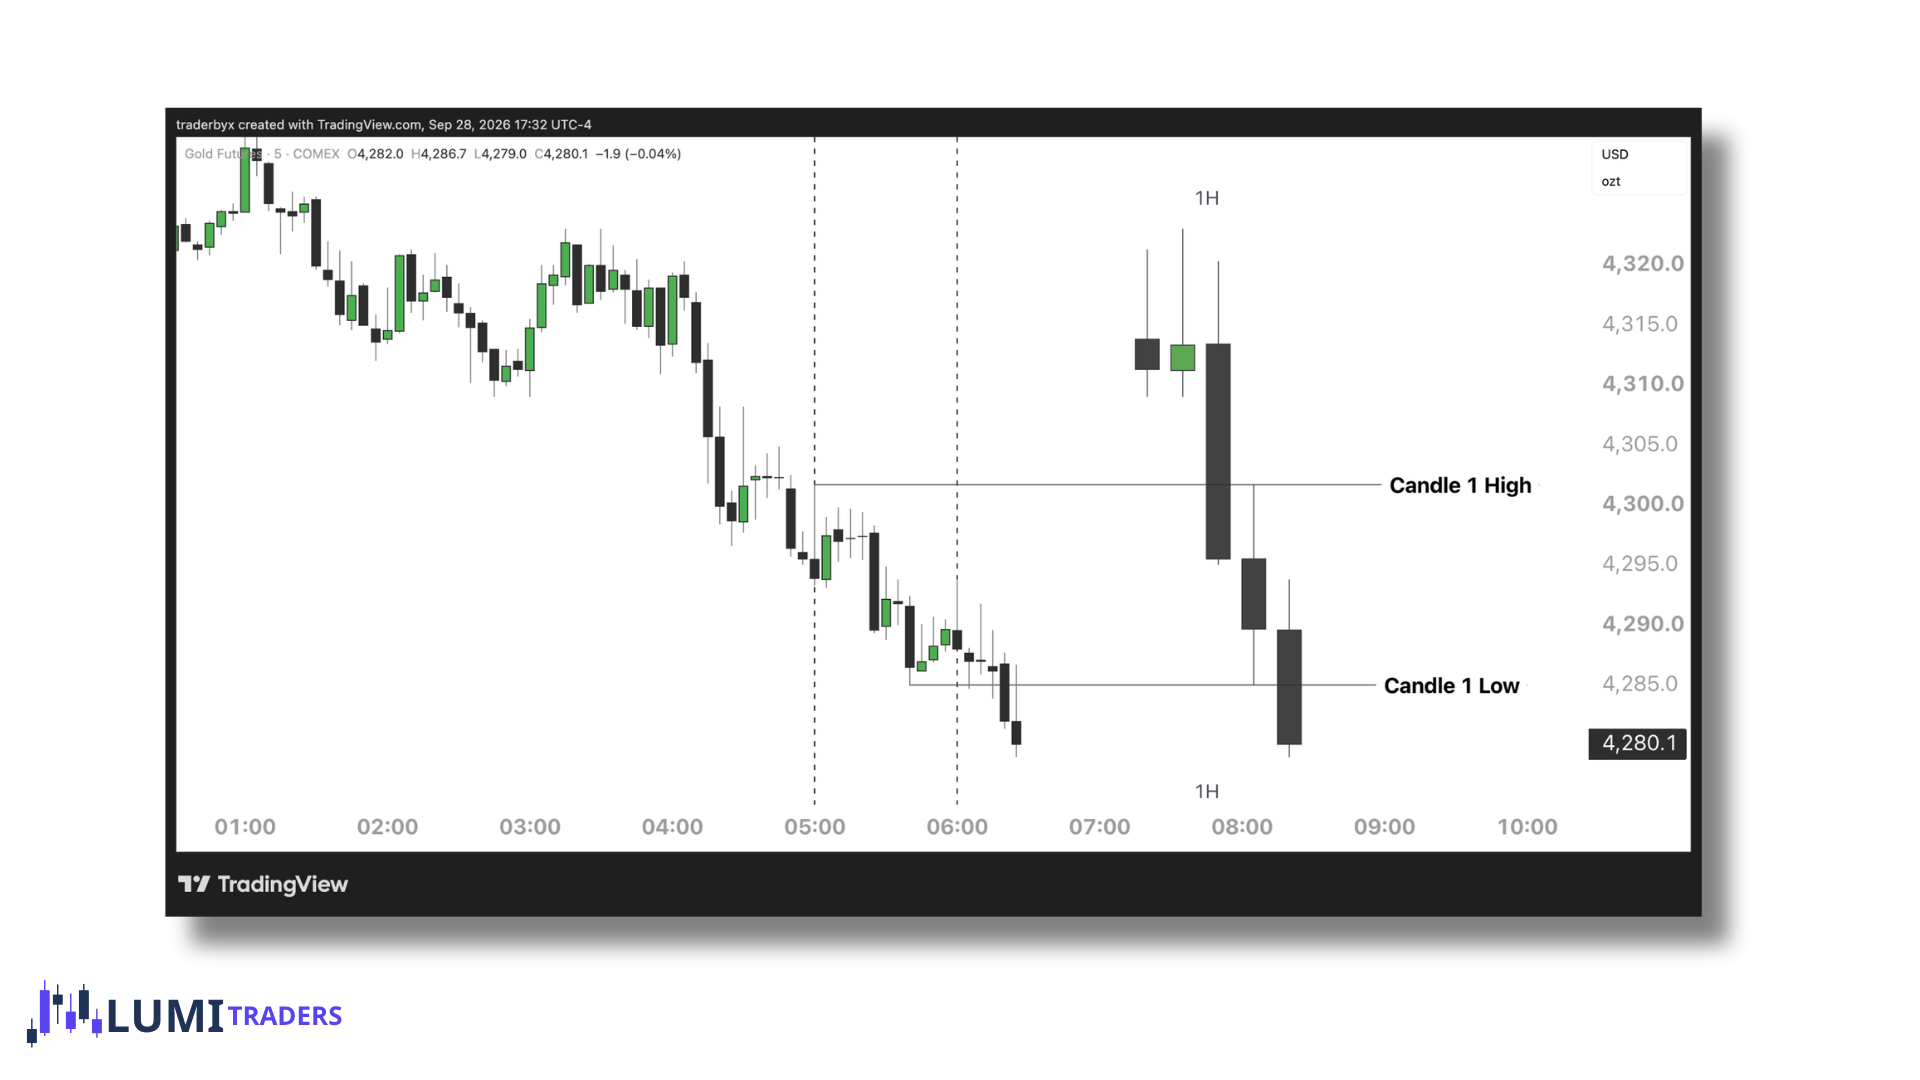
Step 2 — Candle 2 Sweeps Candle 1
Candle 2 trades below Candle 1's low.
Sell-side liquidity is taken.
At this moment:
We do not enter.
The sweep alone is not enough.
Step 3 — Switch on LTF and look for LTF CISD
Price must close above/below the sequence of down-close/up-close candles to form CISD.
Now we have:
30M SSL sweep + valid closure + 3M bullish CISD
H1 BSL sweep + valid closure + 5M bullish CISD
The sweep low may now be treated as the potential protected low/high.
We can begin looking for the long/short entry.
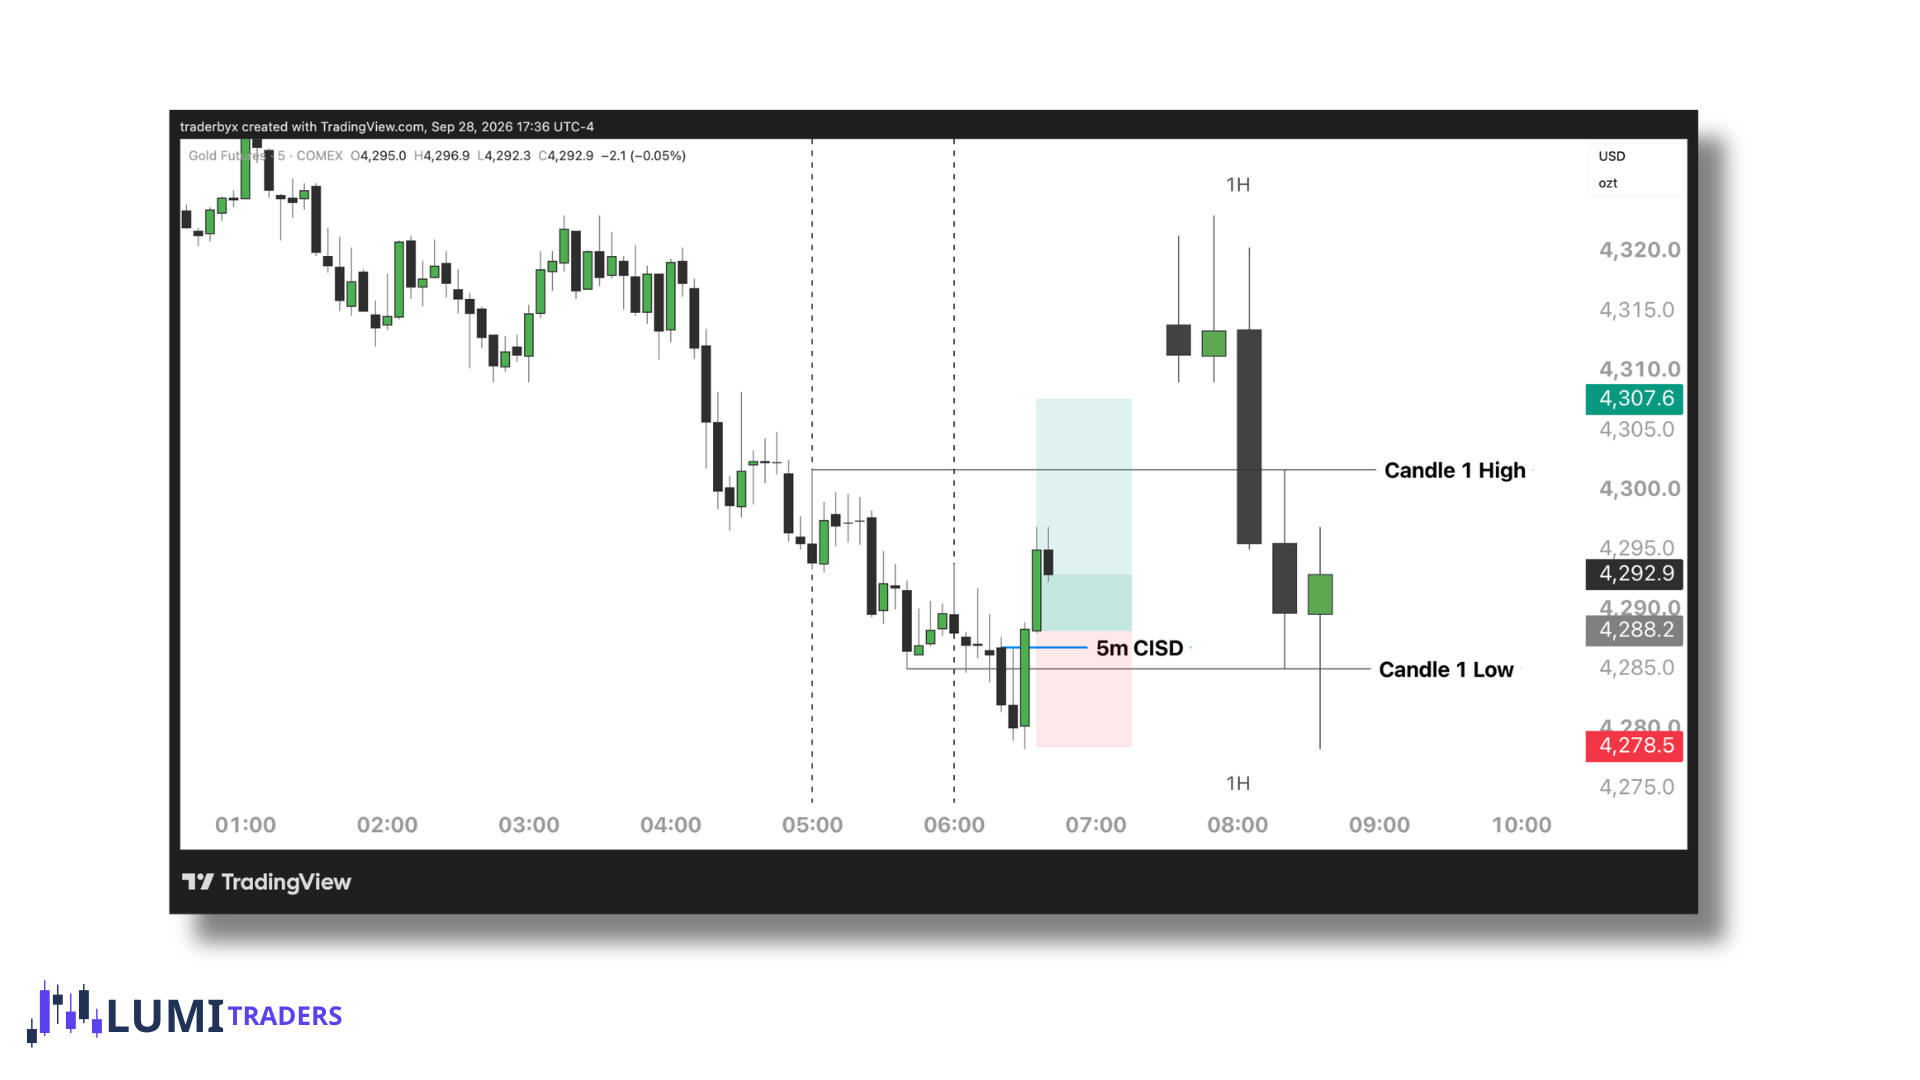
Enter Long During Candle 2
Once 3-minute/5-minute CISD confirms, look for the long/short.
I entered at the open of the next candle once we got confirmed CISD/
The important point is:
The trade happens while the 30M/H1 Candle 2 is still forming.
Stop can be placed:
Below/above the protected 3-minute/5-minute low/high.
Below/above the 30M/H1 Candle 2 sweep low if the setup requires wider invalidation.
The stop belongs where the bullish/bearish reversal becomes invalid.
Potential objectives include:
2R.
Candle 1 high/low.
Internal BSL/SSL.
Session high/low.
Previous day high/low.
External BSL/SSL.
Higher-timeframe draw.
The Importance of Time Remaining in Candle 2
Because we are trading Candle 2 itself, we should also pay attention to how much time remains in the HTF candle.
A CISD shortly after the liquidity sweep may provide more time for Candle 2 to develop its body.
If CISD occurs very late in the 30-minute or 1-hour candle, part of the expected expansion may already be limited.
This does not automatically invalidate the trade.
But it changes the context.
Ask:
How much time remains?
How far has Candle 2 already traveled?
Has the opposing target already been reached?
Is there enough room for a meaningful body to form?
We want to avoid entering late simply because CISD finally appeared.
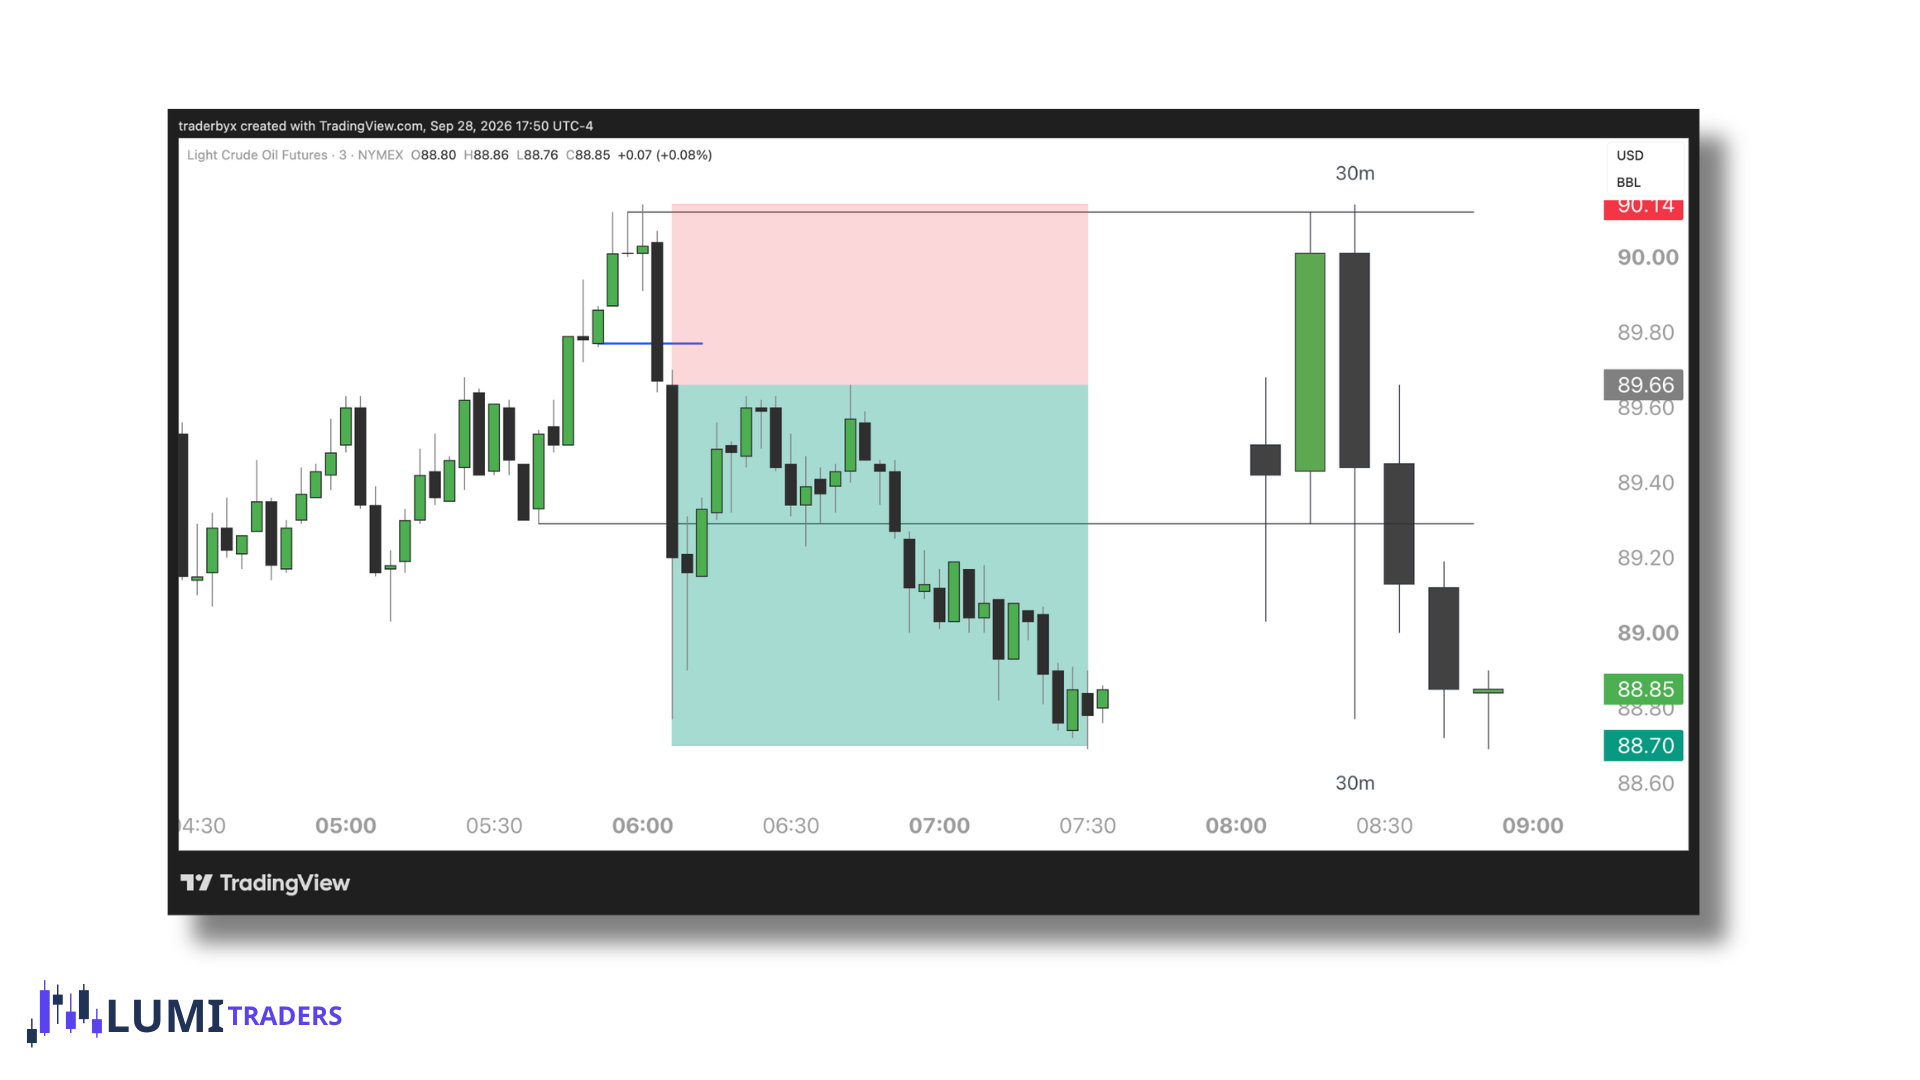
Small Wick Candle 2
A strong setup may produce:
Small manipulation wick → CISD → large Candle 2 body
For a bullish Candle 2:
Price only trades slightly below Candle 1.
SSL is taken.
CISD appears quickly.
Price begins expanding higher.
Candle 2 forms a large bullish body.
For a bearish Candle 2:
Price only trades slightly above Candle 1.
BSL is taken.
CISD appears quickly.
Price begins expanding lower.
Candle 2 forms a large bearish body.
This is similar to the continuation logic discussed with the four-hour candle.
If the market does not need a deep manipulation, the wick may remain small while the body becomes large.
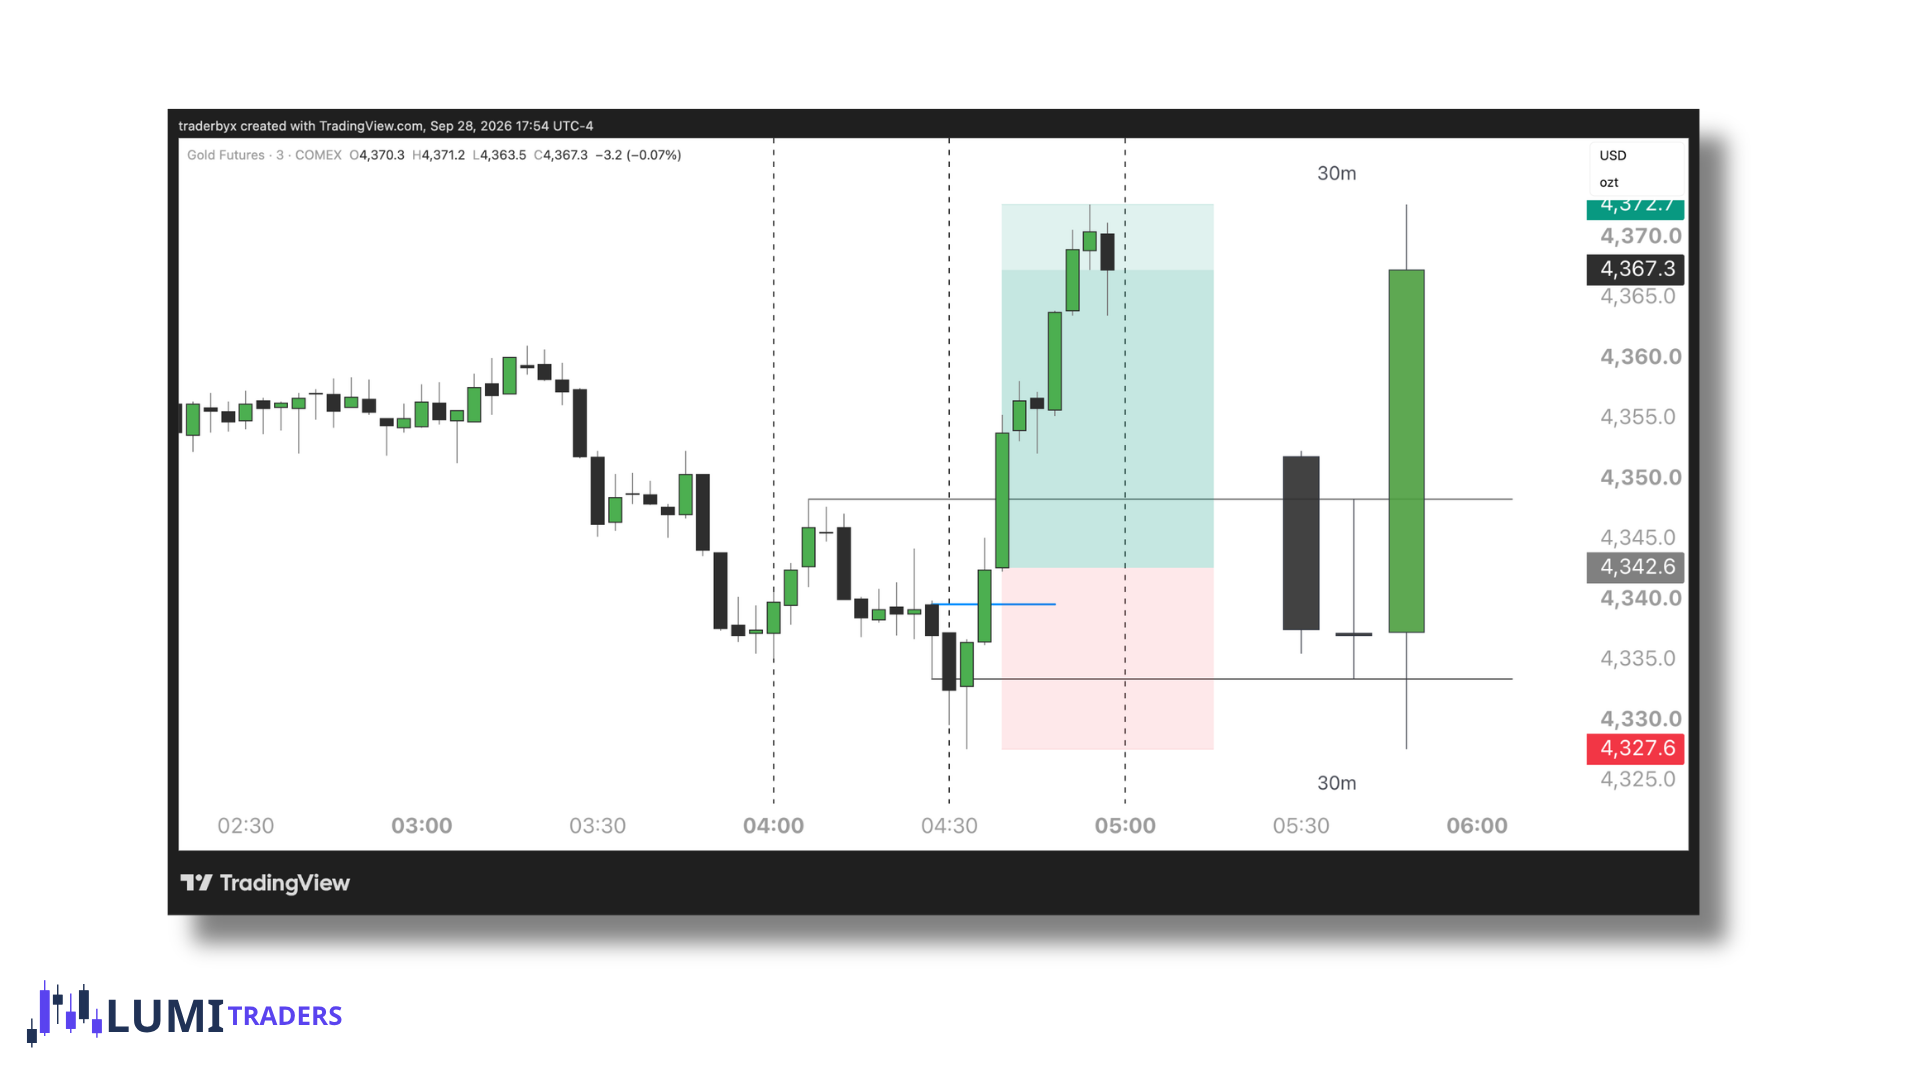
Large Wick Candle 2
Sometimes Candle 2 makes a deeper liquidity sweep.
The wick becomes larger before CISD appears.
This can still be valid.
However, we should consider how much movement has already occurred.
A very deep sweep may mean:
Greater distance to the sweep extreme.
Wider potential invalidation.
More price movement already completed.
Less room to the opposing target.
This is where reward-to-risk becomes important.
Candle 2 Closure Is Information, Not Entry Confirmation
We are not waiting for Candle 2 to close before entering.
The closure helps us later evaluate the completed HTF candle.
But the actual trade is triggered by lower-timeframe CISD during Candle 2.
Therefore:
Incorrect
Sweep → wait for HTF Candle 2 close → trade Candle 3
Correct LumiTraders Approach
Sweep → aligned LTF CISD during Candle 2 → trade Candle 2
Candle 2's eventual close can tell us whether the HTF reversal held successfully, but it is not required before our entry.
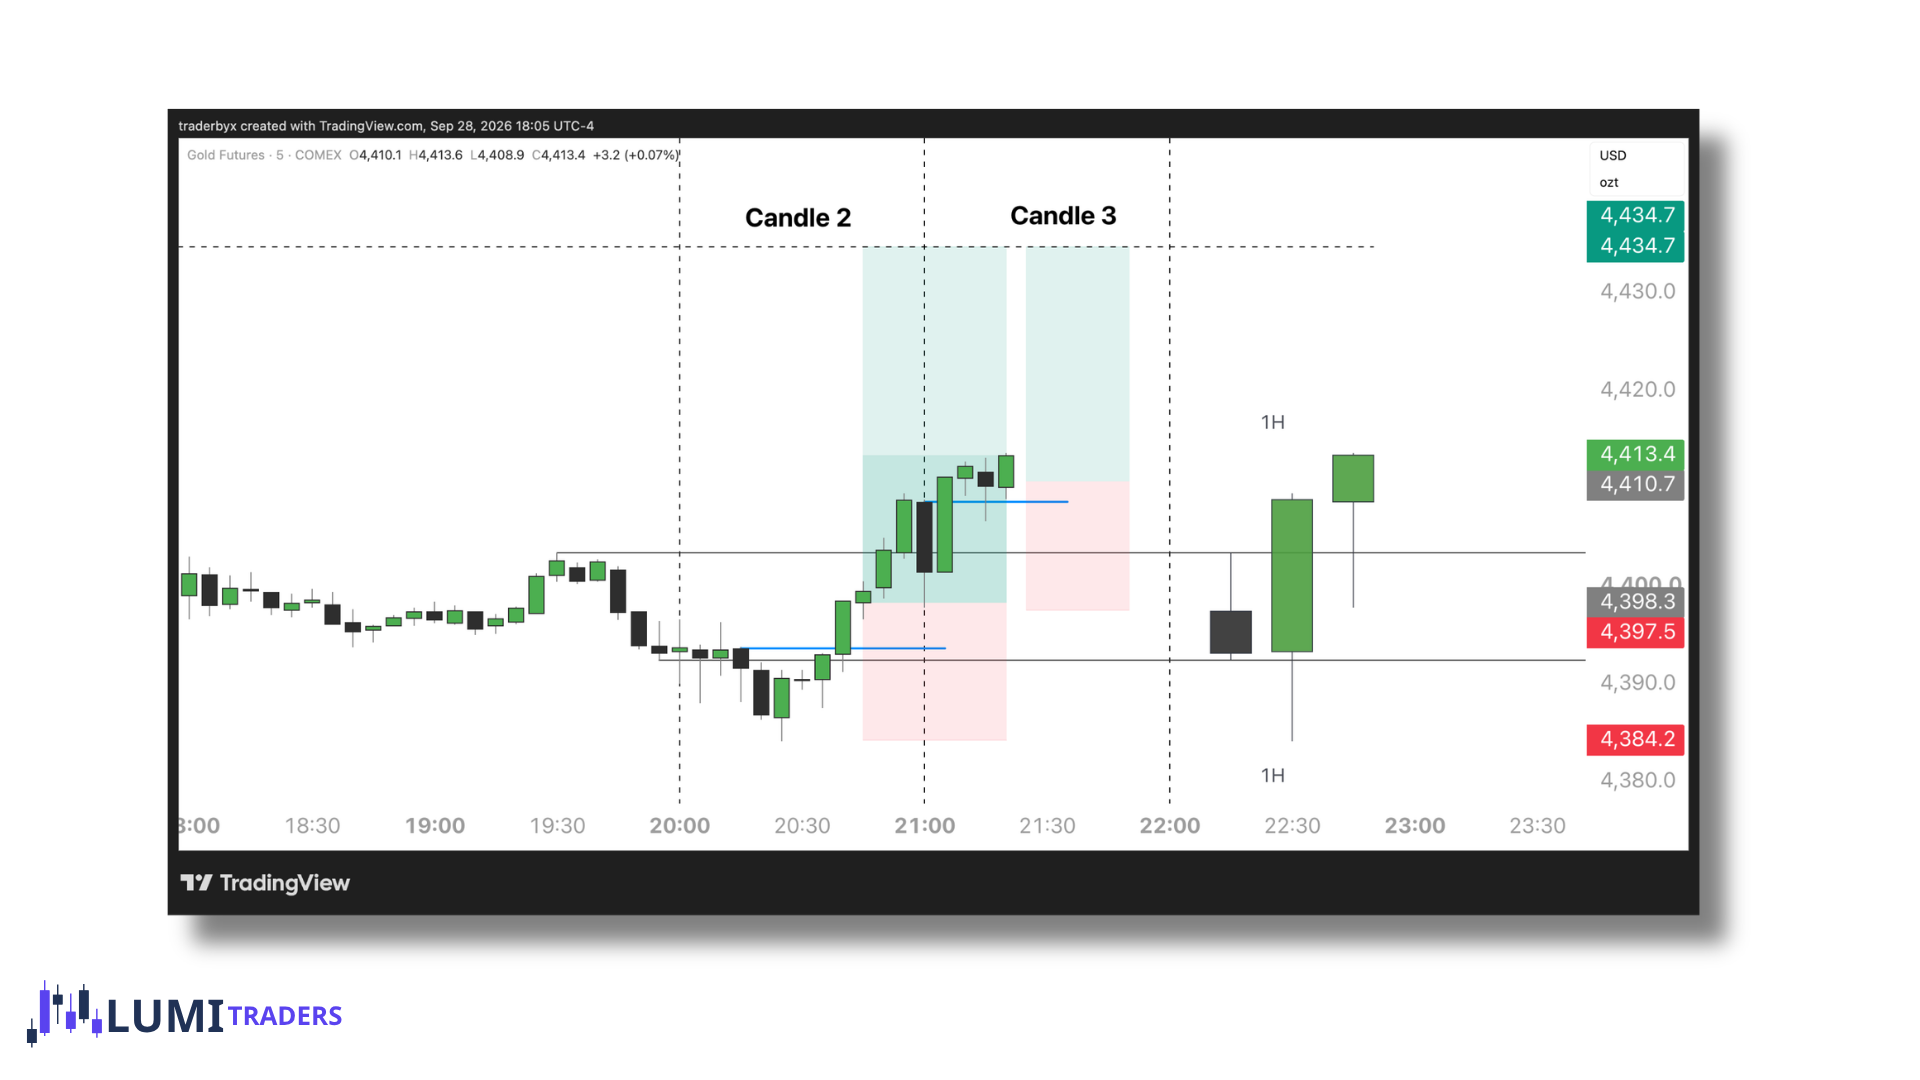
Where Does Candle 3 Fit?
Candle 3 is not my primary entry candle.
If my Candle 2 trade works, Candle 3 may simply continue the move.
For example:
C1 → C2 sweep → LTF CISD → enter C2 → C2 forms body → C3 continues
Candle 3 can provide:
Continuation.
Another entry for someone who missed Candle 2.
Further confirmation of the HTF reversal.
But our model is designed to enter earlier.
We want Candle 2.
What If There Is No CISD During Candle 2?
Then we do not have our Candle 2 trade.
The sweep alone is not sufficient.
If Candle 2 continues to deliver through Candle 1 without an aligned LTF CISD, we allow it to continue.
Do not force the reversal.
The setup may eventually create another model, but it is no longer the clean Candle 2 liquidity-sweep entry we were waiting for.
This is an important discipline rule:
No aligned LTF CISD = no Candle 2 entry.