Before you begin
What you’ll learn
- OTE
- OB
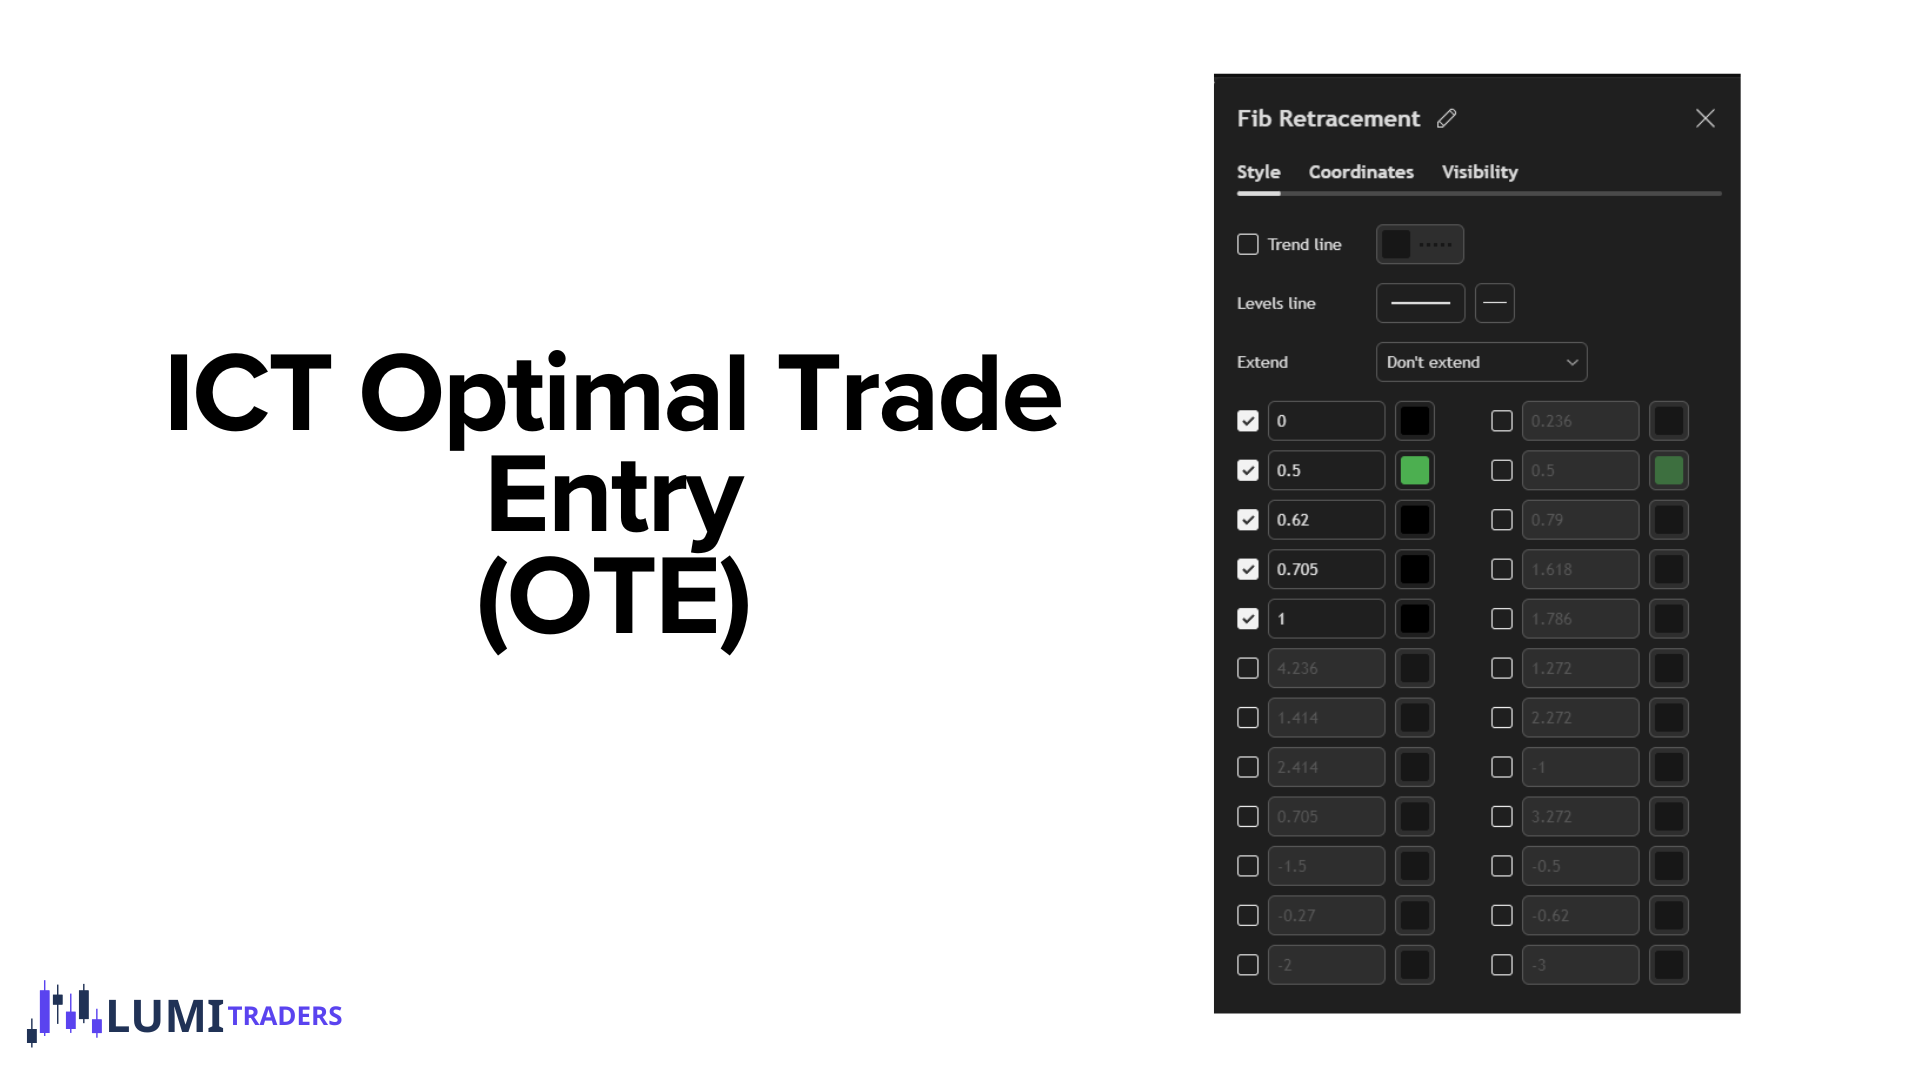
OTE Retracement
OTE = Optimal Trade Entry.
It’s a Fibonacci-based entry model ICT uses to enter trades at a discount (for buys) or at a premium (for sells) within a valid market move.
The key idea:
We don’t chase price. We wait for price to retrace into a high-probability zone, then look for confirmation.
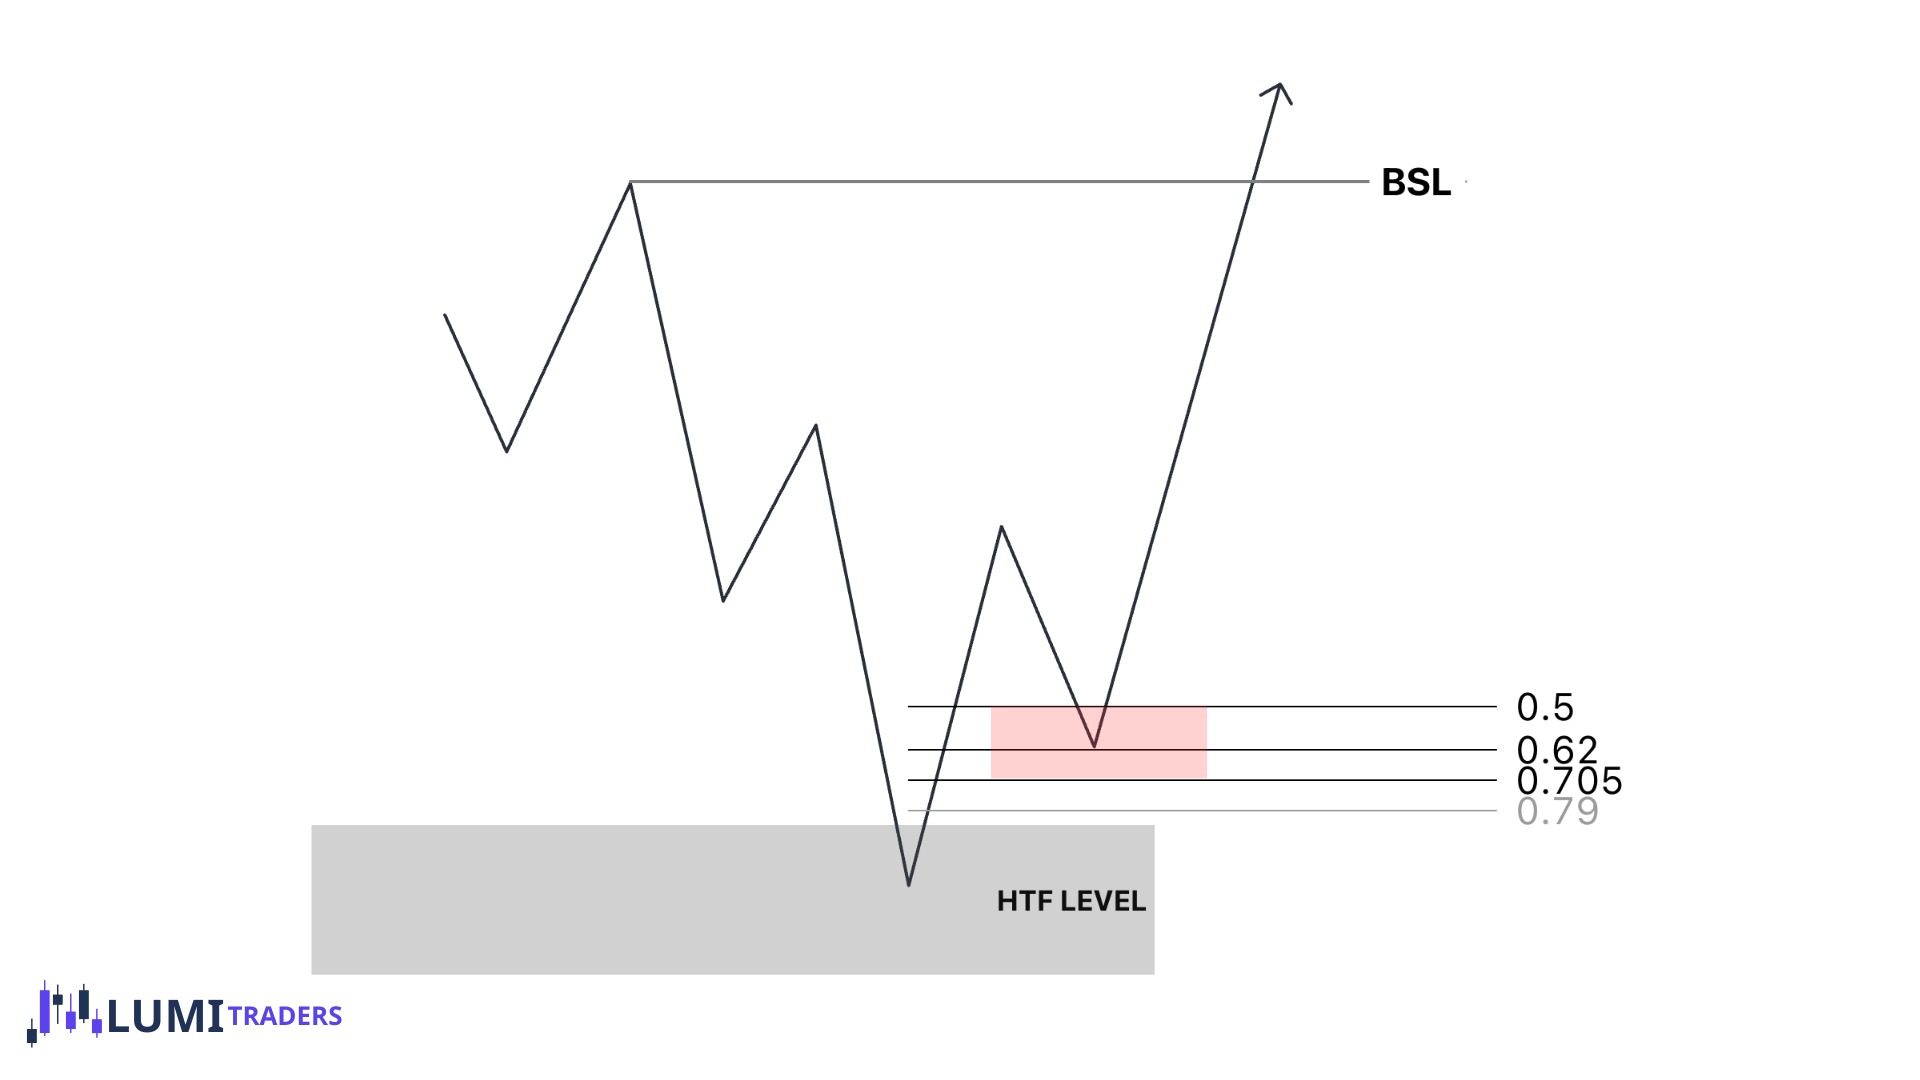
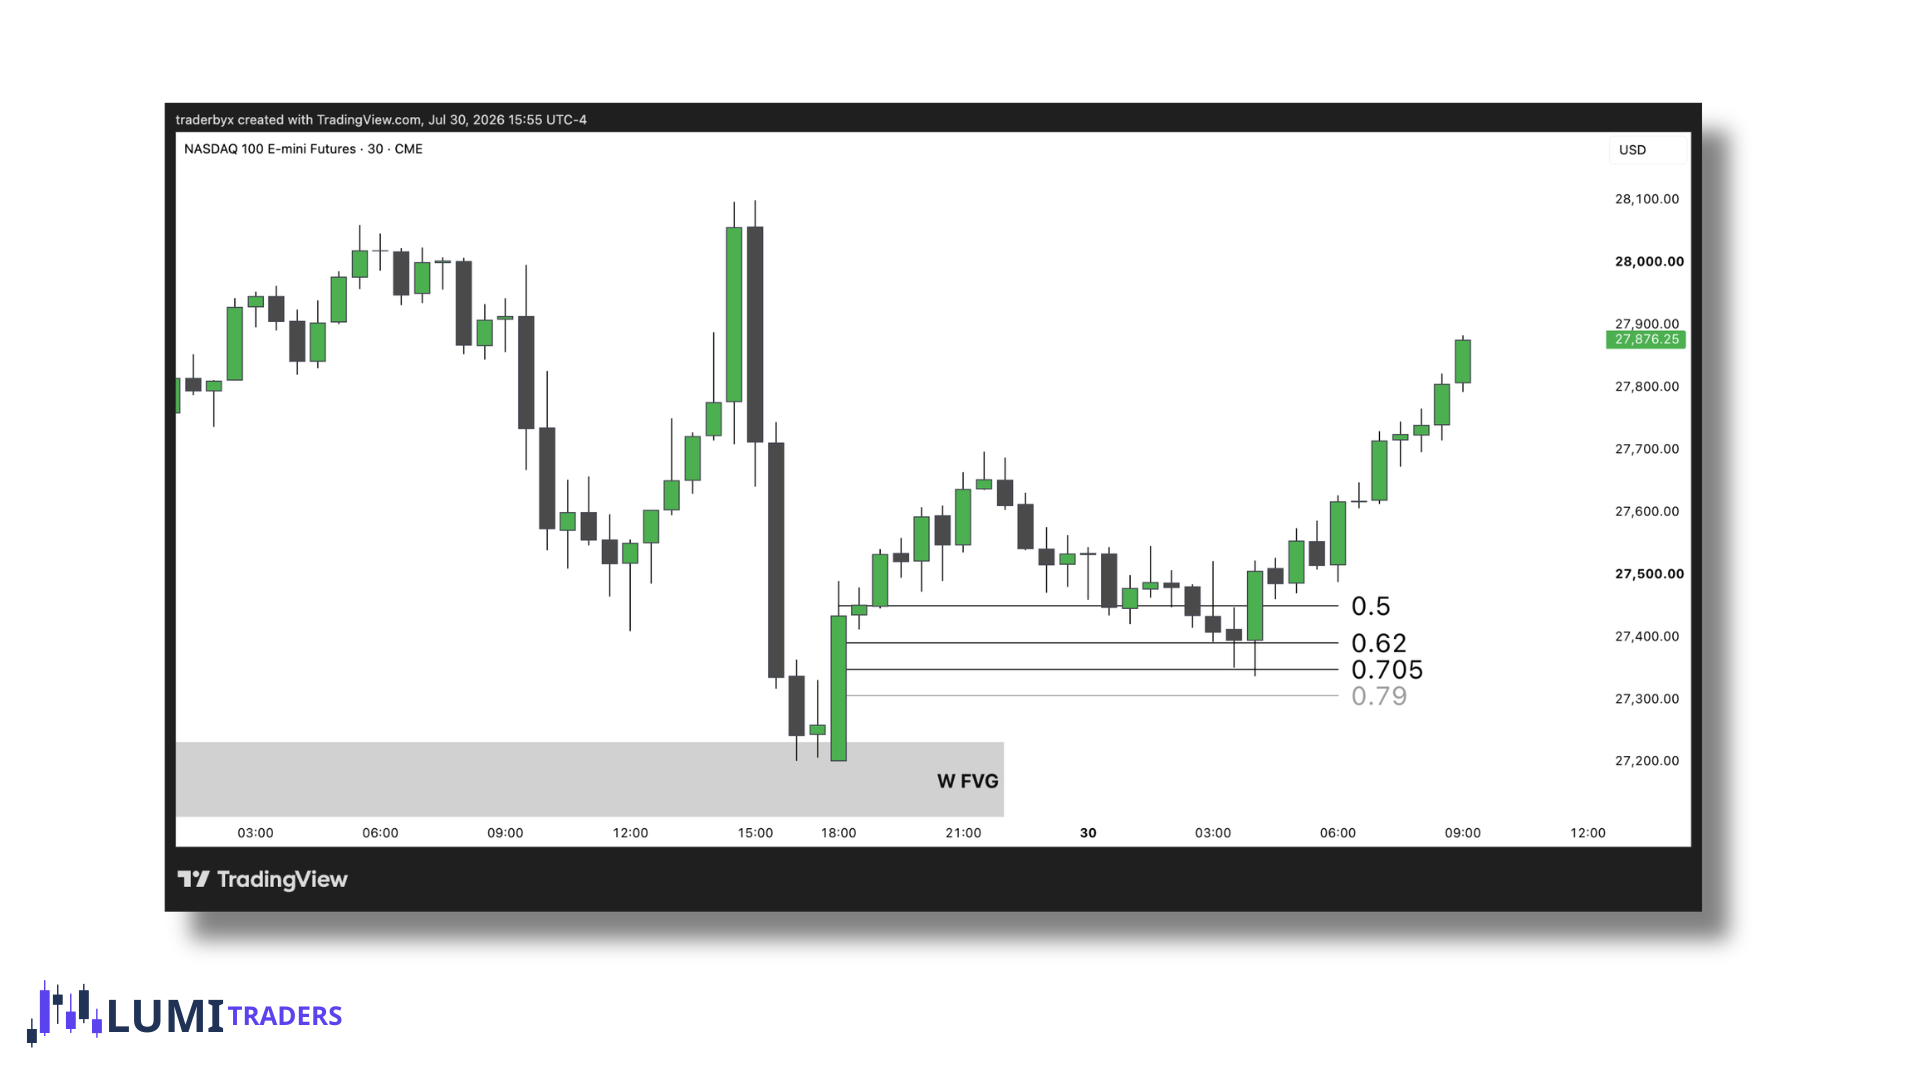
The Core OTE Fibonacci Zone
62% – 79% Fibonacci retracement
Most commonly:
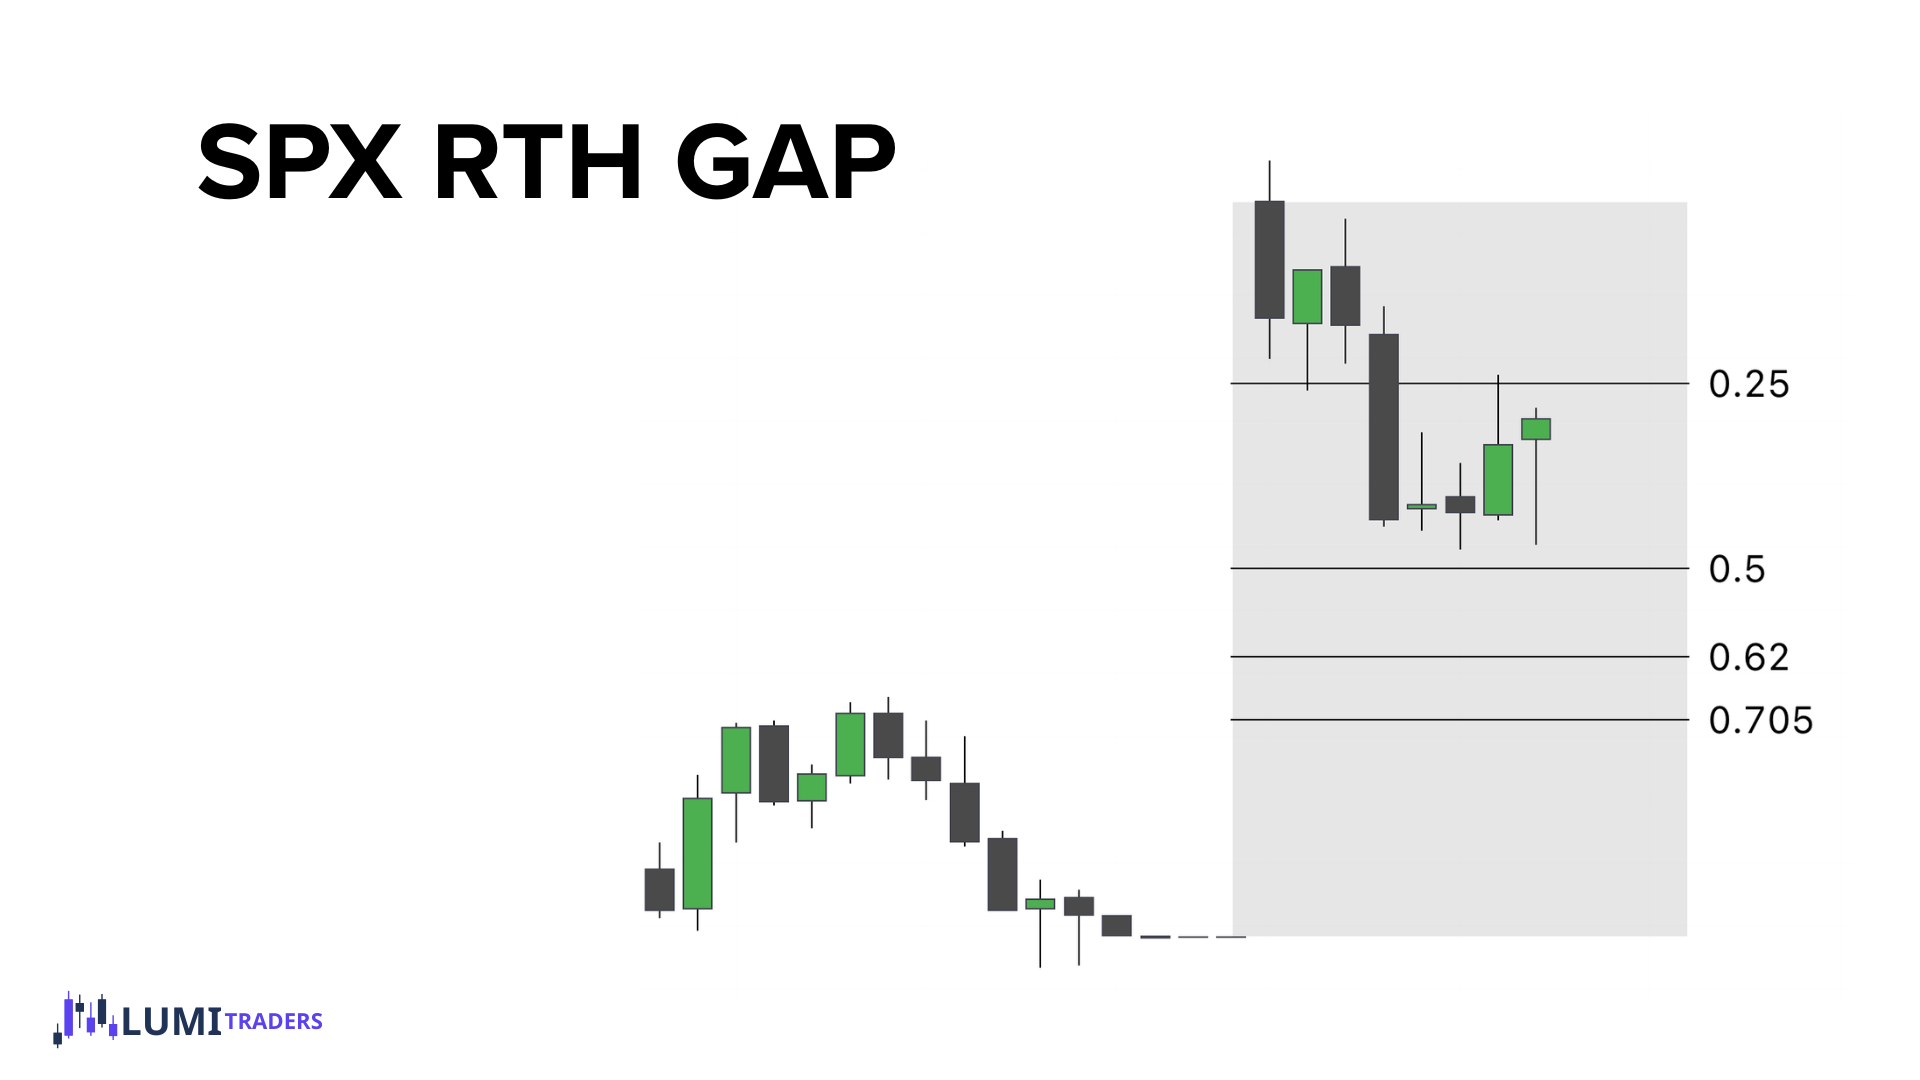
0.62 / 62%
0.705 / 70.5%
The sweet spot = 0.705 (70.5%)
Swing High and Swing Low
A swing high and swing low are simply the market’s most recent obvious turning points—the points that define structure.
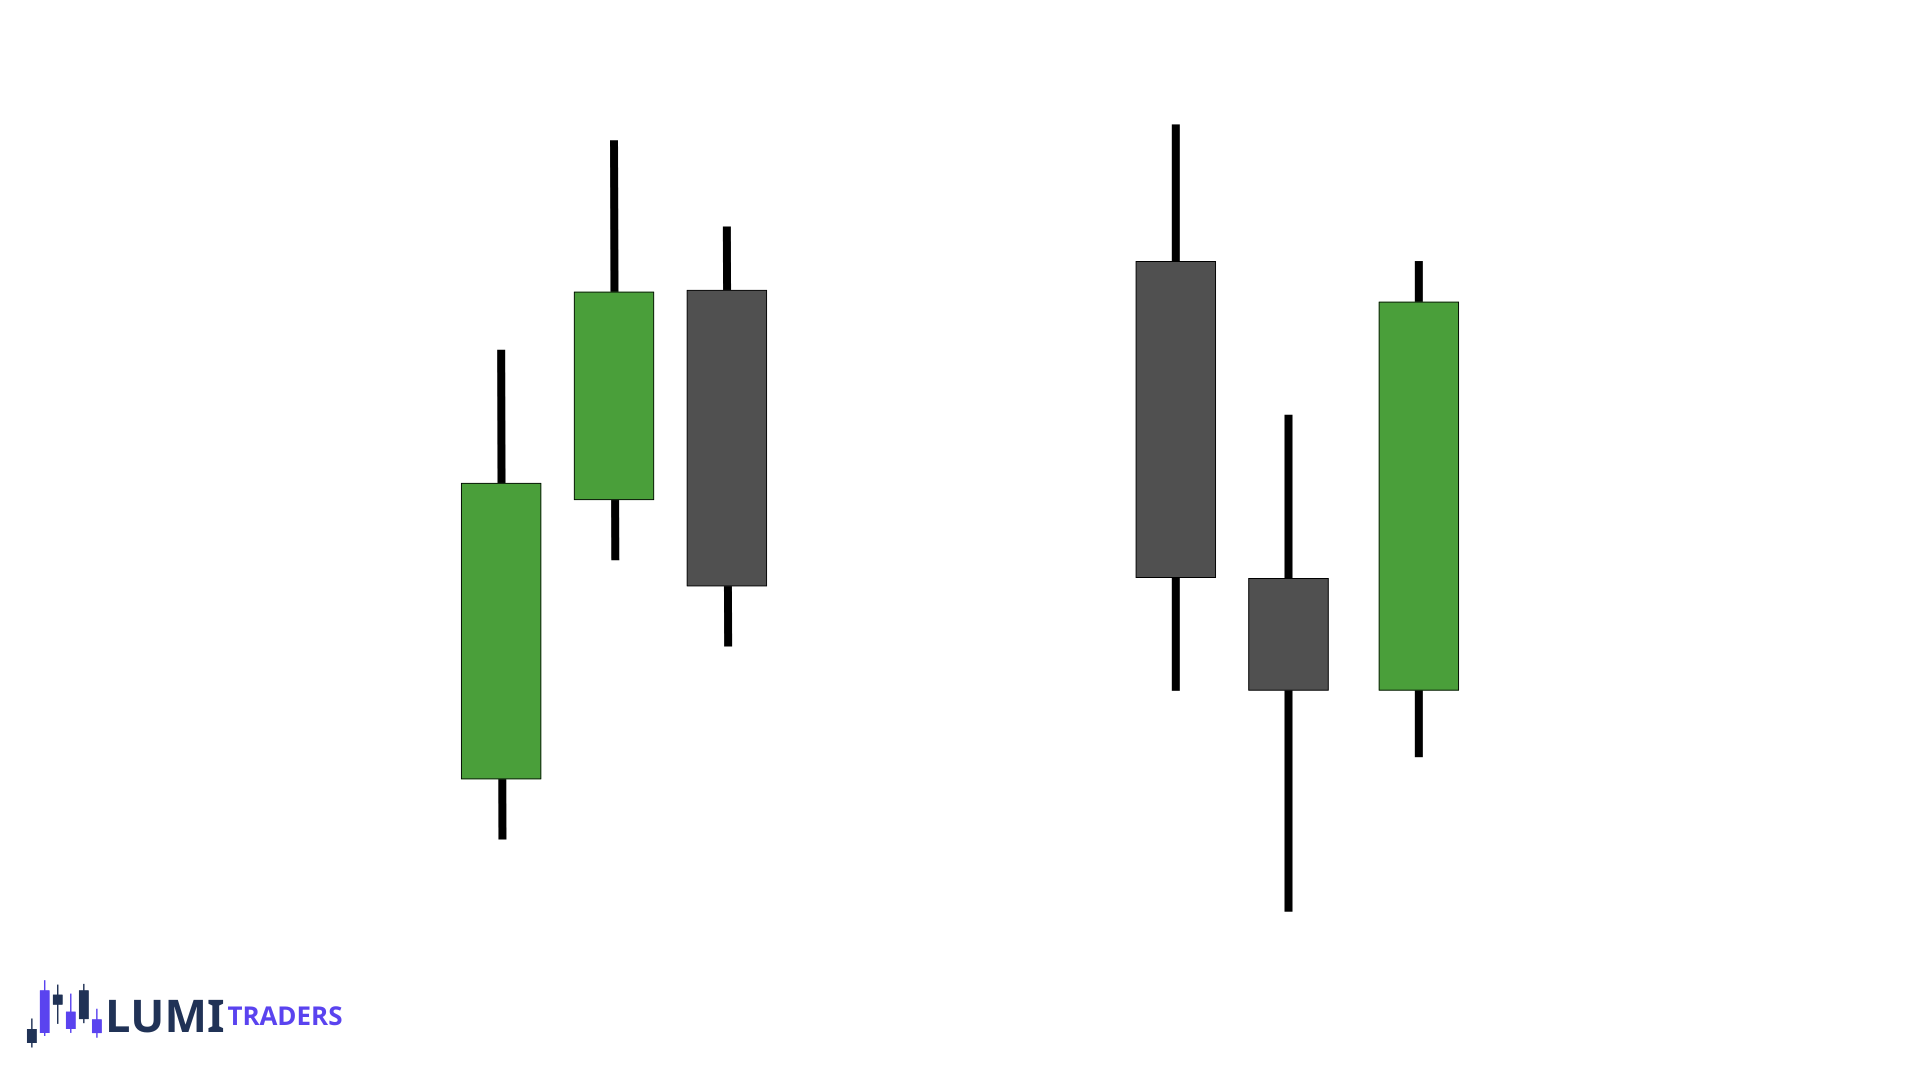
Bullish Swing Point
A bullish swing point, also called a swing low, forms when:
A candle creates a low.
The candle to its left has a higher low.
The candle to its right also has a higher low.
This creates a three-candle formation with the lowest candle in the middle.
A bullish swing point may become:
Sell-side liquidity.
A support level.
The beginning of a bullish price leg.
A structural low that price must protect to remain bullish.
Bearish Swing Point
A bearish swing point, also called a swing high, forms when:
A candle creates a high.
The candle to its left has a lower high.
The candle to its right also has a lower high.
This creates a three-candle formation with the highest candle in the middle.
A bearish swing point may become:
Buy-side liquidity.
A resistance level.
The beginning of a bearish price leg.
A structural high that price must protect to remain bearish.
These formations are basic market structure pivots. However, identifying them is only the first step.
The next step is understanding which swing points actually matter.
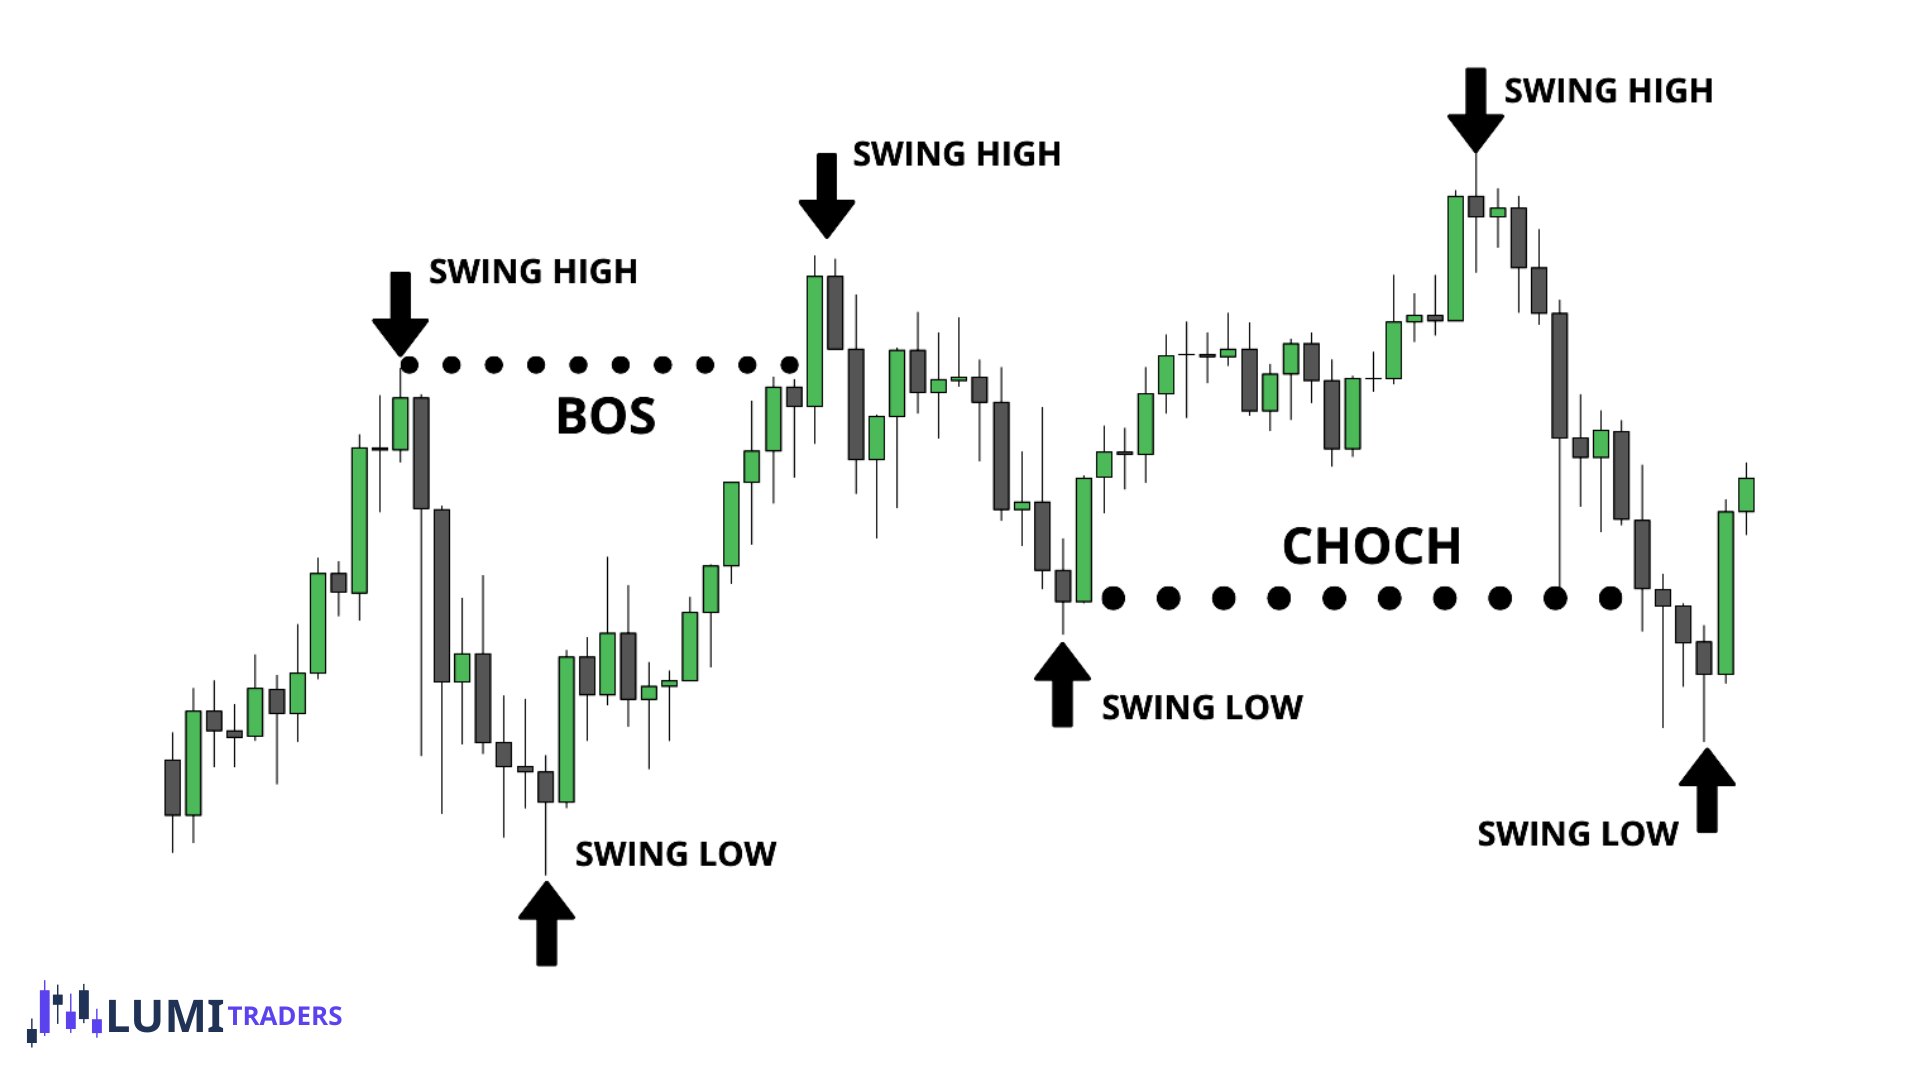
A clean way to identify swing highs/lows without overcomplicating it is to use structure confirmation.
You don’t assume a swing is a swing while price is still pushing. You confirm it after the market proves it turned.
For a swing high, the confirmation is that price forms the high and then starts making lower prices (often breaking a minor low or creating a bearish shift). For a swing low, confirmation is that price forms the low and then starts making higher prices (often breaking a minor high or creating a bullish shift).
Not Every Swing Point Is Relevant
When you look at a lower-timeframe chart, you may see dozens of swing highs and swing lows.
If you treat every swing point as important, your chart will become confusing. You may start calling every small break a market structure shift, even though price has not changed its true direction.
Relevant swing points usually have a clear purpose.
A relevant swing point may:
Take liquidity.
Form at a higher-timeframe PD Array.
Create displacement.
Break an important previous swing.
Begin a strong impulsive move.
Protect the current market structure.
Form during an important trading session or macro time.
The stronger the reaction from a swing point, the more important that swing point becomes.
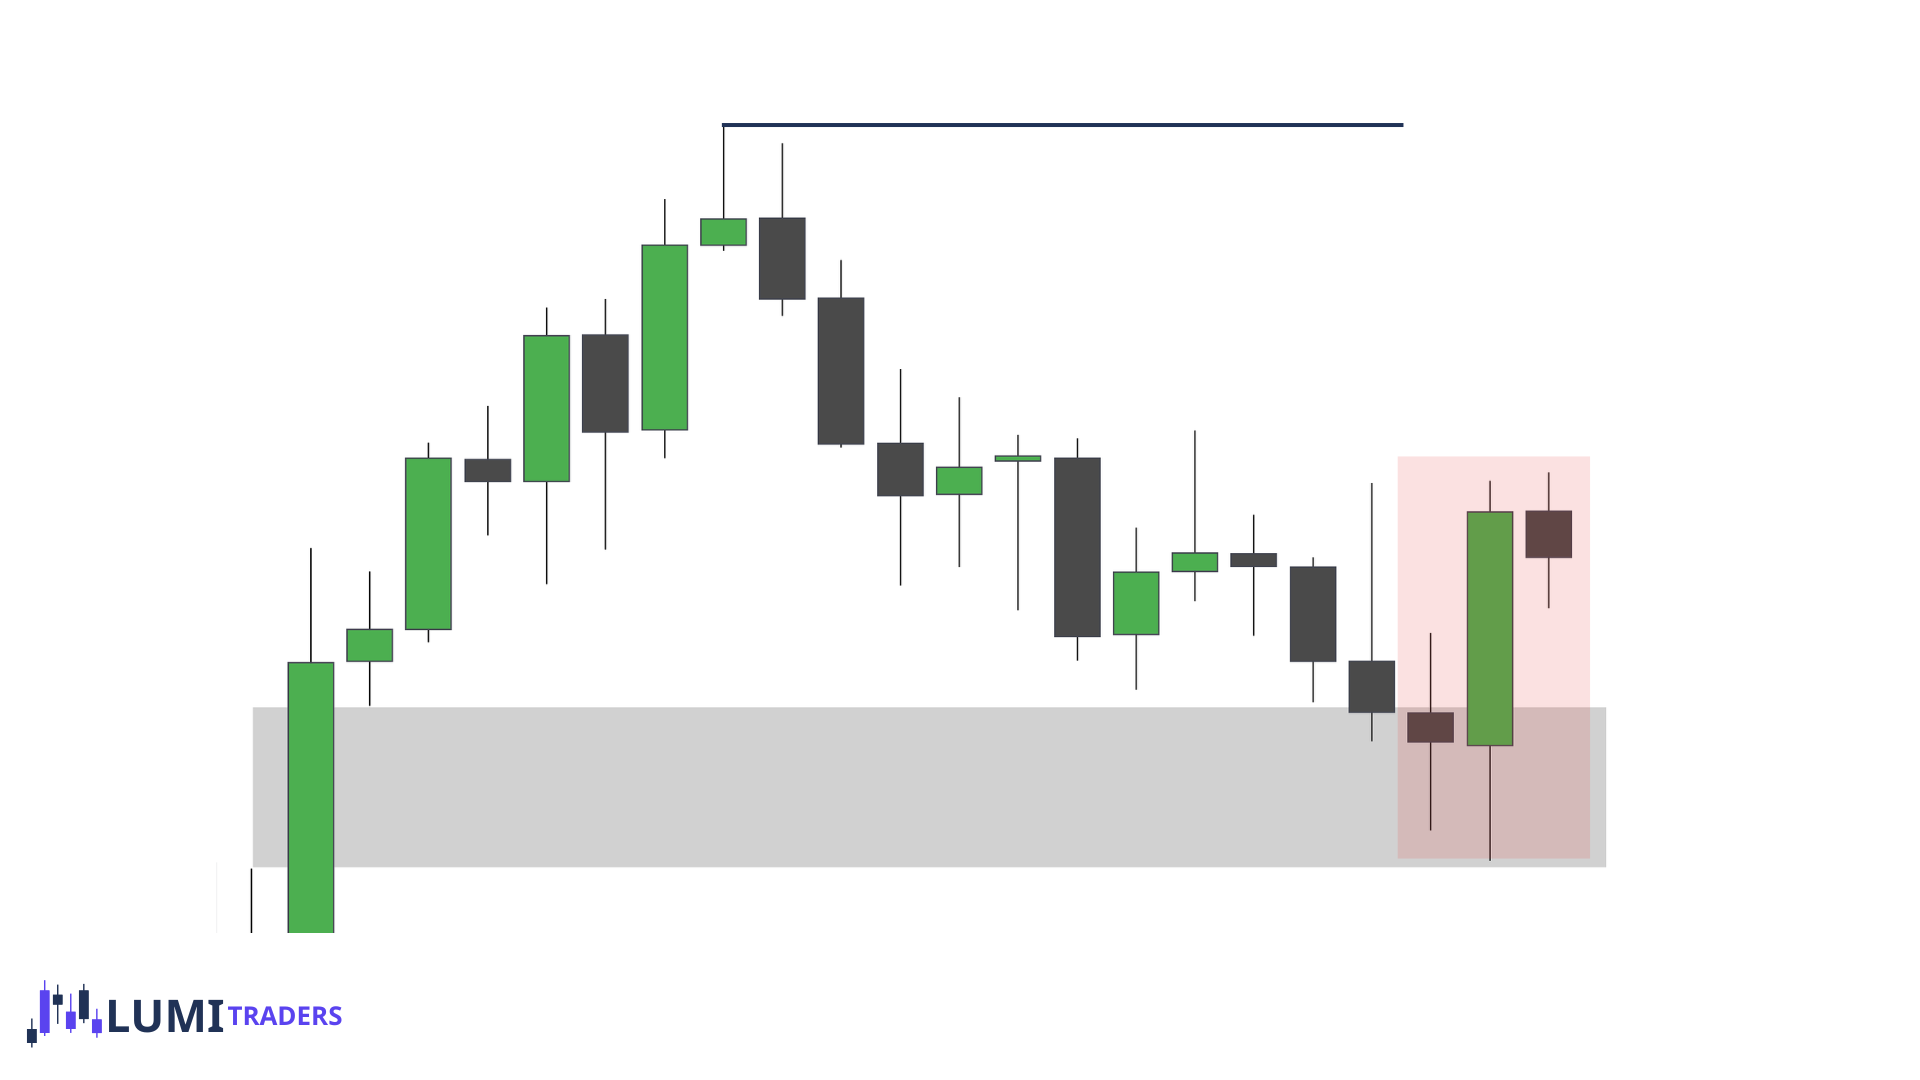
Relevant Swings
A relevant swing is a swing point that plays an important role in the delivery of price.
For example, imagine price trades below the London low, takes sell-side liquidity, reaches a 4-hour bullish order block, and then creates strong bullish displacement.
The swing low formed during this reaction is important because it:
Took liquidity.
Reached a higher-timeframe level.
Created displacement.
Started a new bullish leg.
This swing low is much more relevant than a random swing low that formed in the middle of consolidation.
Failure Swings
A failure swing occurs when price creates a swing point but fails to produce meaningful continuation.
For example, price creates a bullish swing low, moves slightly higher, but fails to break an important swing high. Price then trades back below the swing low.
That swing low failed to create a meaningful bullish expansion.
The same idea applies to a bearish swing high.
Failure Swing vs. Relevant Swing
The main difference is what happened after the swing point formed.
Ask the following questions:
Did the swing point take liquidity?
Did it form at a higher-timeframe level?
Did it create displacement?
Did it break an important opposing swing?
Did it leave an imbalance?
Did it form during an important time window?
Did price continue away from it?
If the answer to several of these questions is yes, the swing point is more likely to be relevant.
If the swing formed in the middle of consolidation and produced no displacement or structural break, it is probably less important.
A swing point becomes significant because of the price delivery that follows it.
Step-by-Step Process
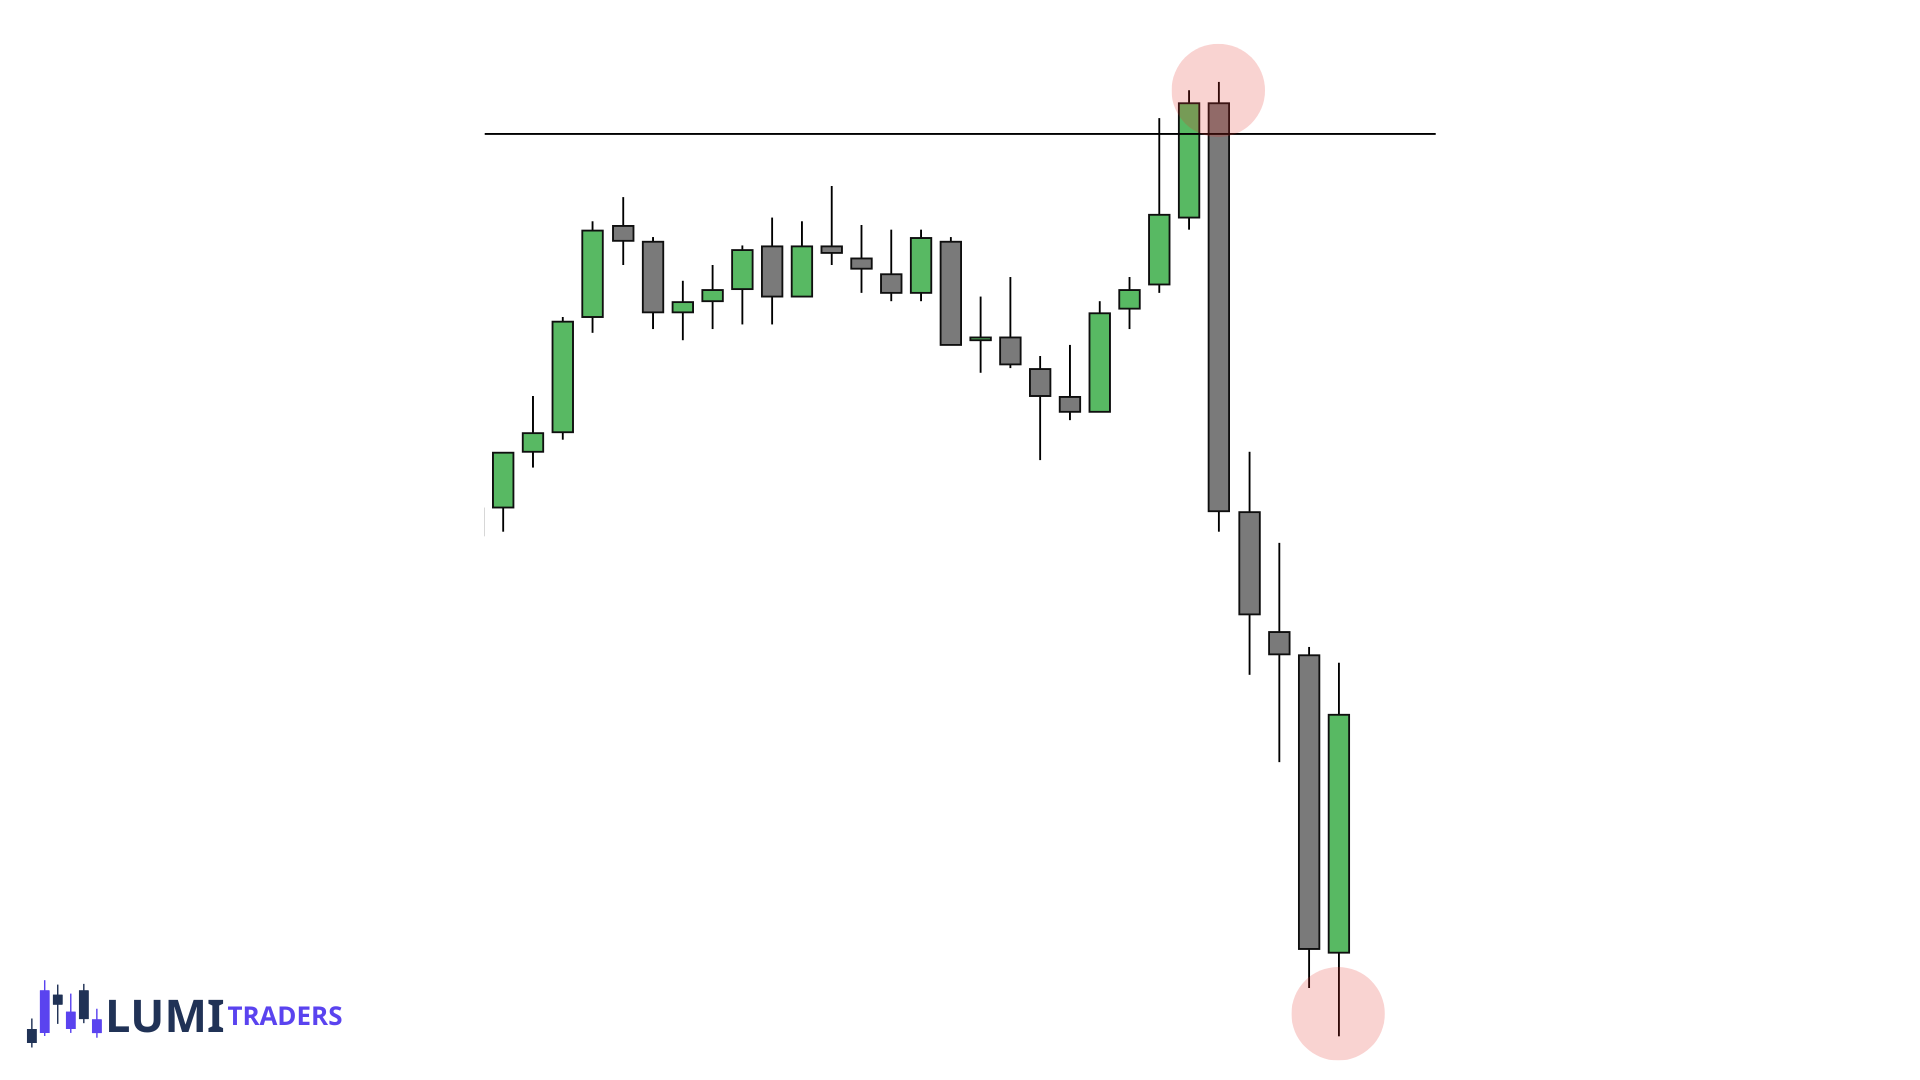
1. Identify a valid bullish/bearish impulse
Higher High / Lower Low + Higher Low / Lower High
Strong displacement up/down
Ideally breaks a prior high/low (liquidity taken)
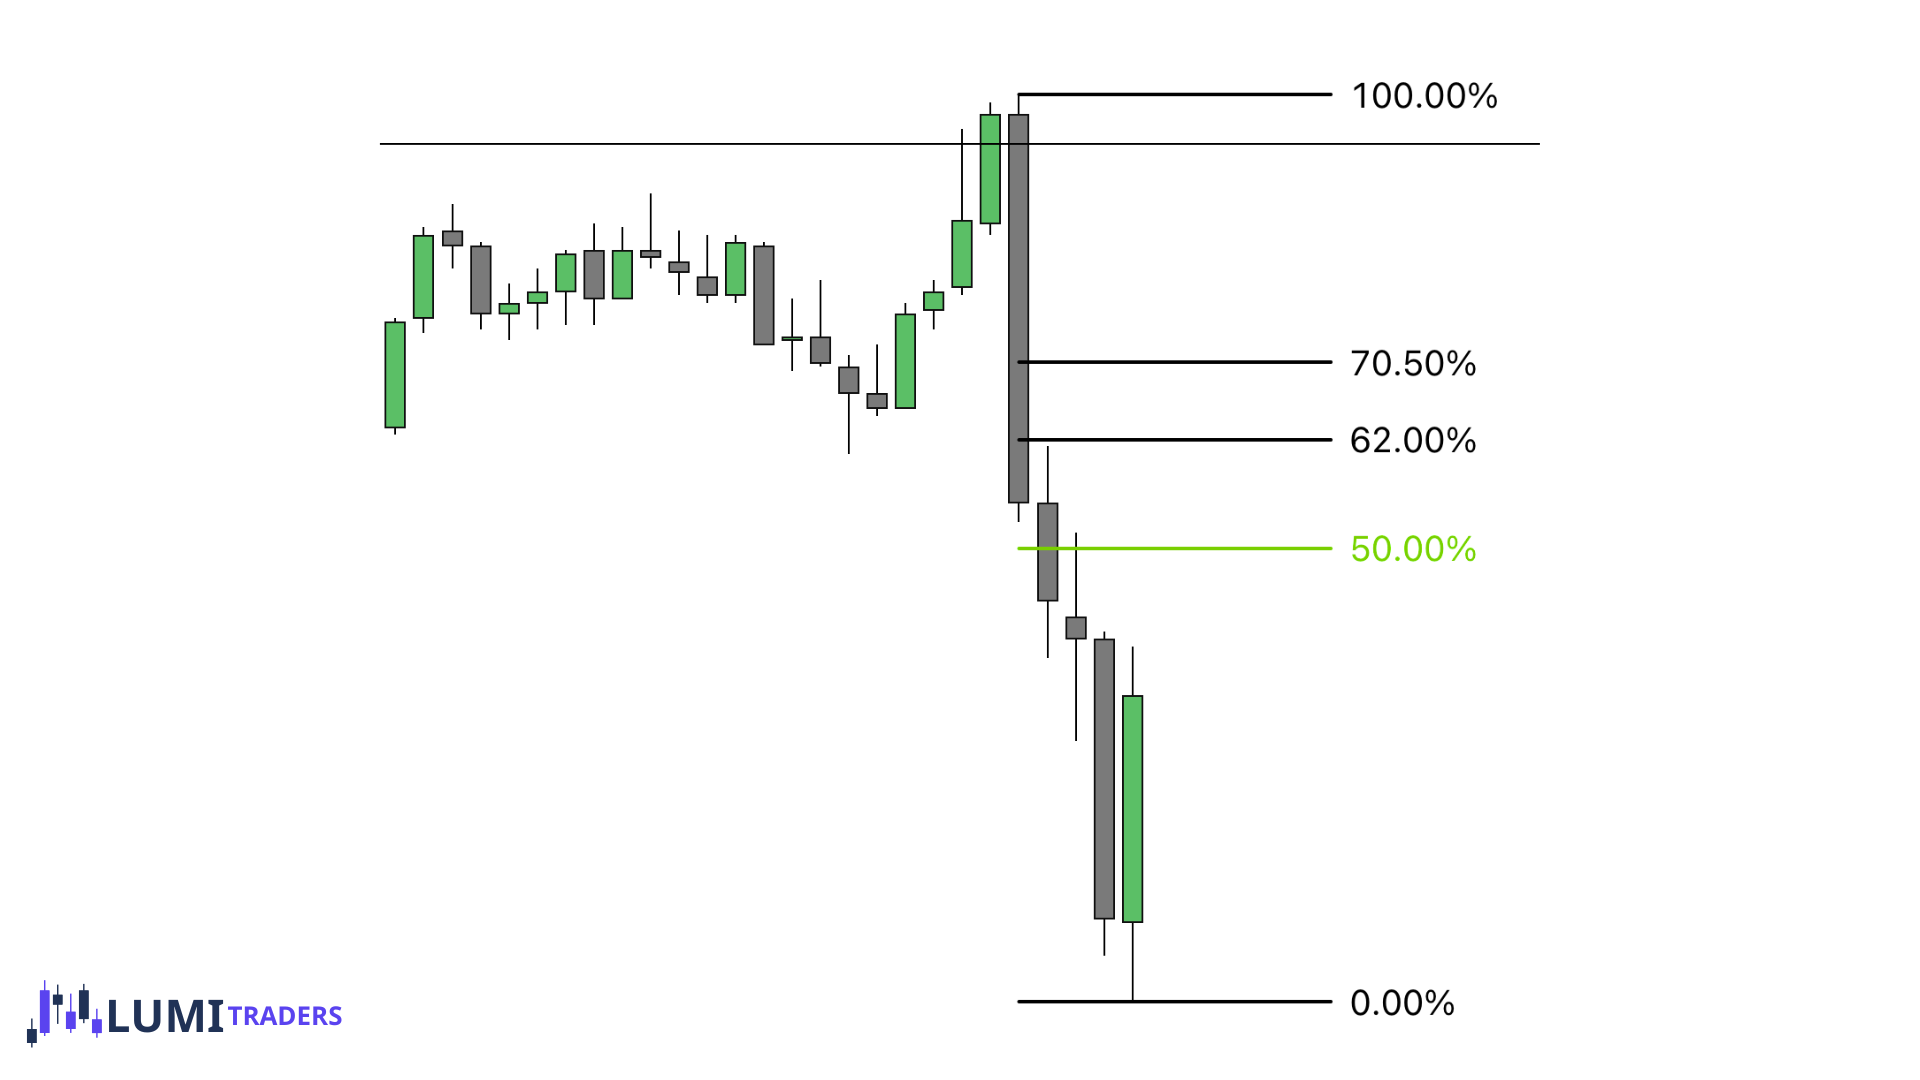
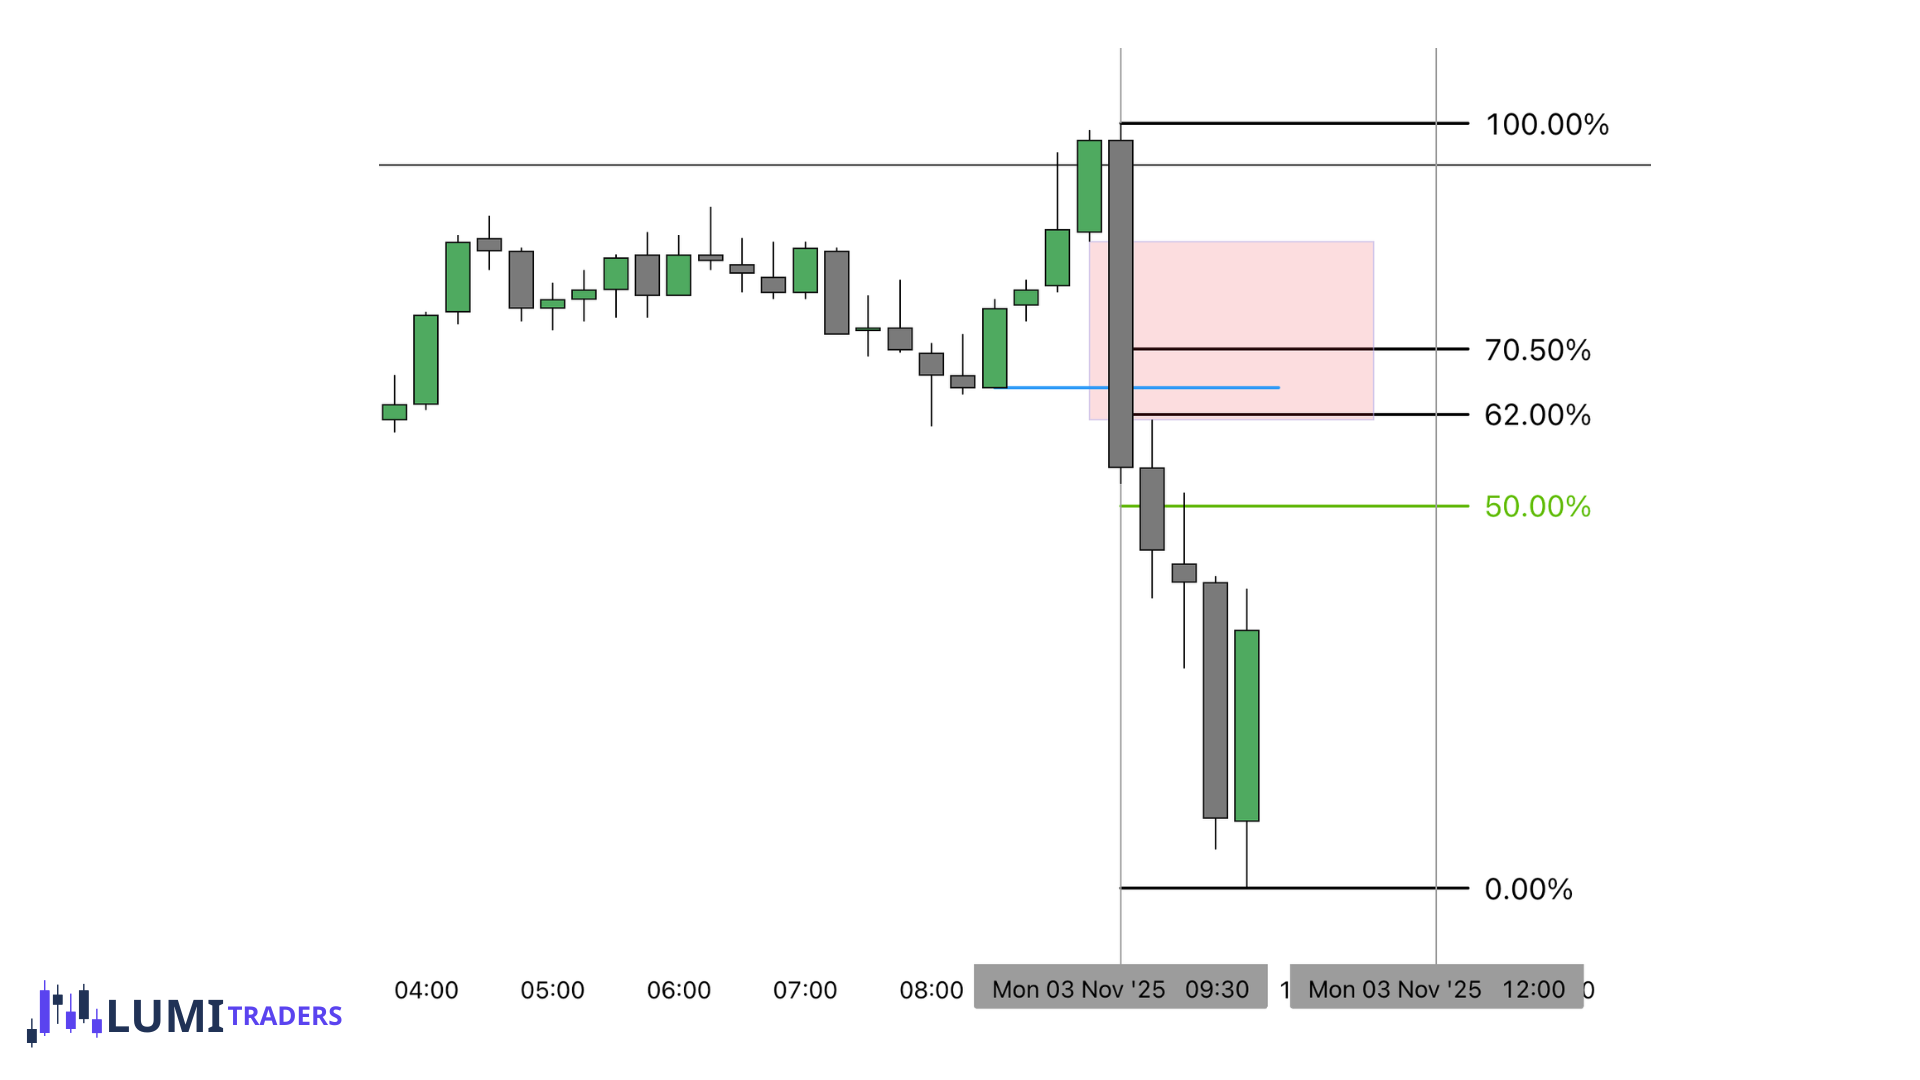
2. Draw Fibonacci
Swing low/high → swing high/low
Mark the OTE zone
62% – 70.5% (you can include 79%) retracement
3. Look for confluence
Price should tap OTE AND align with:
Fair Value Gap (FVG)
Order Block
Previous low/high
Session timing (London / NY)
4. Wait for entry confirmation
CISD
Market structure shift (LTF)
SMT divergence
Strong displacement candle
I personally use LTF IFVG or CISD for my entry after we got OTE retracement.
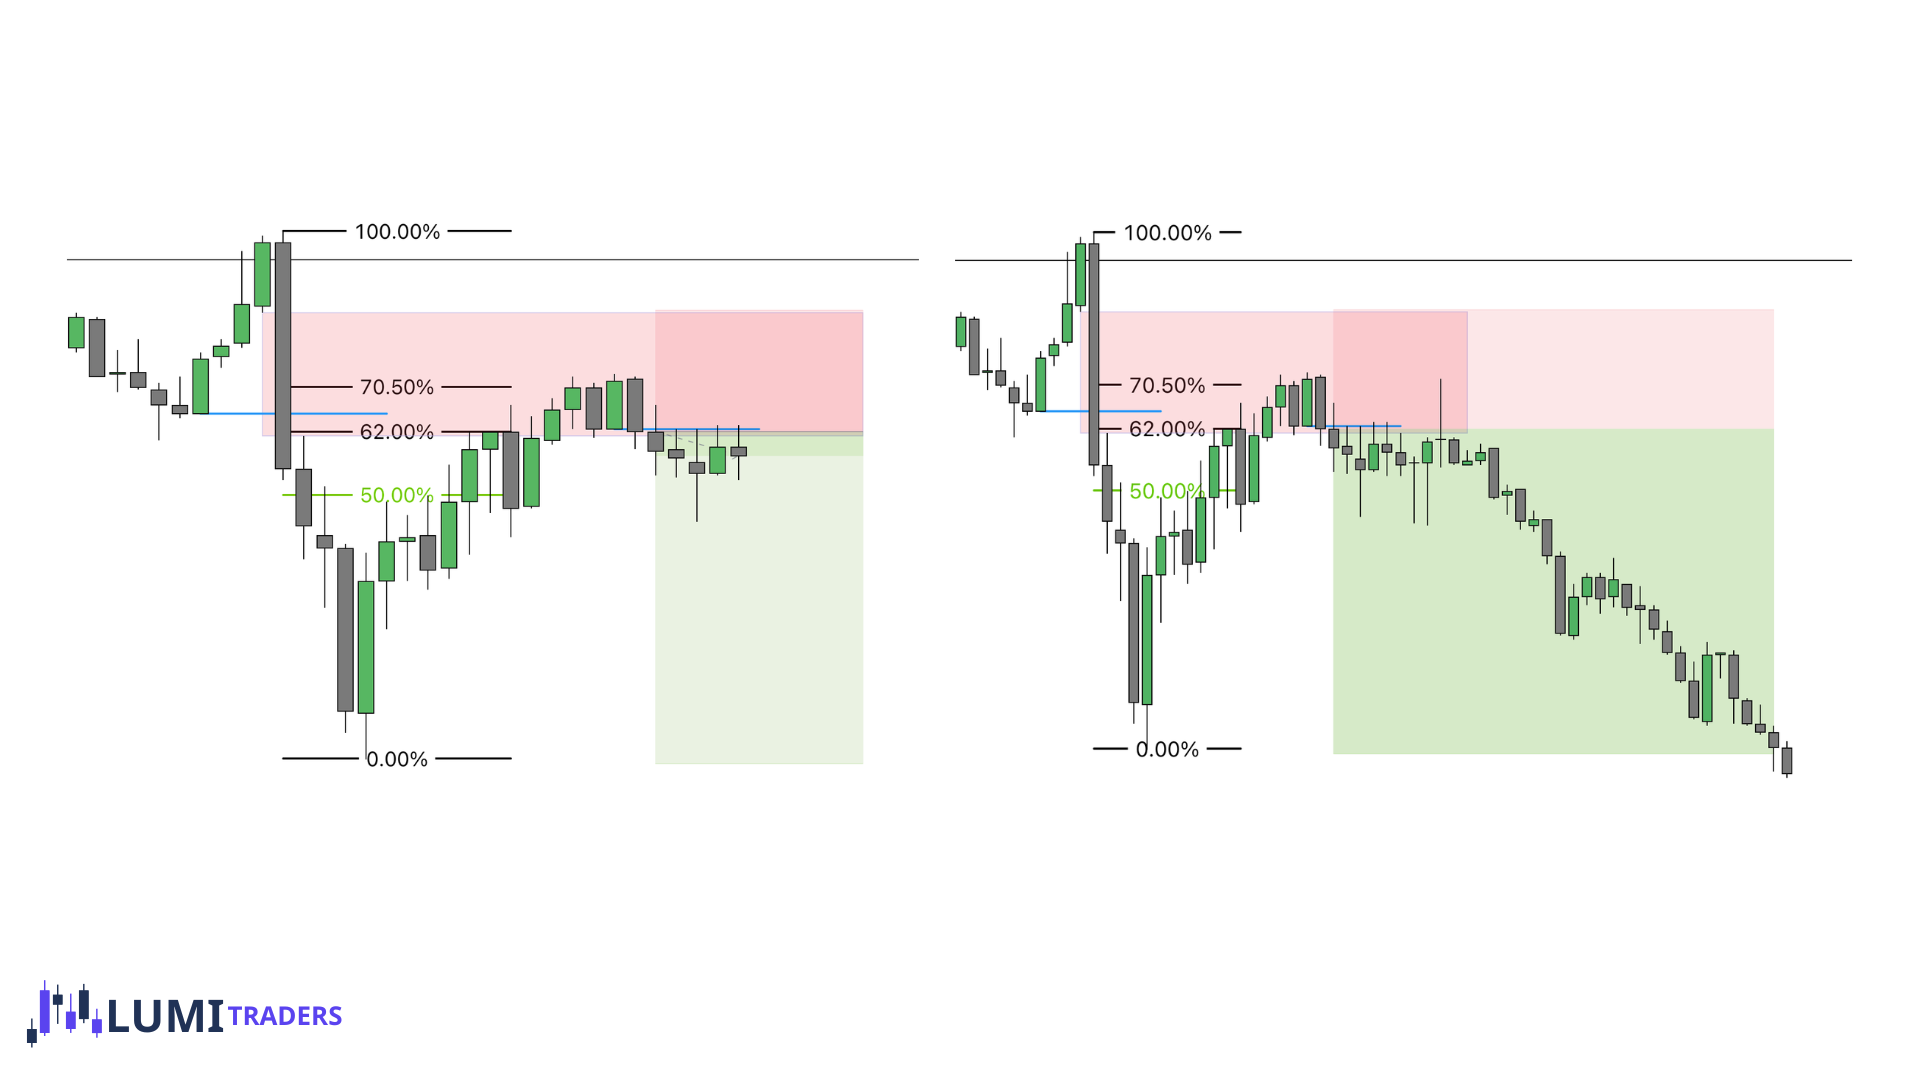
Target
You can aim BSL after we got a retracement or SSL after we got the retracement
You can aim for -50% (-0.5) extension
You can aim for STDV projections
Best Sessions for OTE Trades
OTE works best during high volume windows:
London Open
New York AM (9:30–11:00 ET) ← 🔥 best
NY PM continuation
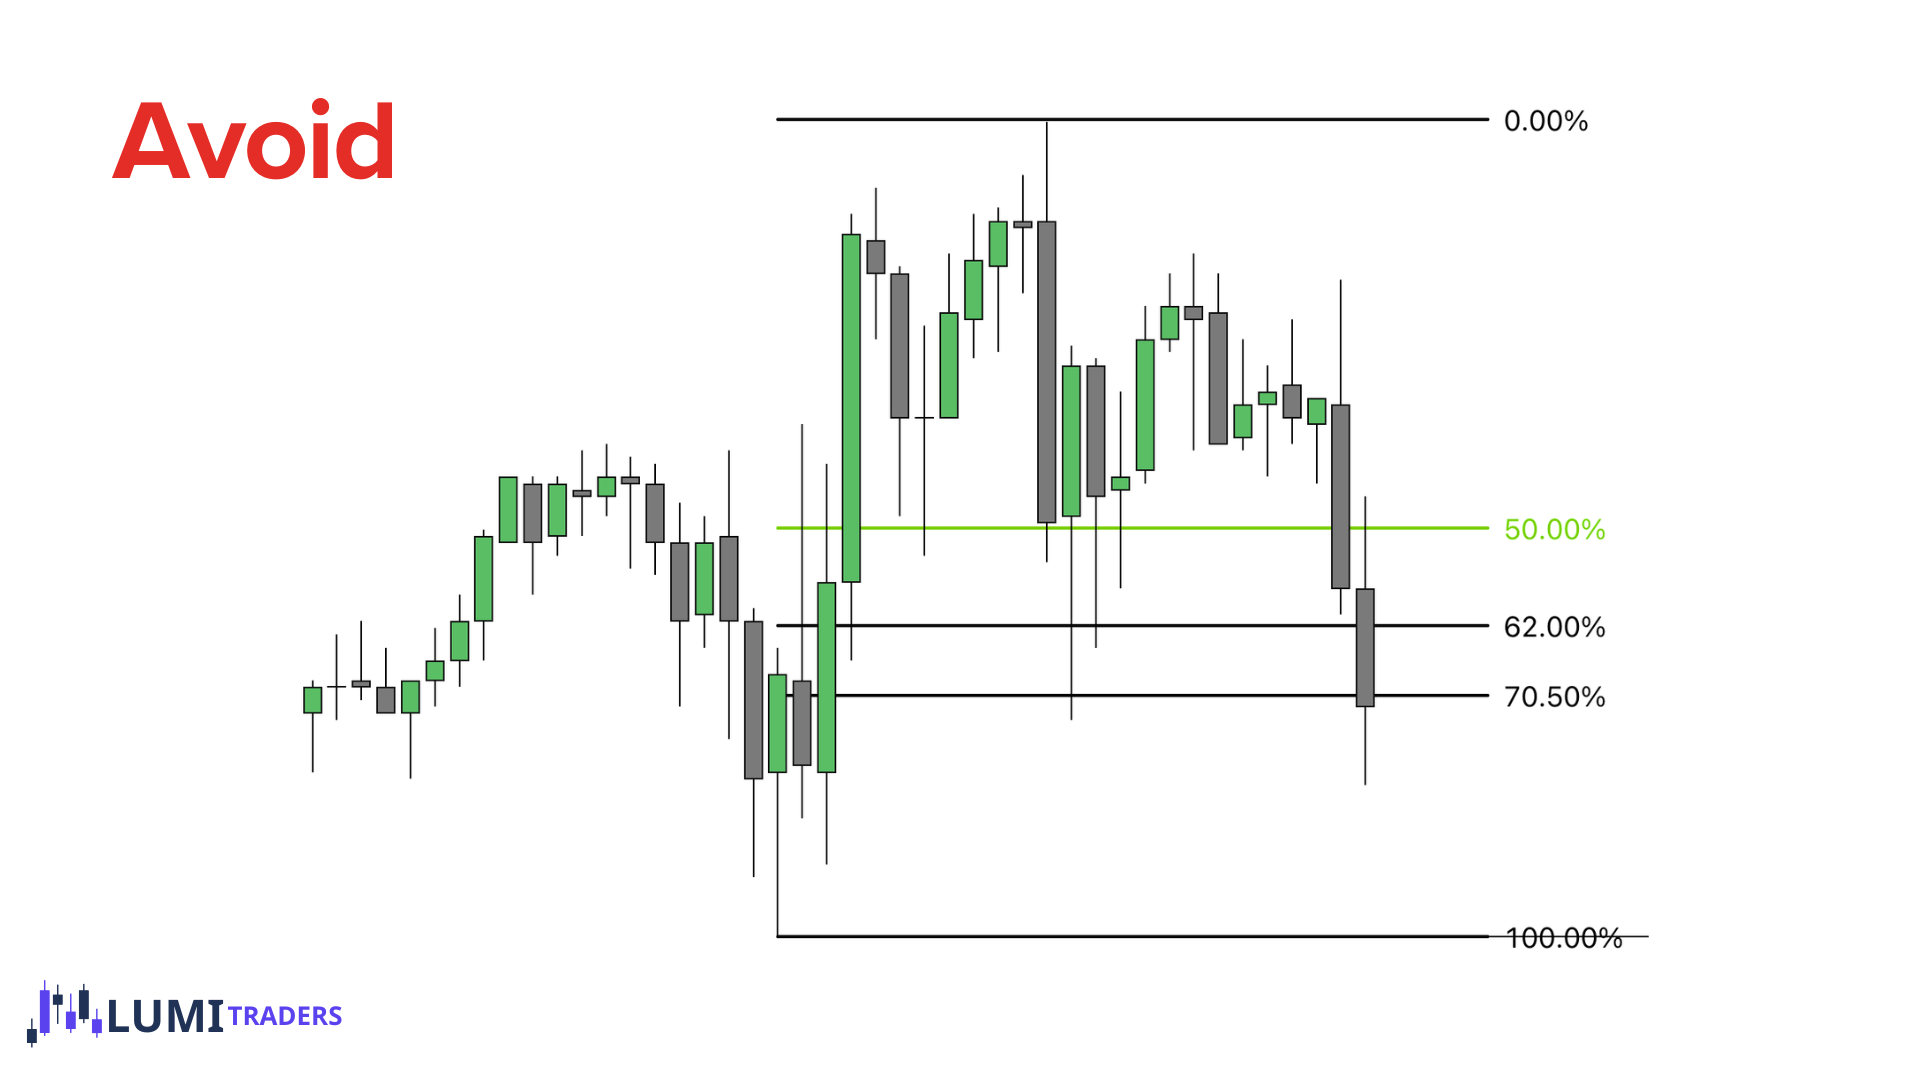
Avoid:
Asian range
Midday chop
How to Pick the Correct Swing for OTE
First: Understand the Purpose of the Swing.
OTE is not about finding any retracement. OTE is about finding where smart money re-enters AFTER manipulation.
That means:
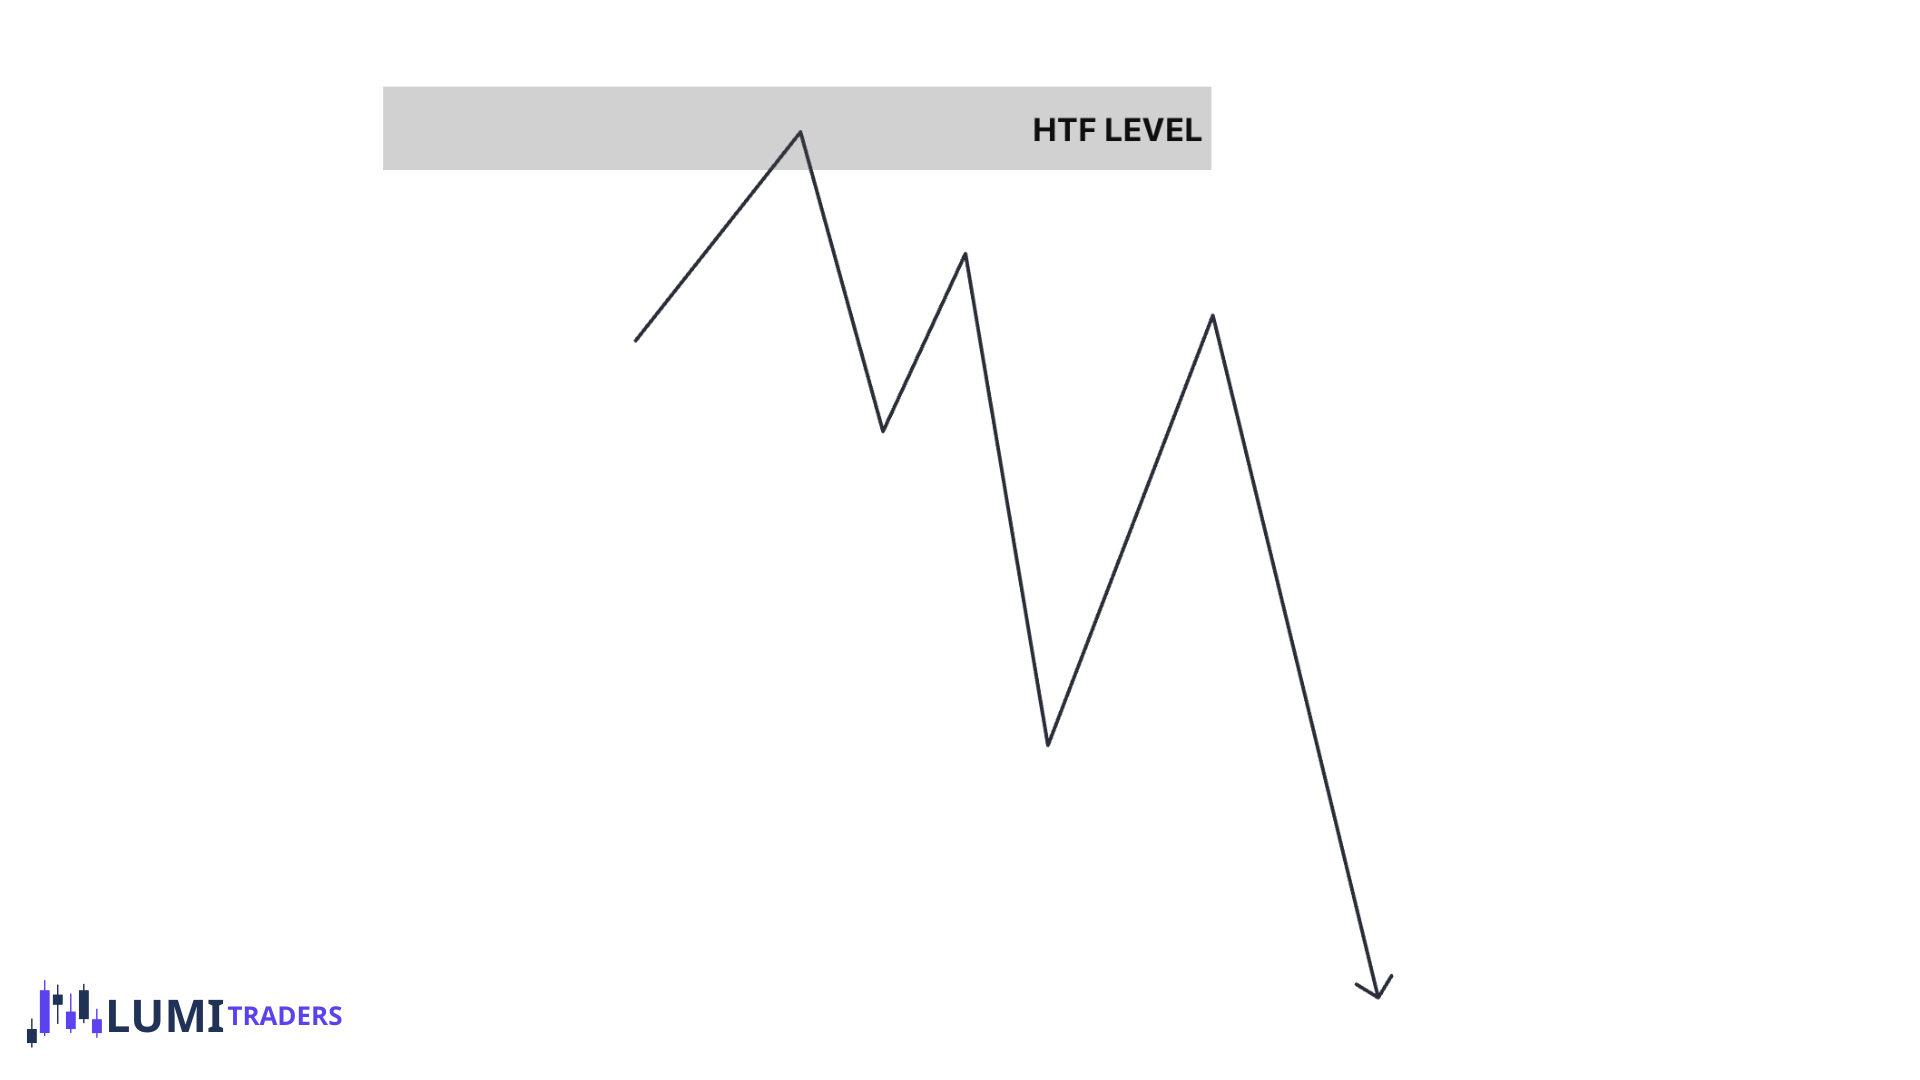
The swing you choose MUST represent displacement after liquidity/HTF level is taken.
If that’s not true — it’s the wrong swing.
Rule #1: Liquidity/HTF level Comes First
Before you even touch Fibonacci, ask:
Did price take liquidity?
Previous high or low, Equal highs or lows, Asia high / low, Prior session high / low, etc.
If NO liquidity/HTF level was taken → Do not draw fib
Rule #2: Use the Displacement Leg (Not Random Candles)
What Is the Correct Swing?
The correct swing is:
The impulsive move
The move that breaks structure
The move that follows the liquidity raid
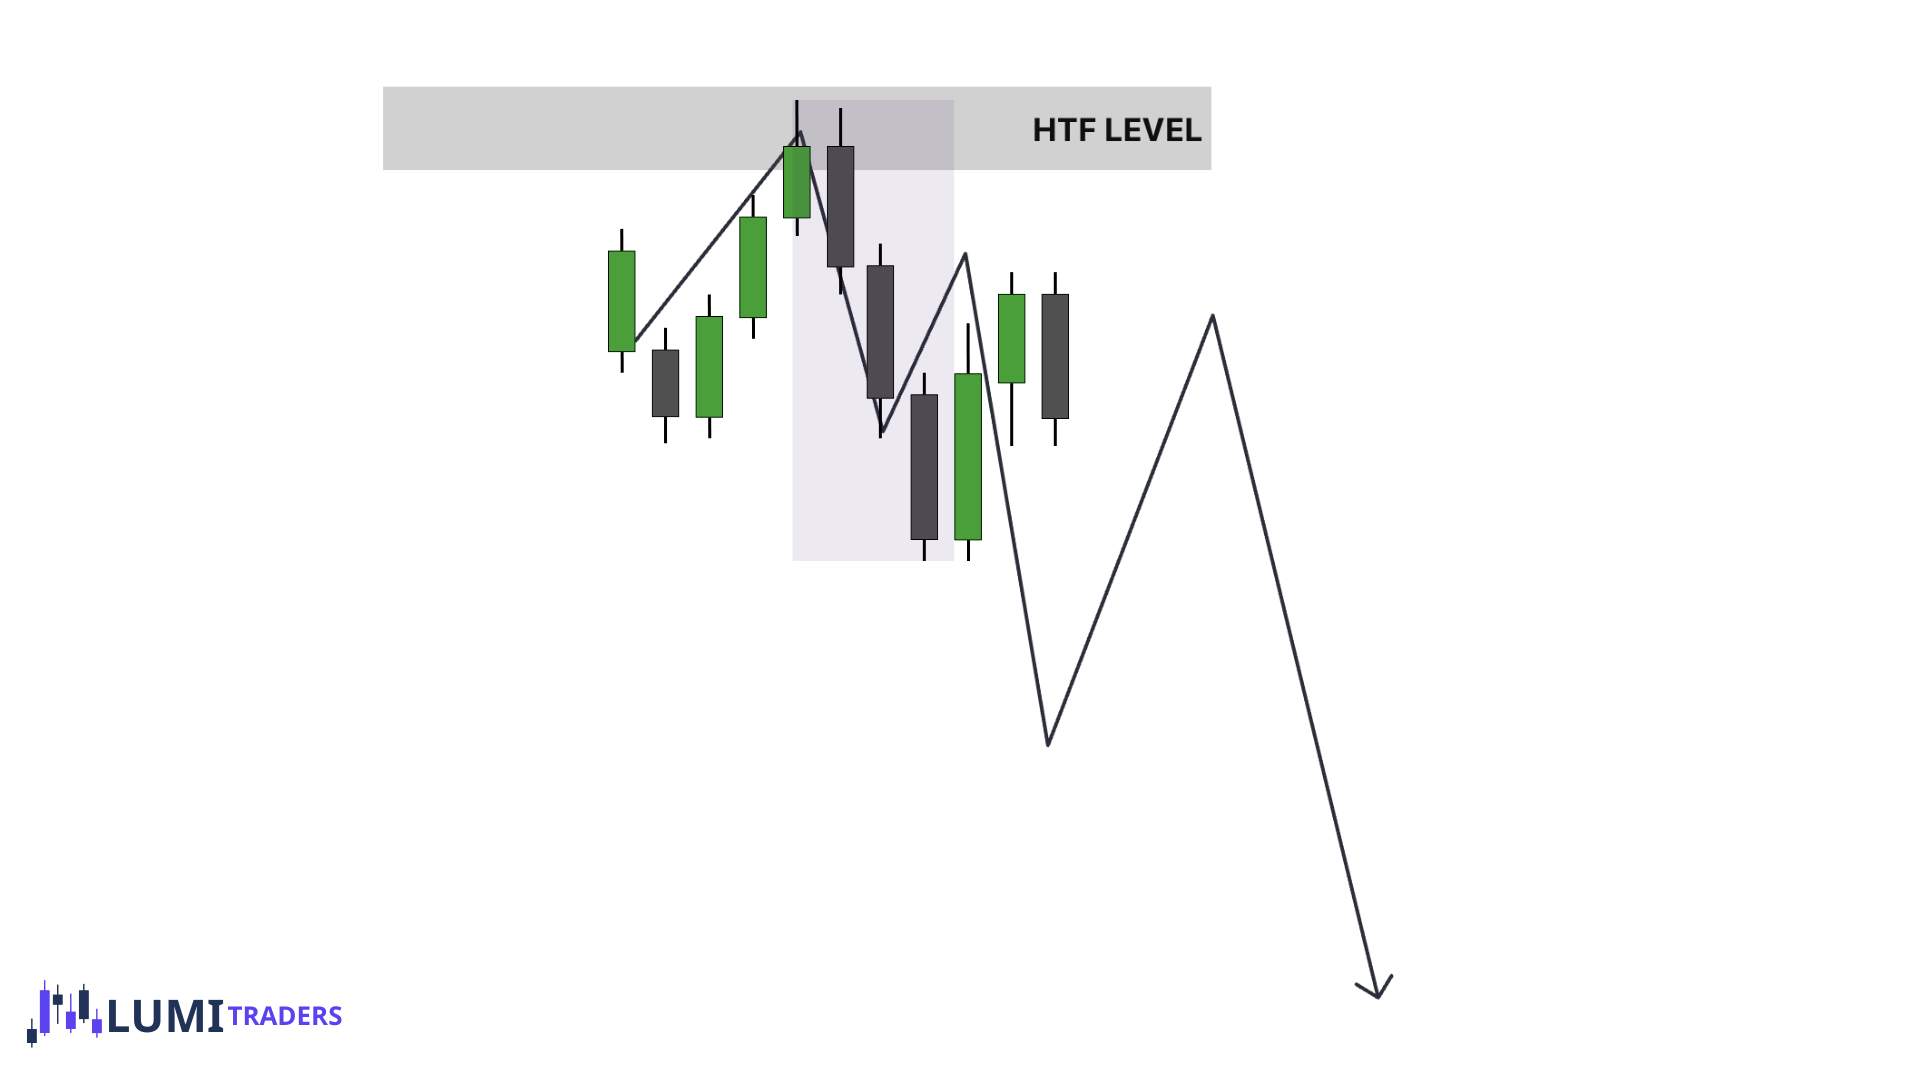
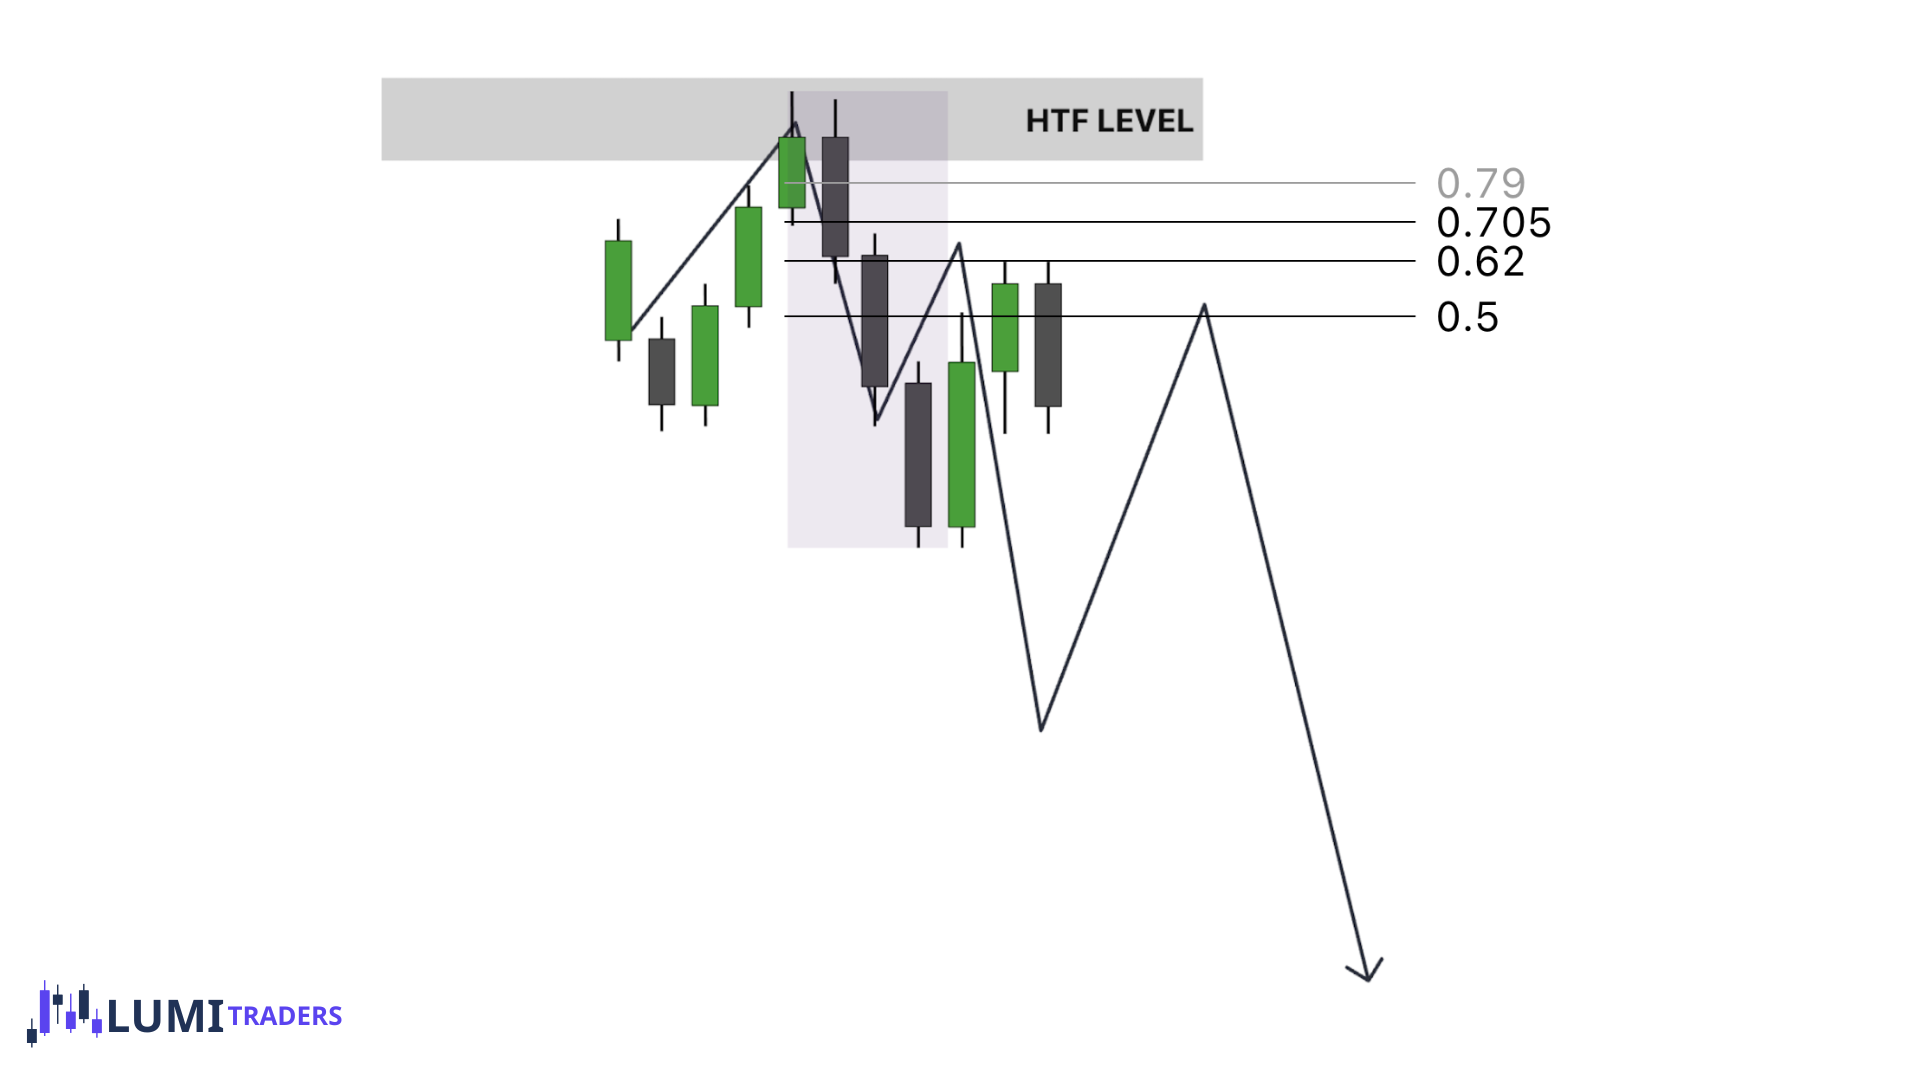
Rule #3: The Swing Must Create Market Structure Shift
Key Concept : A valid swing changes the narrative.
Ask:
Did this move create a higher high (bullish)?
Did this move create a lower low (bearish)?
If price just moved but:
Didn’t break anything
Didn’t change structure
That swing is invalid for OTE.
Rule #4: Higher Timeframe Defines the Swing
This Is Critical. The swing must align with HTF bias.
Common OTE Mistakes
Drawing fib on wrong swing
Ignoring HTF bias
No liquidity taken
Entering without confirmation
Trading OTE in chop
Using it outside killzones
OTE Break
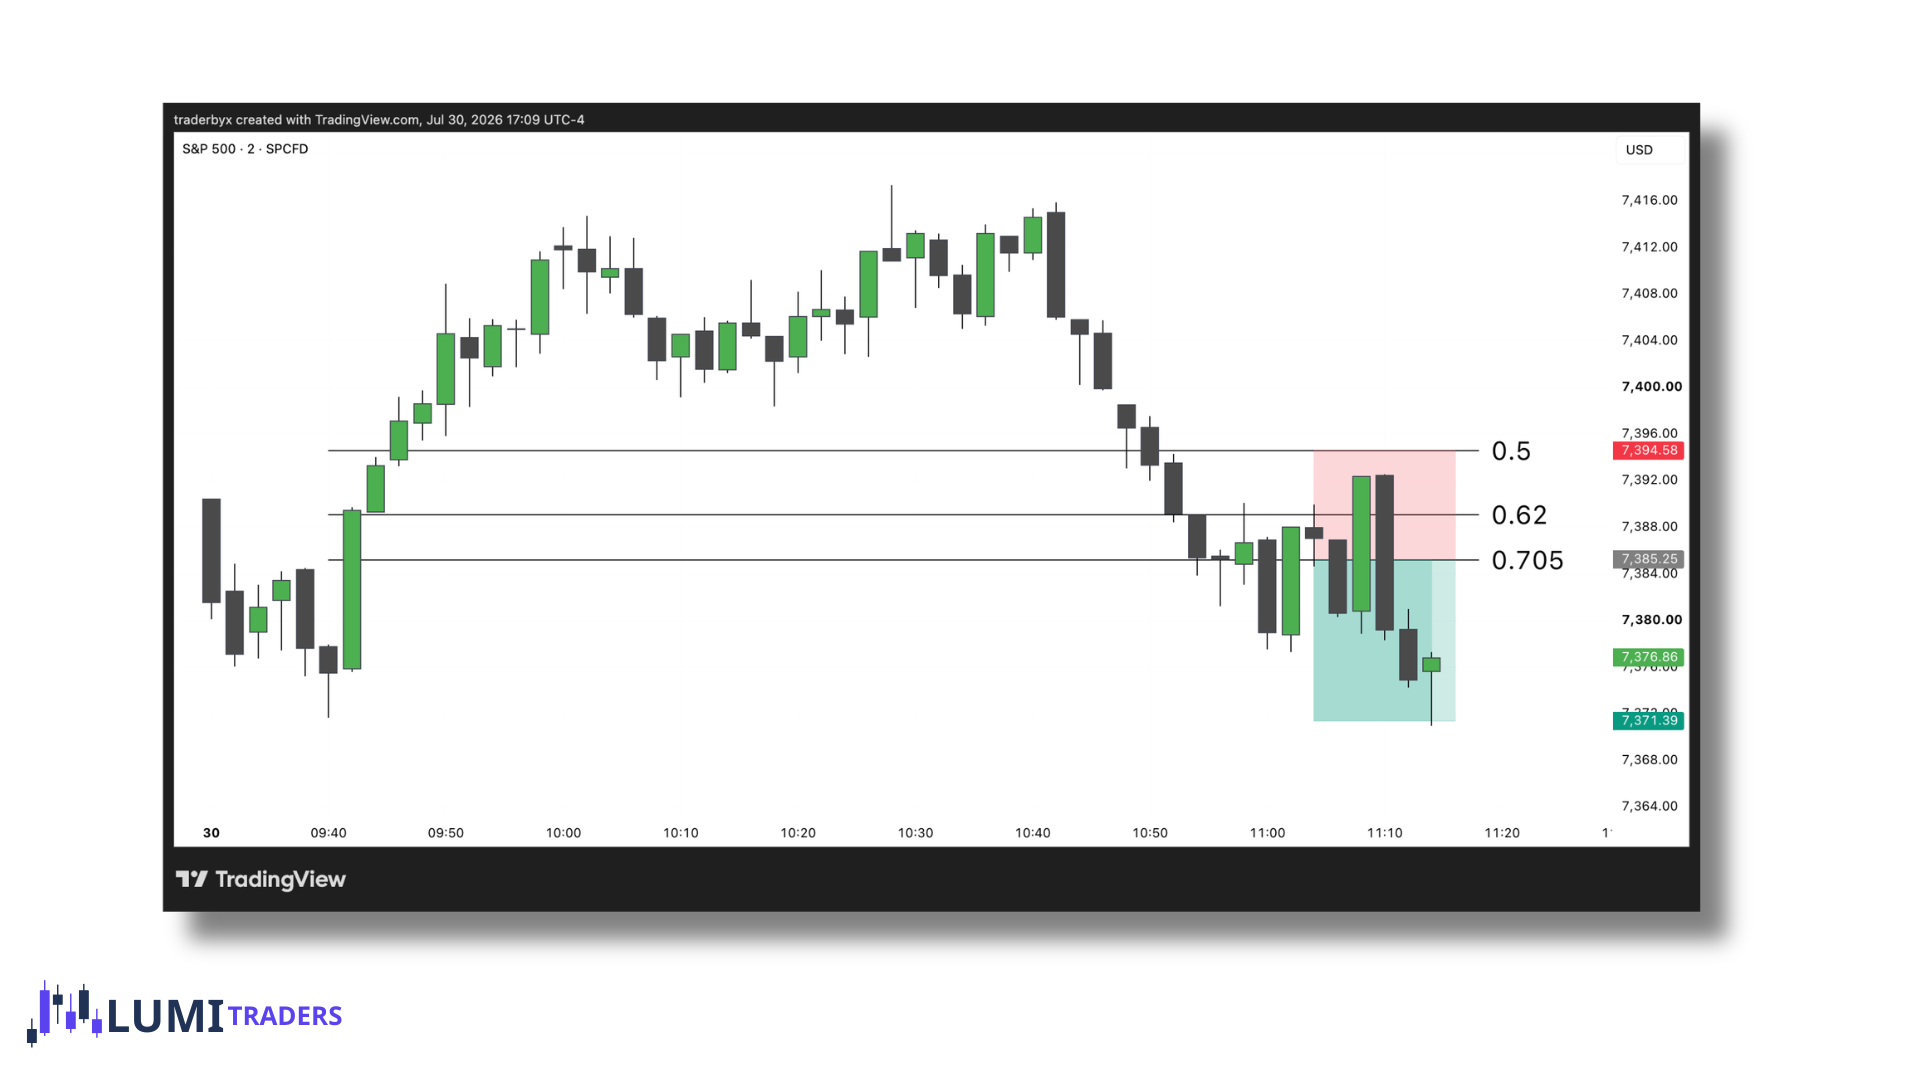
If 70.5% broken, there is a big chance to make a new high/low after this!
Once OTE broken (70.5%), we want to see 50% keeps holding and if price respects 70.5% level with CISD on LTF, I want to start looking for entry to aim for new high/low with stop at 50% of our OTE.
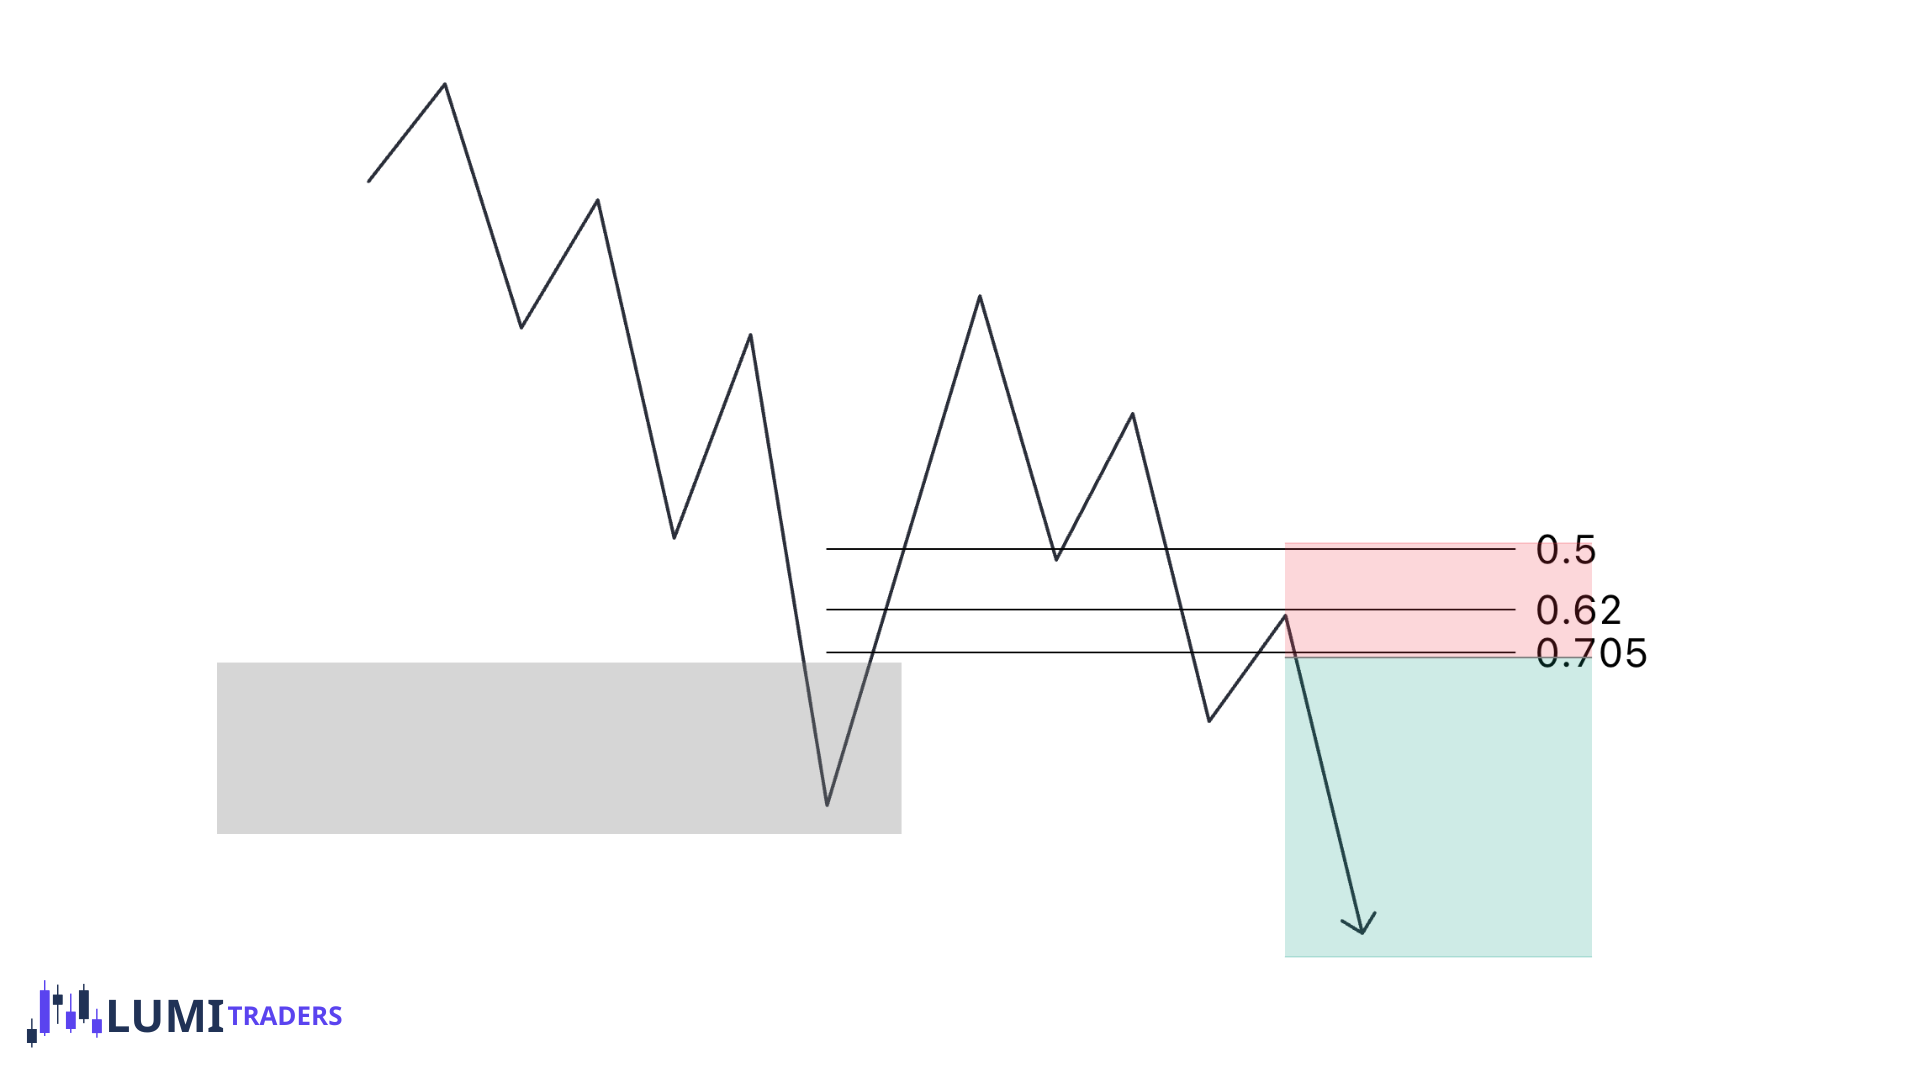
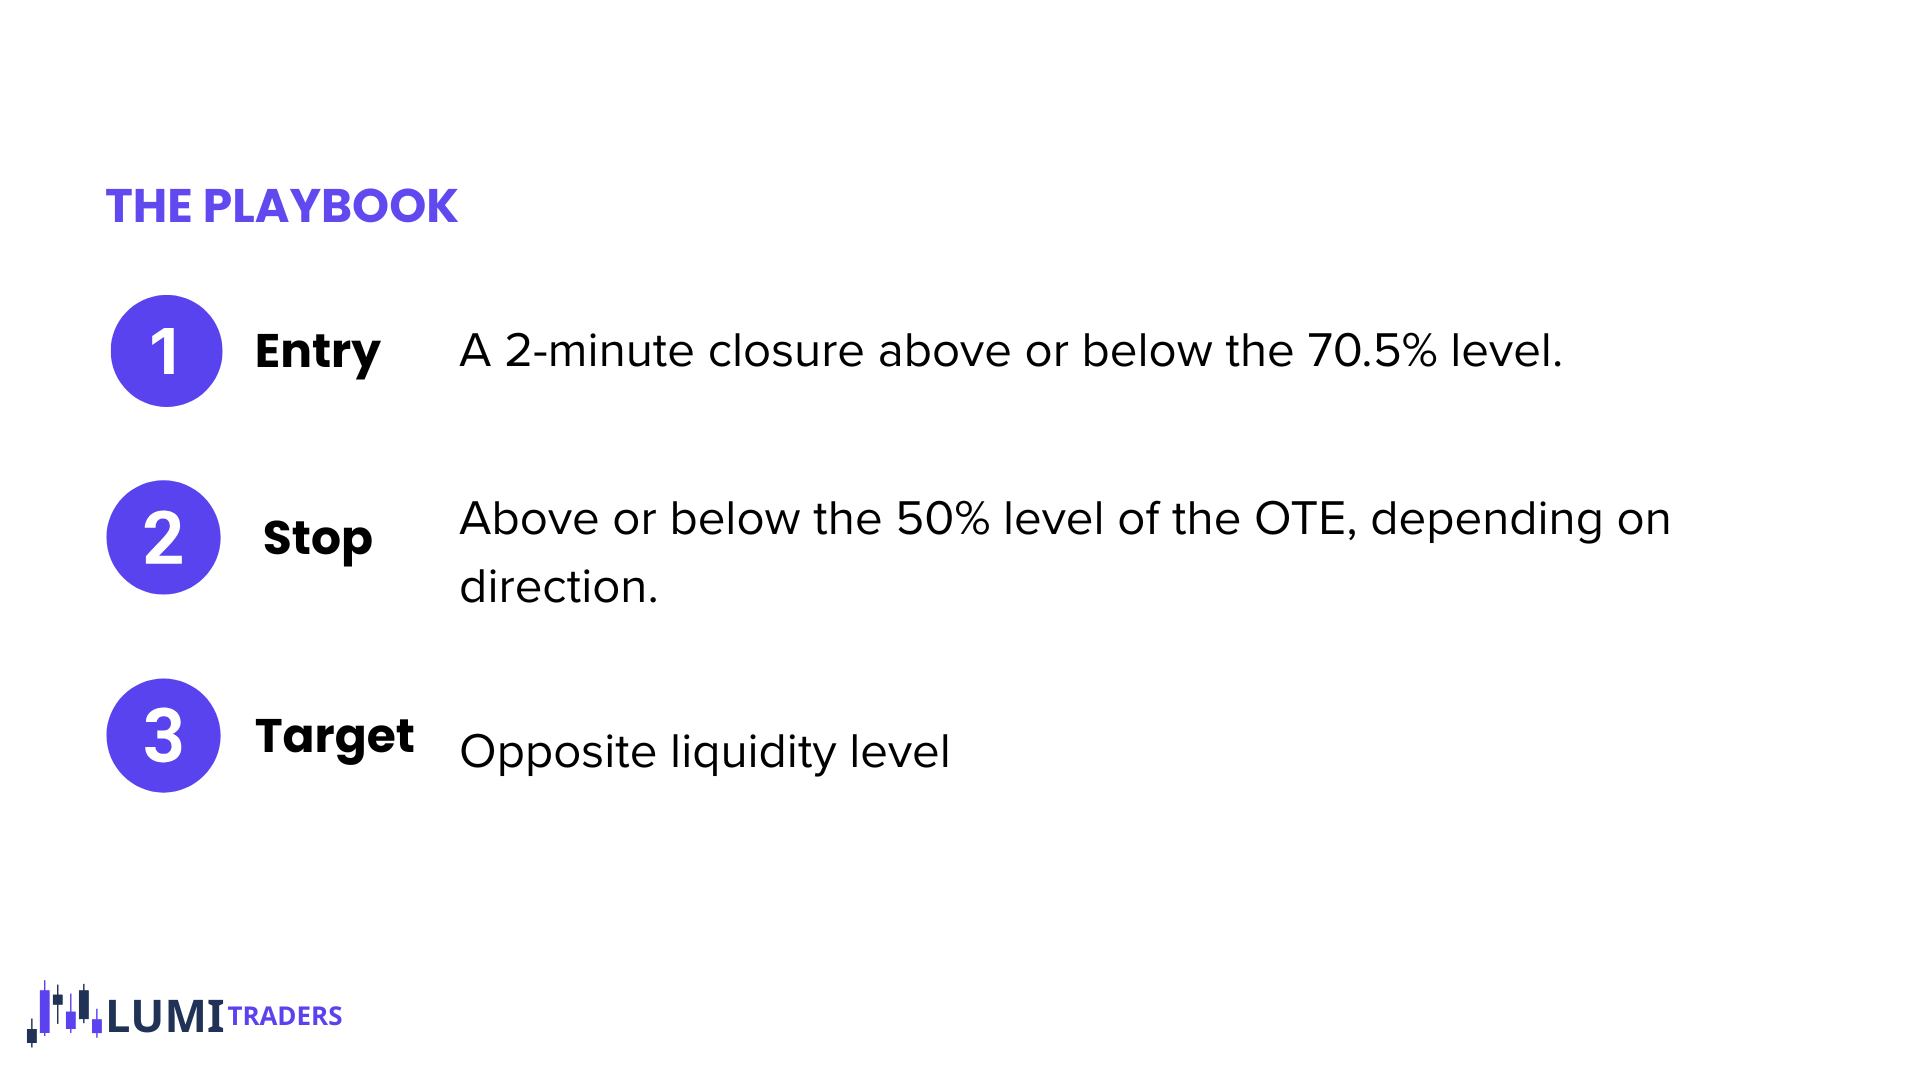
OTE of HTF Wicks
The Wick Is the Manipulation Zone. The Close Tells You If It Was Rejected.
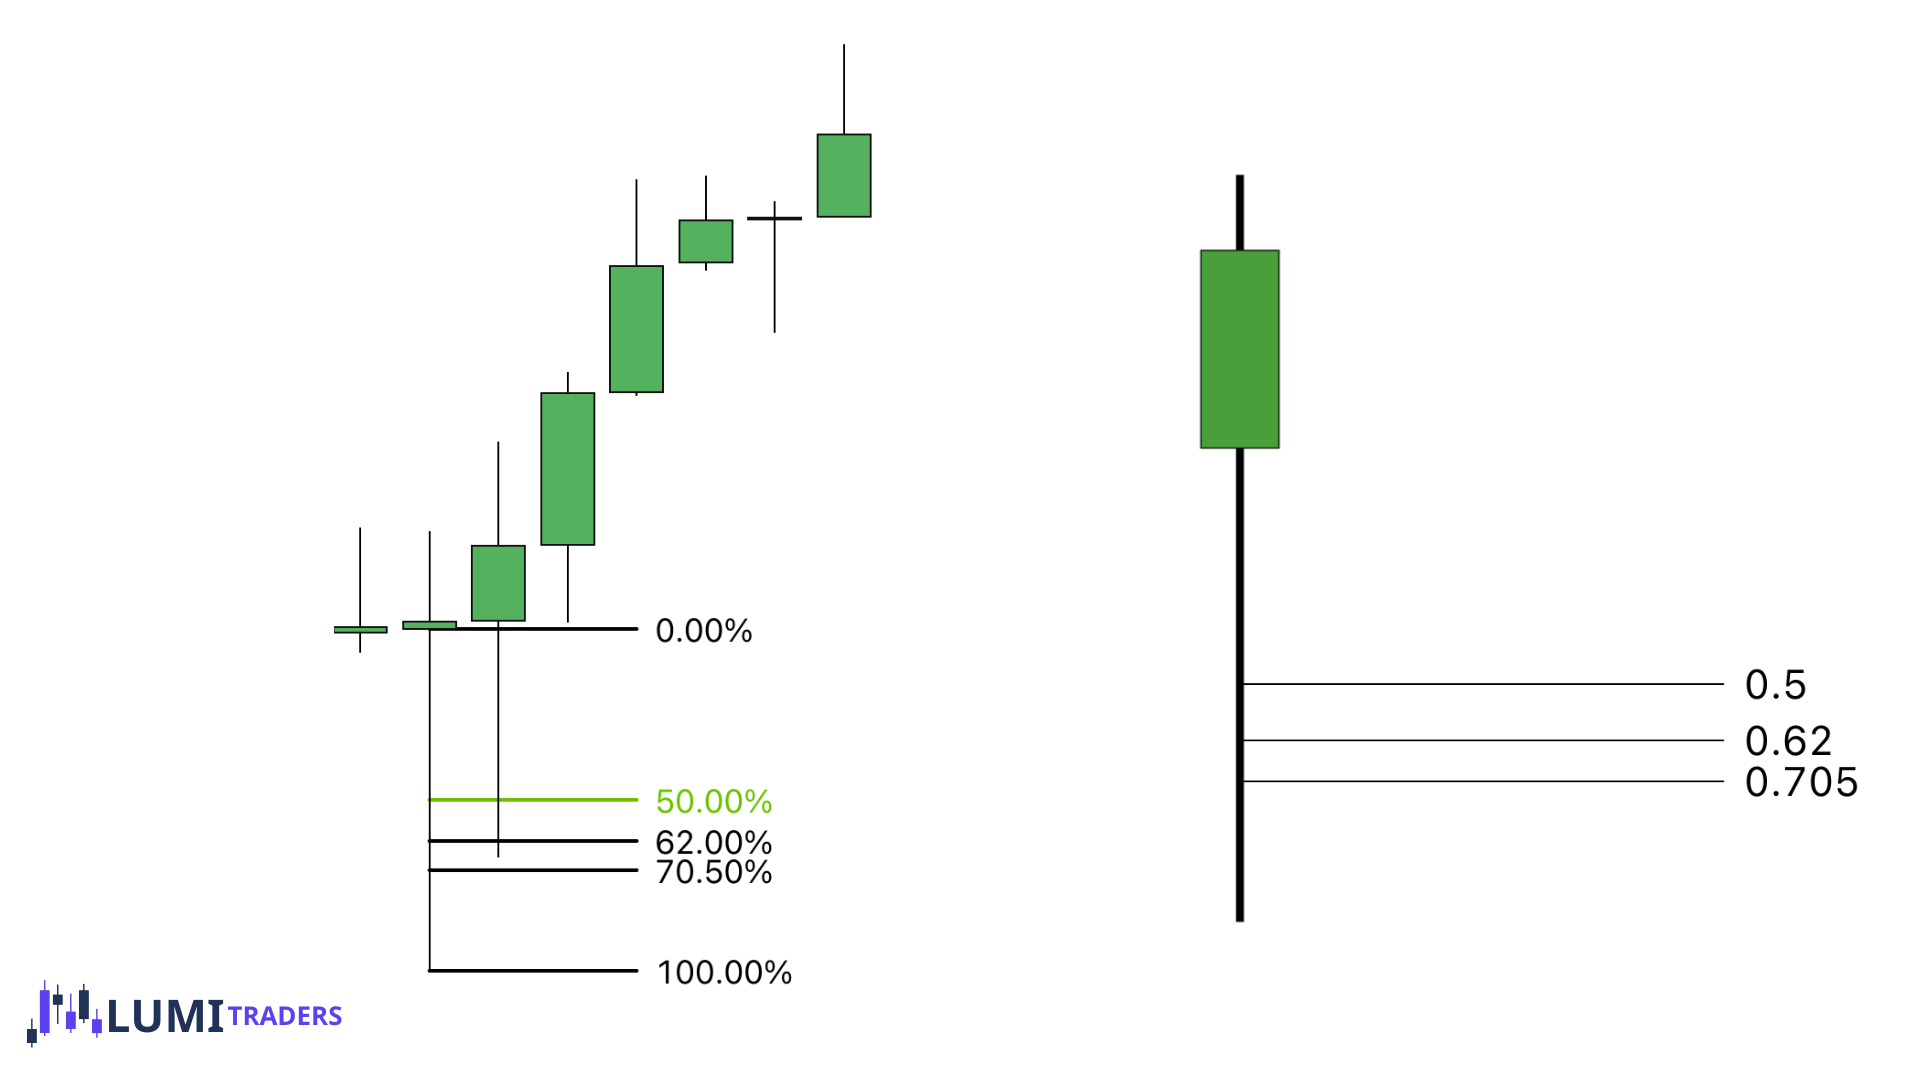
When wick-based OTE is valid (and when it’s not)
Valid (use wick OTE) when:
Wick is on HTF (at least M15; best is 1H/4H)
Wick is obvious (stands out vs previous candles)
It occurs at liquidity (equal highs/lows, old swing points, PDA)
Ideally aligns with HTF context
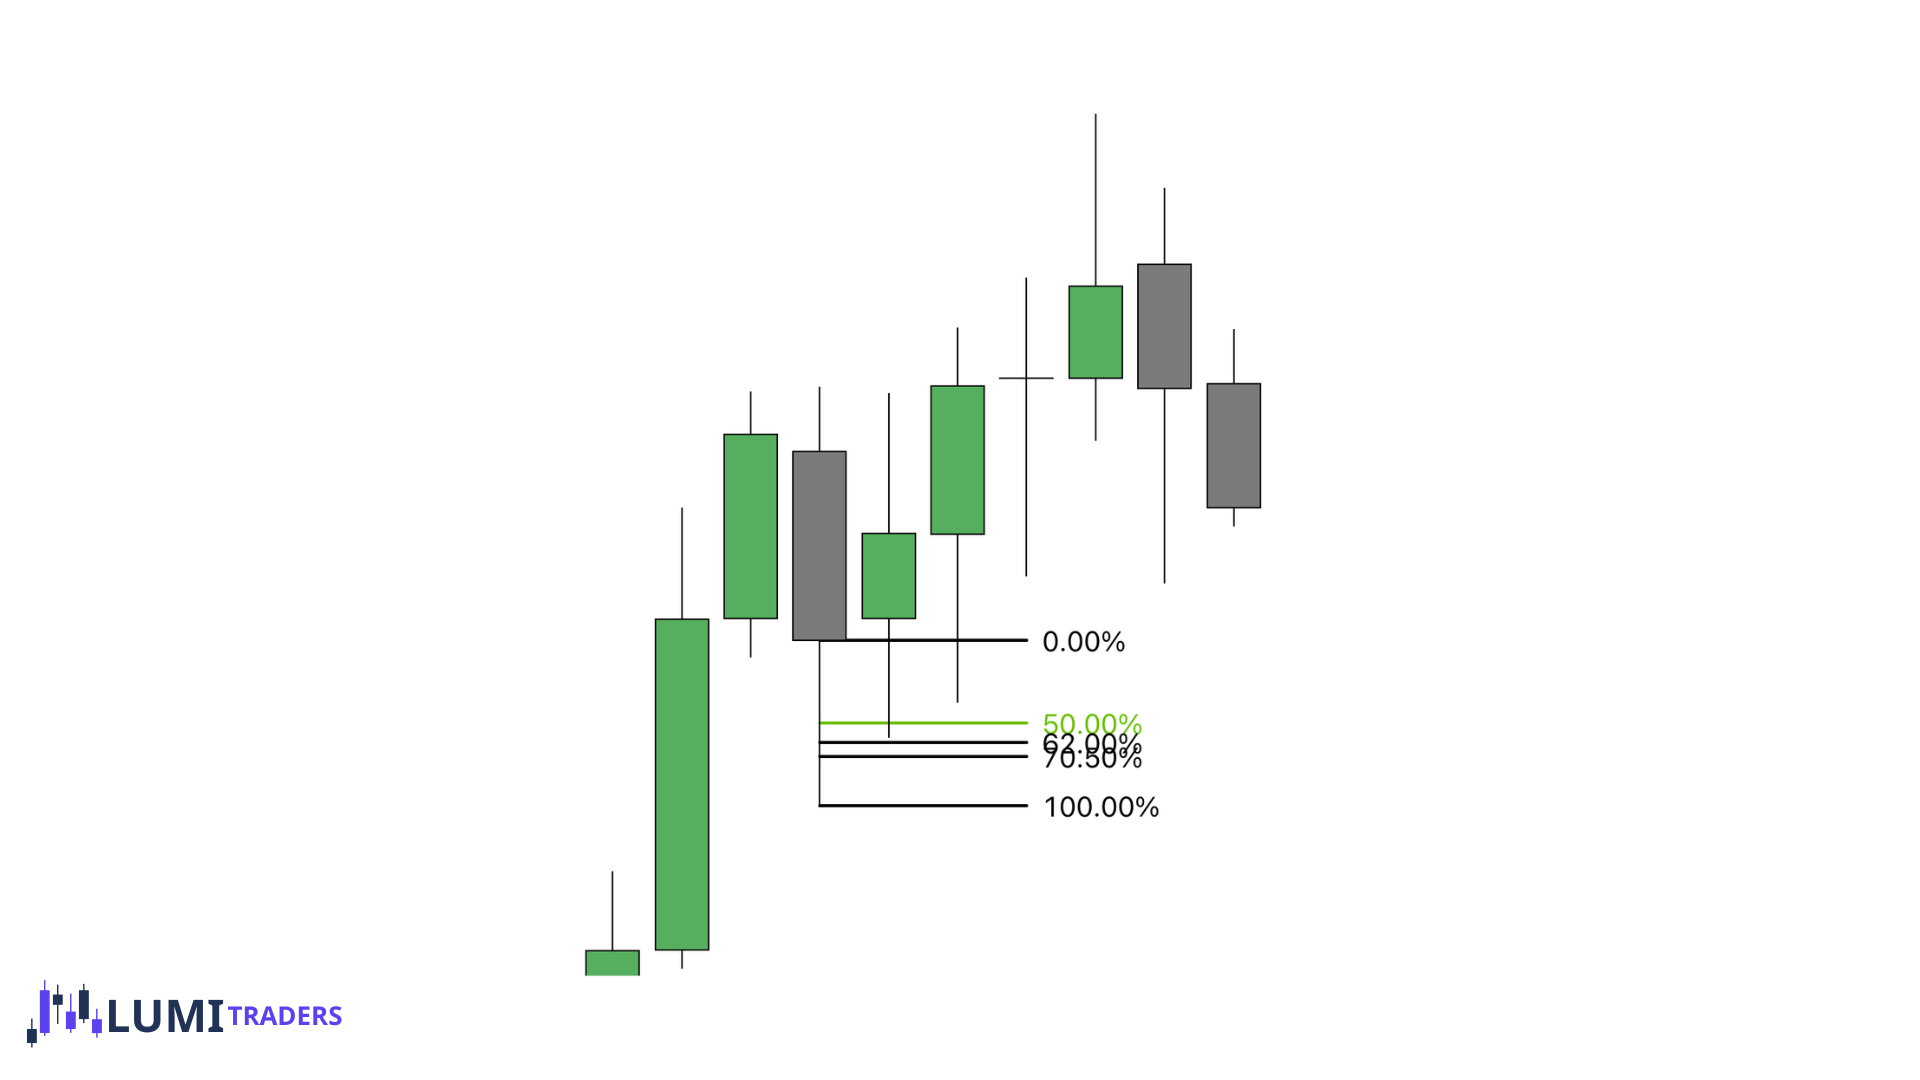
When wick-based OTE is valid (and when it’s not)
Not valid (skip it) when:
Wick is small / normal noise
No clear liquidity was taken
Market is dead hours / no volatility (often produces fake wicks)
You’re forcing it against strong HTF trend without a reason
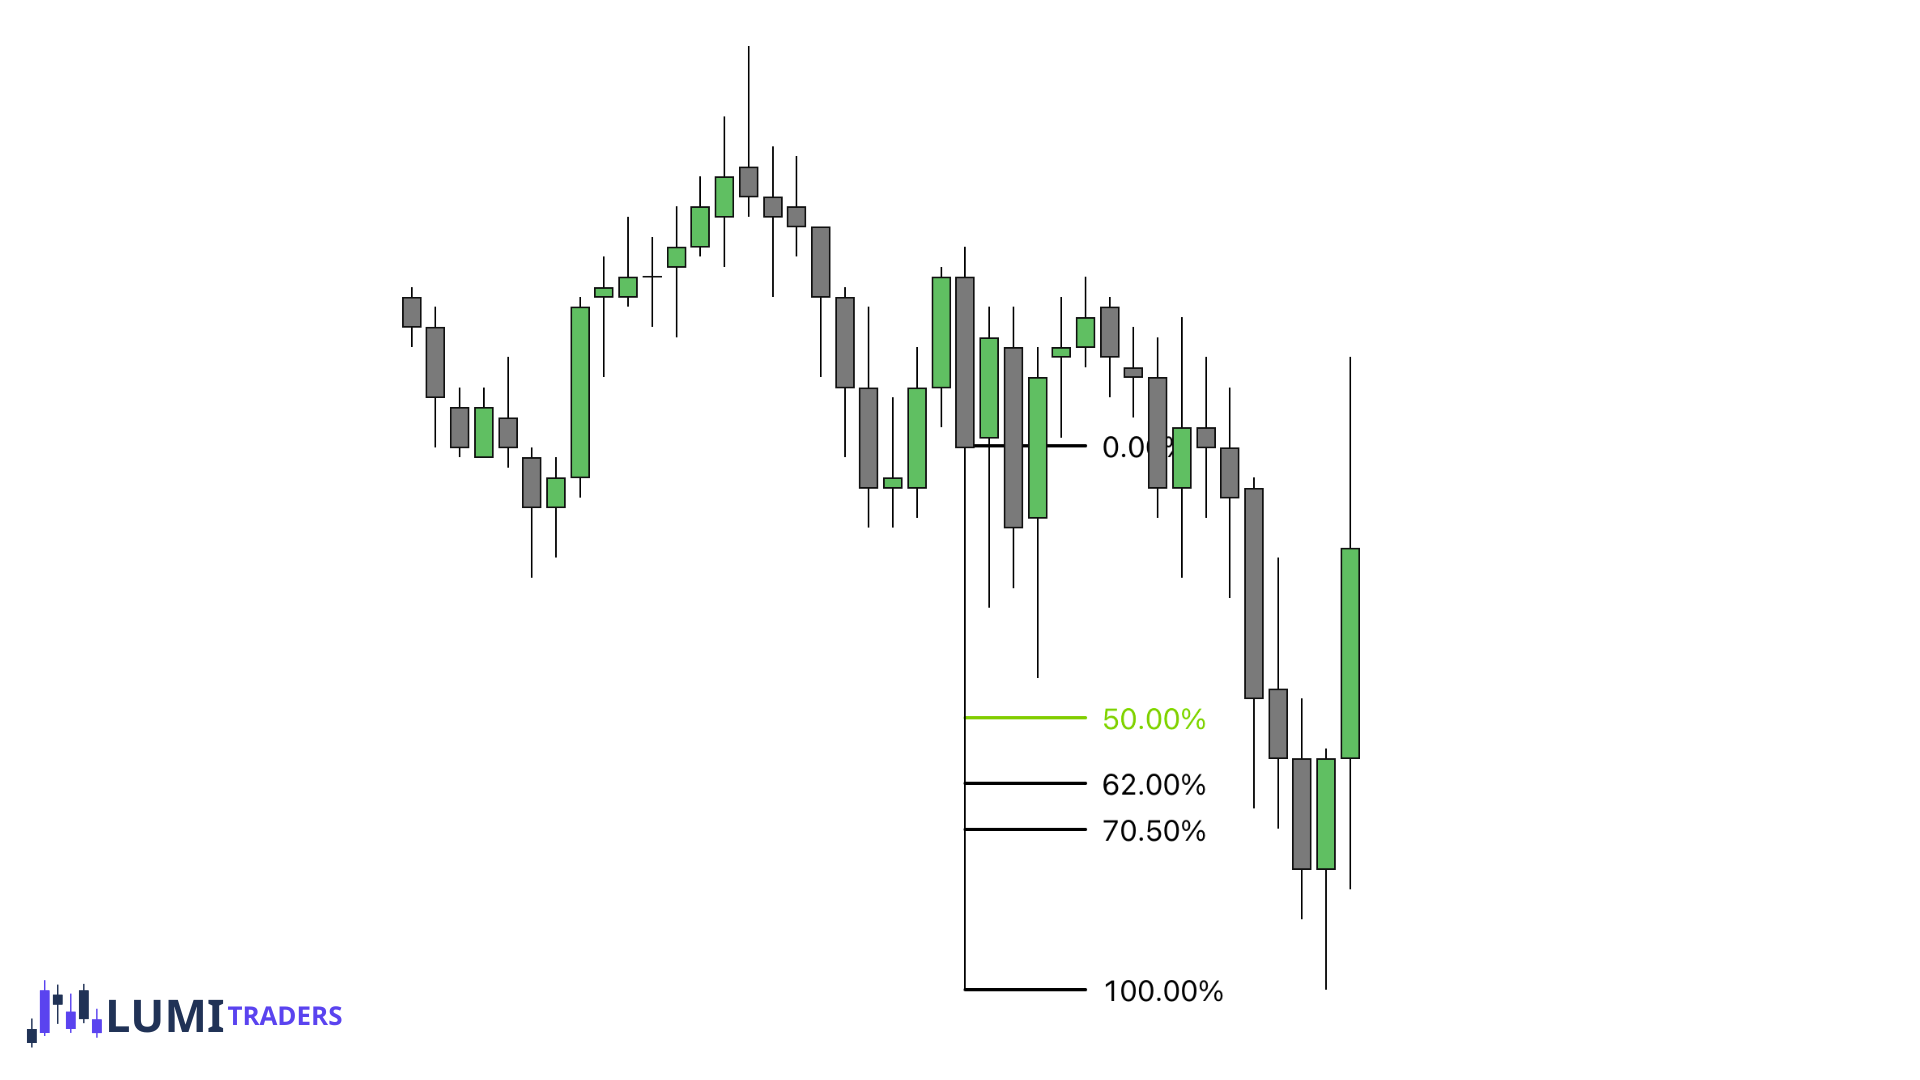
A standard OTE helps you enter and follow the move, while a Wick OTE helps you identify the area where price is likely to reject.
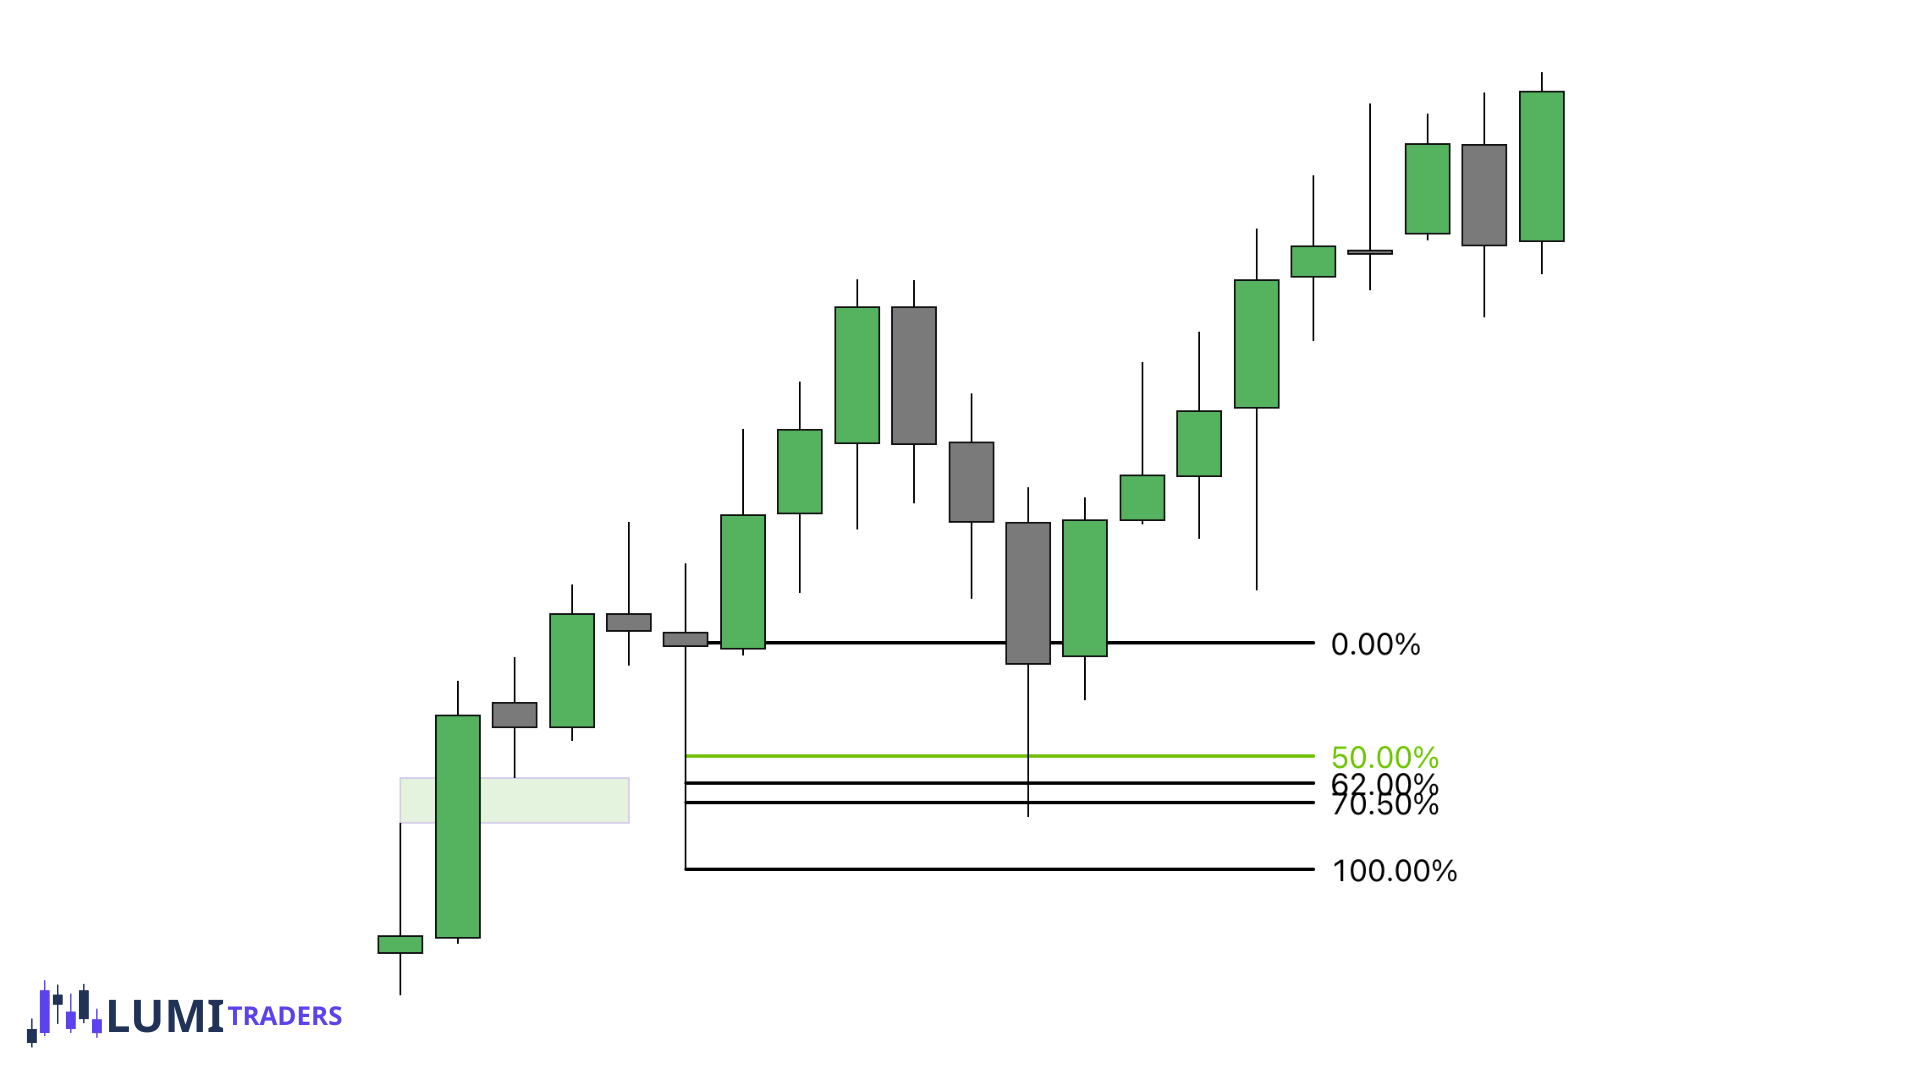
Wick OTE Is NOT a Signal — It’s Context
Wick OTE defines a zone of interest, not an entry.
You must wait for:
Lower timeframe market structure shift
Displacement away from the wick
CISD or FVG reactions (normally on M3 or M5 charts)
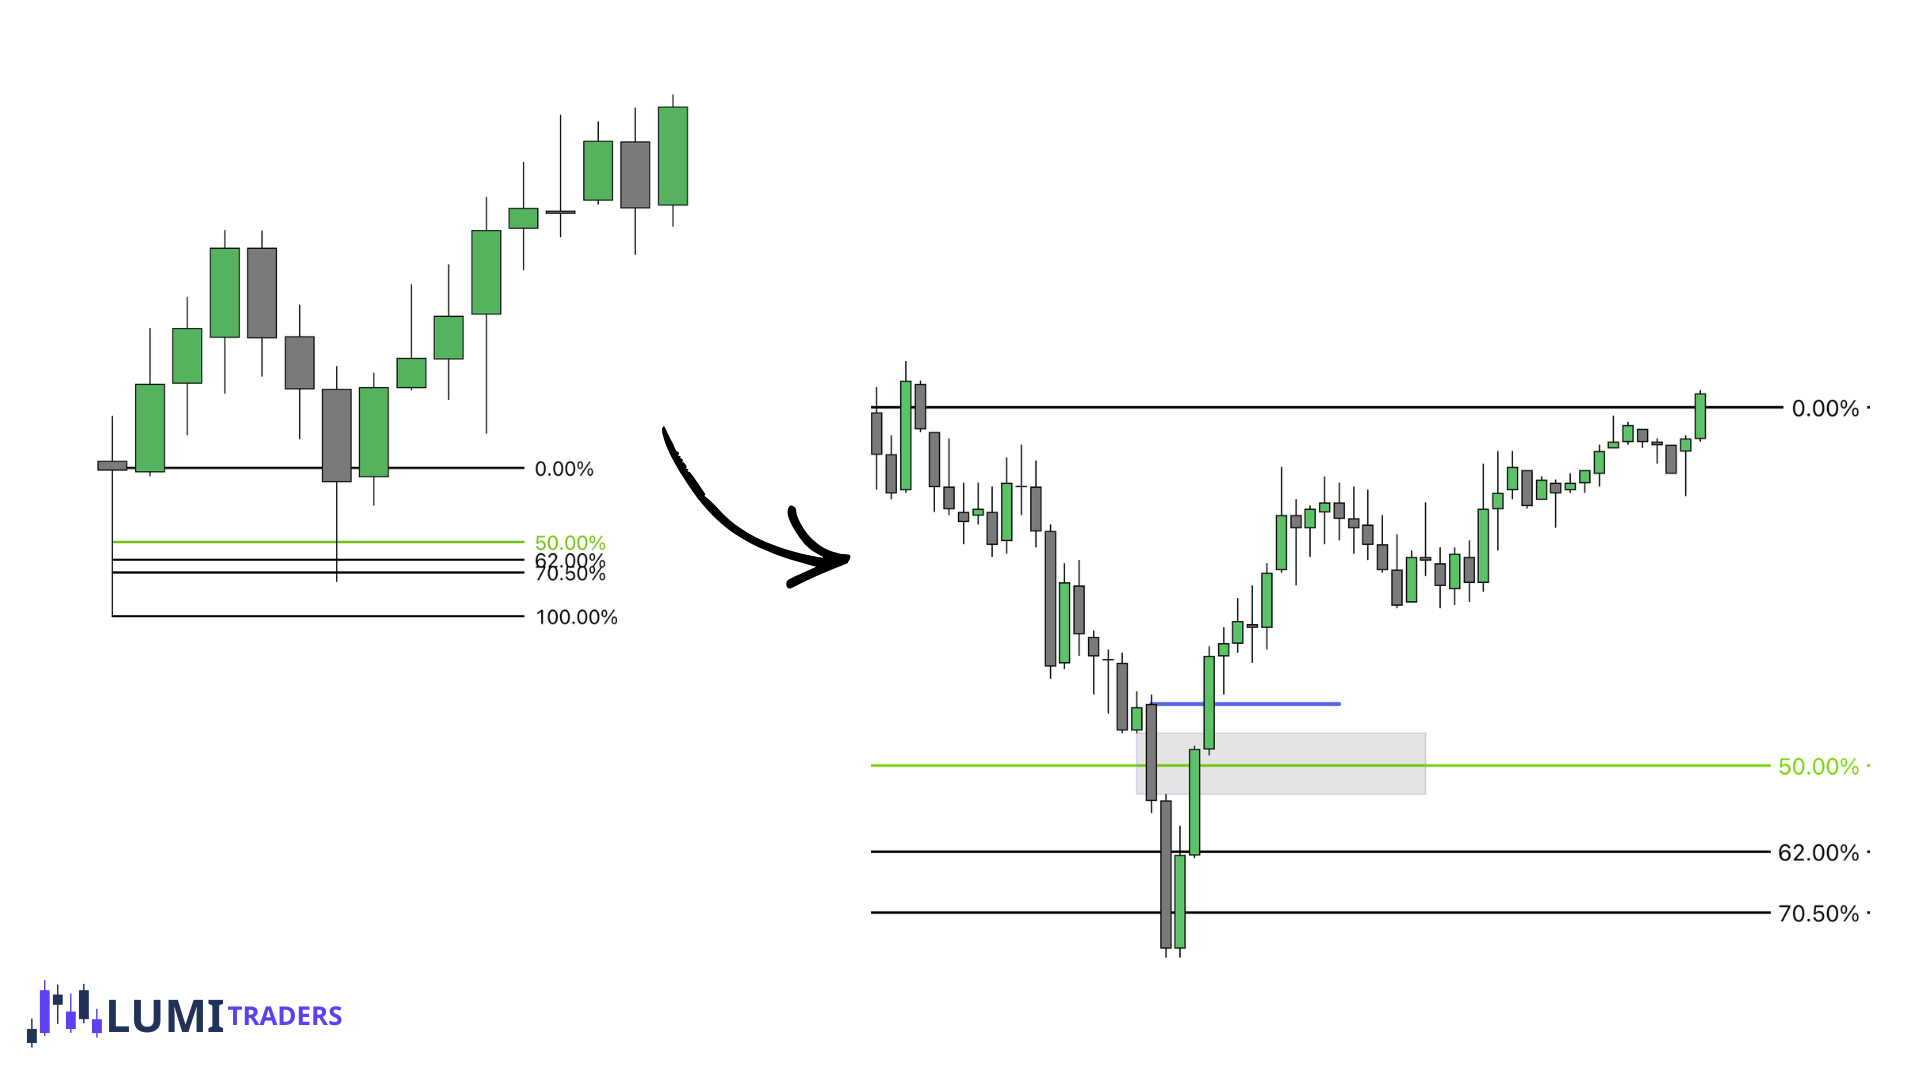
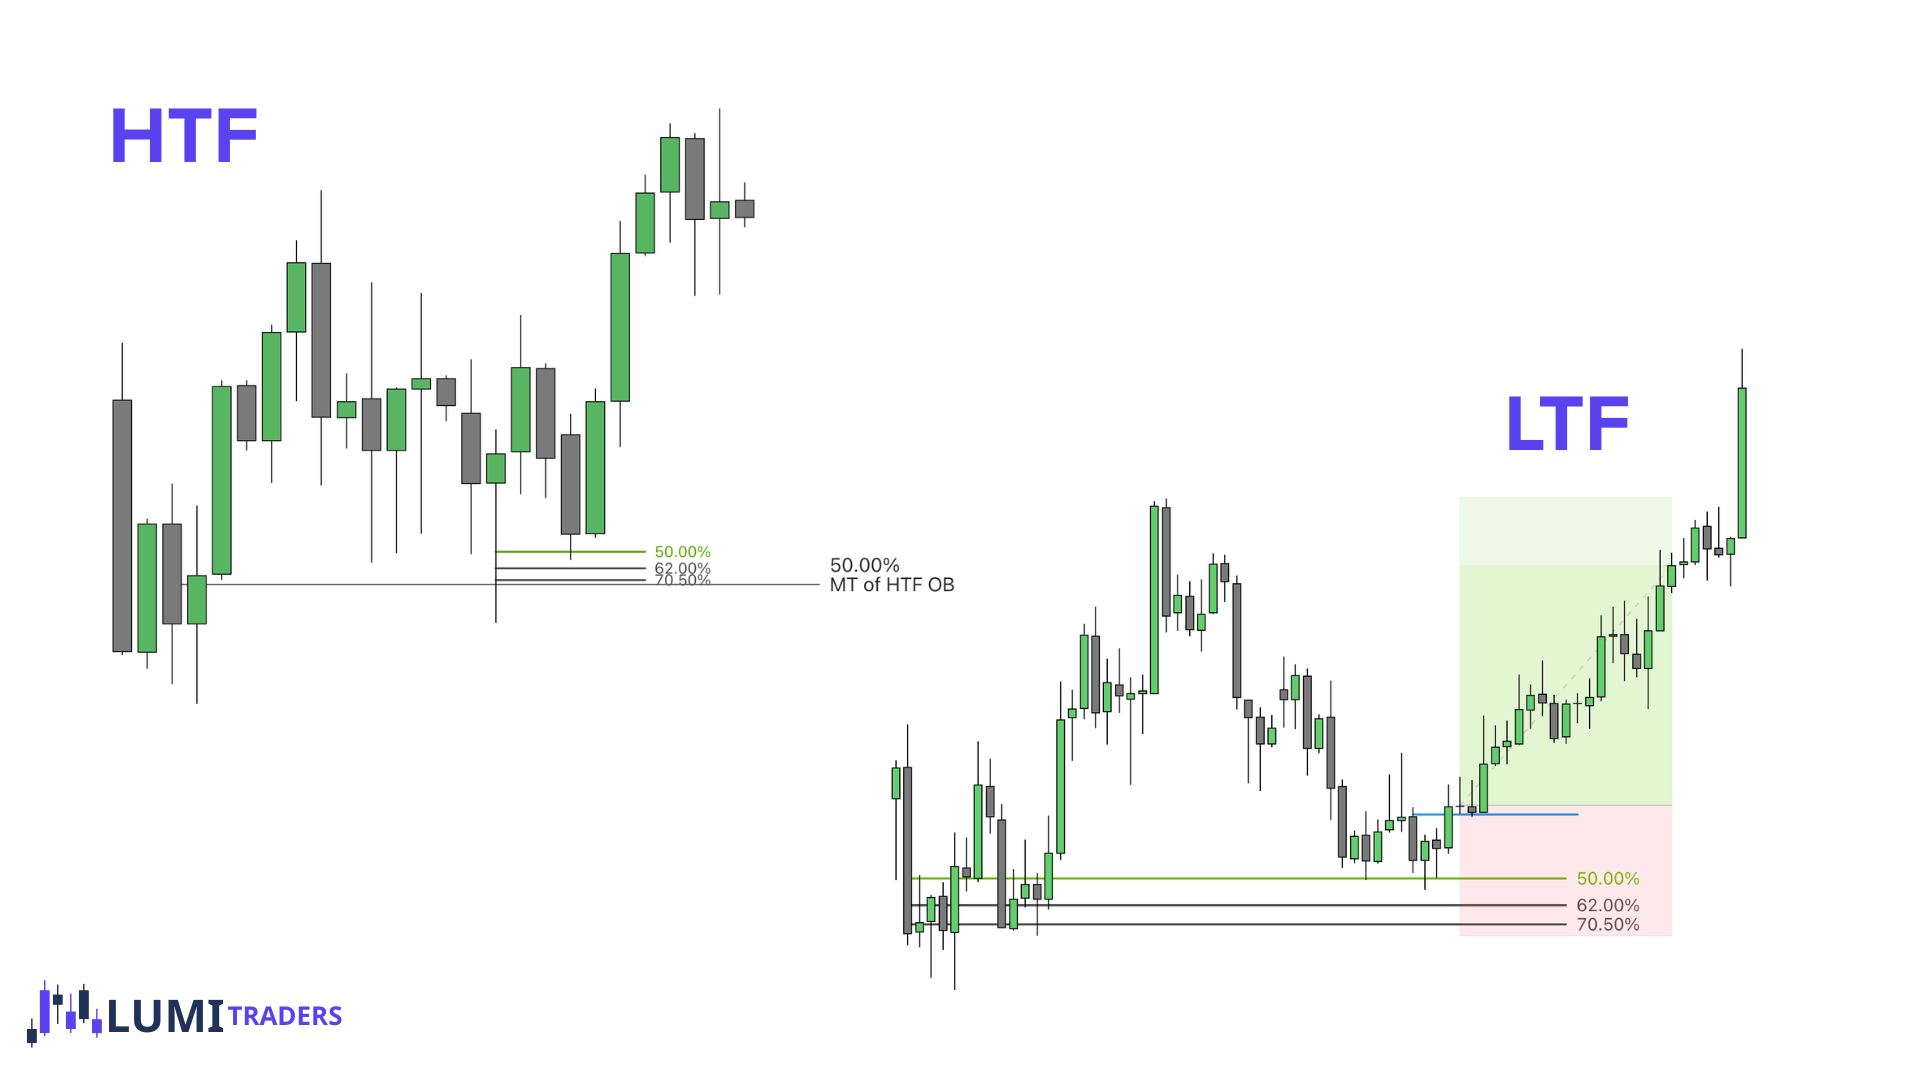
Example
After price respected the Mean Threshold (MT) of the higher-timeframe CISD, it formed a large wick. Price later retraced but remained within the OTE range. From there, we want to move to a lower timeframe and look for an Order Block or CISD confirming a reaction from the OTE.